f18Sound can change according to the speed at which it travels. Another word for sound speed is pitch. When the sound speed slows, the pitch lowers. With clarinet reeds, it’s high. Guitar strings can do both, as they are adjustable. If you look carefully, you can actually see the low pitch strings vibrate back and forth, but the high pitch strings move so quickly it’s hard to see. But you can detect the effects of both with your ears.


[am4show have=’p8;p9;p16;p43;p64;p100;’ guest_error=’Guest error message’ user_error=’User error message’ ]


The range of your ears is about 20 – 20,000 Hz (cycles per second). Bats and dogs can hear a lot higher than we can. The image (right) is a real picture of an aircraft as it breaks the sound barrier – meaning that the aircraft is passing the speed that sounds travels at (about 700 mph). The white cloud you see in the photo is related to the shock waves that are forming around the craft as it moves into supersonic speeds. You can think of a shock wave as big pressure front, which creates clouds. In this photo, the pressure from the shock waves is condensing the water vapor in the air.


There are lots of things on earth that break the sound barrier – bullets and bullwhips, for example. The loud crack from a whip is the tip zipping faster than the speed of sound.


shockwaveSo why do we hear a boom at all? Sonic booms are created by air pressure (think of how the water collects at the bow of a boat as it travels through the water). The vehicle pushes air molecules aside in such a way they are compressed to the point where shock waves are formed. These shock waves form two cones, at the nose and tail of the plane. The shock waves move outward and rearward in all directions and usually extend to the ground.


As the shock cones spread across the landscape along the flightpath, they create a continuous sonic boom. The sharp release of pressure, after the buildup by the shock wave, is heard as the sonic boom.


How to Make an Air Horn

Let’s learn how to make loud sonic waves… by making an air horn. Your air horn is a loud example of how sound waves travel through the air. To make an air horn, poke a hole large enough to insert a straw into the bottom end of a black Kodak film canister. (We used the pointy tip of a wooden skewer, but a drill can work also.) Before you insert the straw, poke a second hole in the side of the canister, about halfway up the side.


Here’s what you need:


  • 7-9″ balloon
  • straw
  • film canister
  • drill and drill bits

Grab an un-inflated balloon and place it on your table. See how there are two layers of rubber (the top surface and the bottom surface)? Cut the neck off a balloon and slice it along one of the folded edges (still un-inflated!) so that it now lays in a flat, rubber sheet on your table.


Drape the balloon sheet over the open end of the film canister and snap the lid on top, making sure there’s a good seal (meaning that the balloon is stretched over the entire opening – no gaps). Insert the straw through the bottom end, and blow through the middle hole (in the side of the canister).


You’ll need to play with this a bit to get it right, but it’s worth it! The straw needs to *just* touch the balloon surface inside the canister and at the right angle, so take a deep breath and gently wiggle the straw around until you get a BIG sound. If you’re good enough, you should be able to get two or three harmonics!


Download Student Worksheet & Exercises


Troubleshooting: Instead of a rubber band vibrating to make sound, a rubber sheet (in the form of a cut-up balloon) vibrates, and the vibration (sound) shoots out the straw. This is one of the pickiest experiments – meaning that it will take practice for your child to make a sound using this device. The straw needs to barely touch the inside surface of the balloon at just the right angle in order for the balloon to vibrate. Make sure you’re blowing through the hole in the side, not through the straw (although you will be able to make sounds out of both attempts).


Here’s a quick video where you can hear the small sonic boom from a bull whip:


Since most of us don’t have bull whips, might I recommend a twisted wet towel? Just be sure to practice on a fence post, NOT a person!


Exercises 


  1. Why do we use a straw with this experiment?
  2. Does the length of the straw matter? What will affect the pitch of this instrument?

[/am4show]


Click here to go to next lesson on Behavior or Waves at the Boundary.

When waves go from air to water, they must pass through a boundary between the two, and depending on the properties of two mediums, the wave will do one (or more) of four possible behaviors: reflect, diffract, transmit transmit through, and/or refract.


[am4show have=’p9;p58;’ guest_error=’Guest error message’ user_error=’User error message’ ]


Reflection is when the wave hits the end and comes back the way it came, bouncing off the boundary. We’ve already looked into fixed end (where some of the energy was transmitted to the door handle and some was reflected back) and free end (where some of the energy was bounced back) reflections on a string.


The amount of energy reflected back depends on how similar the two mediums are. If they’re nearly the same, then there’s very little reflection at all because a lot of energy will be transmitted to the new medium. If they’re really different, then a lot of energy will get bounced back. Echoes are reflections, because the cave wall is so different (smooth, solid and hard) from the air surrounding it.


Designers of concert halls use materials and textures that don’t reflect and reverberate and echo sound waves. Acoustic tiles and fiberglass are often used to absorb the sound waves (reduce reflection and increase transmission). Echos take more than 0.1 seconds after the source makes the sound to reach your ear. If it takes less on 0.1 seconds, then it’s called a reverberation because of the way your brain interprets the sound (whether it’s a delayed first sound or a new sound).


Sound waves bend depending on the medium they encounter. Diffraction is one form of this bending (refraction is the other). Sound waves diffract around large obstacles, like doorways and pillars, so you can hear just fine behind a column at a concert, or hear a conversation in the next room.


Animals use this principle to communicate with each other. Owls hoot at low frequencies since lower frequency (longer wavelengths) sounds travel further than higher frequency sounds. Bats use high frequency ultrasonic waves (echolocation) to detect objects in the air, because if they used lower frequencies, the waves would diffract around their prey and they’d never eat dinner.


Click here to go to next lesson on Resonance and Standing Waves.

[/am4show]


Everything is vibrating. Absolutely everything is wiggling and jiggling, and most of those things are doing it really fast! Now, I can hear you saying “Hey…maybe you need to check your eyesight or lay off the coffee because in my house, I’m not seeing everything jiggling.”


[am4show have=’p9;p58;’ guest_error=’Guest error message’ user_error=’User error message’ ]


Well, you may be right about both of those things, but indeed, everything is wiggling and jiggling. I don’t mean that your couch is jumping up and down or that your dinner table is vibrating out of the room or anything like that. However, if you could get super, super small you could see that the atoms that make up that couch or that table are vibrating at a specific frequency (speed of vibration).


Click here to go to next lesson on Humming Balloon.

[/am4show]


You can easily make a humming (or screaming!) balloon by inserting a small hexnut into a balloon and inflating. You can also try pennies, washers, and anything else you have that is small and semi-round. We have scads of these things at birthday time, hiding small change in some and nuts in the others so the kids pop them to get their treasures. Some kids will figure out a way to test which balloons are which without popping… which is what we’re going to do right now.


[am4show have=’p8;p9;p16;p43;p64;p100;’ guest_error=’Guest error message’ user_error=’User error message’ ]


Here’s what you need:


  • hexnut
  • balloon
  • your lungs


Download Student Worksheet & Exercises


What to do: Place a hexnut OR a small coin in a large balloon. Inflate the balloon and tie it. Swirl the balloon rapidly to cause the hexnut or coin to roll inside the balloon. The coin will roll for a very long time on the smooth balloon surface. At high coin speeds, the frequency with which the coin circles the balloon may resonate with one of the balloon’s “natural frequencies,” and the balloon may hum loudly.


Exercises


  1. How does sound travel?
  2. What is pitch?
  3. How is frequency related to pitch?

[/am4show]


Click here to go to next lesson on Natural Frequency.

This is one of my absolute favorites, because it’s so unexpected and unusual… the setup looks quite harmless, but it makes a sound worse than scratching your nails on a chalkboard. If you can’t find the weird ingredient, just use water and you’ll get nearly the same result (it just takes more practice to get it right). Ready?


NOTE: DO NOT place these anywhere near your ear… keep them straight out in front of you.


[am4show have=’p8;p9;p16;p43;p64;p100;’ guest_error=’Guest error message’ user_error=’User error message’ ]
Here’s what you need:


  • water or violin rosin
  • string
  • disposable plastic cup
  • pokey-thing to make a hole in the cup


Download Student Worksheet & Exercises


Exercises


  1. What does the rosin (or water) do in this experiment?
  2. What is vibrating in this experiment?
  3. What is the cup for?

[/am4show]


Click here to go to next lesson on Vibrating Strings.

hornet1Sound is everywhere. It can travel through solids, liquids, and gases, but it does so at different speeds. It can rustle through trees at 770 MPH (miles per hour), echo through the ocean at 3,270 MPH, and resonate through solid rock at 8,600 MPH.


Sound is made by things vibrating back and forth, whether it’s a guitar string, drum head, or clarinet. The back and forth motion of an object (like the drum head) creates a sound wave in the air that looks a lot like a ripple in a pond after you throw a rock in. It radiates outward, vibrating it’s neighboring air molecules until they are moving around, too. This chain reaction keeps happening until it reaches your ears, where your “sound detectors” pick up the vibration and works with your brain to turn it into sound.


You can illustrate this principle using a guitar string – when you pluck the string, your ears pick up a sound. If you have extra rubber bands, wrap them around an open shoebox to make a shoebox guitar. You can also cut a hole in the lid (image left) and use wooden pencils to lift the rubber band off the surface of the shoebox.


[am4show have=’p8;p9;p16;p43;p151;p64;p75;p100;’ guest_error=’Guest error message’ user_error=’User error message’ ]


Materials:


  • index card
  • rubber band
  • 3′ string
  • small piece of craft foam sheet OR a second index card
  • hot glue and glue sticks
  • tape


Download Student Worksheet & Exercises


Why is this happening? When you sling the hornet around, wind zips over the rubber band and causes it to vibrate like a guitar string… and the sound is focused (slightly) by the card. The card really helps keep the contraption at the correct angle to the wind so it continues to make the sound.


Troubleshooting: Most kids forget to put on the rubber band, as they get so excited about finishing this project that they grab the string and start slinging it around… and wonder why it’s so silent! Make sure they have a fat enough rubber band (about 3.5” x ¼ “ – or larger) or they won’t get a sound.


Variations include: multiple rubber bands, different sizes of rubber bands, and trying it without the index card attached. The Buzzing Hornet works because air zips past the rubber band, making it vibrate, and the sound gets amplified just a bit by the index card.


Exercises 


  1. What effect does changing the length of the string have on the pitch?
  2. What vibrates in this experiment to create sound?
  3. Why do we use an index card?

[/am4show]


Click here to go to next lesson on Forced Vibrations.

When a guitarist plucks a string to start the vibration, it not only vibrates the string, but it also vibrates the entire box of the guitar. This is called a forced vibration, which means that the motion of the original source vibration is also causing another object to vibrate (the box of the guitar). Since the box is larger than the string, it amplifies the vibration and makes it louder.


[am4show have=’p9;p58;’ guest_error=’Guest error message’ user_error=’User error message’ ]


You need:


  • Table
  • Spoon (or whatever is handy)
  • Partner

1. Sit at a table.


2. Have your partner sit at the other end of the table.


3. Have your partner very lightly scratch the table with the spoon.


4. Listen to see if you can hear it.


5. While your partner is scratching, put your ear on the table. Do you hear a difference in the sound?


6. Switch roles so your partner gets a chance to try.


Did you notice how you could hear the soft spoon-scratching sound (I love a good alliteration) quite clearly when your head was on the table? The sound waves moved quickly through the table so they lost little of the loudness and quality of the original sound. When sound travels through the air, the sound energy gets dispersed (spread out) much more than through the table, so the sound does not travel as far nor as clearly. This next one is an oldie but a goodie!


A Couple Cups of Conversation


1. Using the scissors or a nail poke a hole in the middle of the bottom of both cups. Get an adult to help you with this. Since this isn’t biology, no bleeding allowed!


2. Thread an end of the string through the hole in the bottom of the cup and tie a big knot in it to keep it from sliding through the hole.


3. Do the same thing with the other cup so that when you are done you have a cup attached to both ends of the string.


4. Take one of the cups for yourself and hand the other cup to your partner. Walk apart from one another until the string is fairly taut.


5. Have your partner hold the cup up to his or her ear while you whisper into your cup.


6. Can your partner hear you? If not, see if you can stretch the string a little more.


7. Switch roles and try again.


The string being a solid and having tightly packed molecules allows the sound wave to move quickly and clearly through it. You can talk very quietly in one cup and yet your partner can still hear you fairly well.


Tips & Tricks

You can try different types of cups (foam, plastic, metal (like tin foil), paper…) and also change the sizes of the cups – is bigger or smaller better?  You can also change the connection between the cups – have you tried yarn, wool, string, nylon fishing line, rope, clothesline, or a braided combination?  You can also stick a slinky in place of the string of ‘space phones’.


Click here to go to next lesson on Vibrations and Speakers.

[/am4show]


An electrical signal (like music) zings through the coil (which is also allowed to move and attached to your speaker cone), which is attracted or repulsed by the permanent magnet. The coil vibrates, taking the cone with it. The cone vibrates the air around it and sends sounds waves to reach your ear. Here’s how speakers work and also how to make your own out of cardboard (it really works!):


[am4show have=’p9;p58;’ guest_error=’Guest error message’ user_error=’User error message’ ]


Let’s talk about the telegraph. A telegraph is a small electromagnet that you can switch on and off. The electromagnet is a simple little thing made by wrapping insulated wire around a nail. An electromagnet is a magnet you can turn on and off with electricity, and it only works when you plug it into a battery.


Anytime you run electricity through a wire, you also get a magnetic field. You can amplify this effect by having lots of wire in a small space (hence wrapping the wire around a nail) to concentrate the magnetic effect. The opposite is true also – if you rub a permanent magnet along the length of the electromagnet, you’ll get an electric current flowing through the wire. Magnetic fields cause electric fields, and electric fields cause magnetic fields. Got it?


A microphone has a small electromagnet next to a permanent magnet, separated by a thin space. The coil is allowed to move a bit (because it’s lighter than the permanent magnet). When you speak into a microphone, your voice sends sound waves that vibrate the coil, and each time the coil moves, it causes an electrical signal to flow through the wires, which gets picked up by your recording system.


A loudspeaker works the opposite way. An electrical signal (like music) zings through the coil (which is also allowed to move and attached to your speaker cone), which is attracted or repulsed by the permanent magnet. The coil vibrates, taking the cone with it. The cone vibrates the air around it and sends sounds waves to reach your ear.


If you placed your hand over the speaker as it was booming out sound, you felt something against your hand, right? That’s the sound waves being generated by the speaker cone. Each time the speaker cone moves around, it create a vibration in the air that you can detect with your ears. For deep notes, the cone moves the most, and a lot of air gets shoved at once, so you hear a low note. Which is why you can blow out your speakers if your base is cranked up too much. Does that make sense?


Here’s a video to help make sense of all these ideas. One of our scientists, Al, is going to demonstrate how to use a signal generator to drive a speaker at different frequencies. We even brought in specialist (with very good hearing!) to detect the full range of sound and used a special microphone during recording, so you should hear the same thing we did during the testing.


How to Build a Speaker

Here’s what you need:


  • Foam plate (paper and plastic don’t work as well)
  • Sheet of copy paper
  • 3 business cards
  • Magnet wire AWG 30 or 32 (RS#278-1345)
  • 2-4 neodymium or similar (rare earth) magnets
  • Disc magnet (1” donut-shaped magnet) (RS#64-1888)
  • Index cards or stiff paper
  • Plastic disposable cup
  • Tape
  • Hot glue gun
  • Scissors
  • 1 audio plug (RS #42-2420) or other cable that fits into your stereo (iPODs and other small devices are not recommended for this project – you need something with built-in amplifier)

Now you’re ready to make your speakers. Note that these speakers are made from cheap materials and are for demonstration purposes only… they do not have an amplifier, so you’ll need to place your ear close to the speaker to detect the sound. DO NOT connect these speakers up to your iPOD or other expensive stereo equipment, as these speakers are very low resistance (less than 2 ohms) and can damage your sound equipment if you’re not careful. The best source of music for these speakers is an old boom box with a place to plug in your headphones. We’ll show you everything in this video:


Sound waves can affect liquids also! Here’s what happens if you run sound waves through a non-newtonian cornstarch solution:


Exercises 


  1. Does it matter how strong the magnets are?
  2. What else can you use besides a foam plate?
  3. Which works better: a larger or smaller magnet wire coil?
  4. How can you detect magnetic fields?
  5. How does an electromagnet work?
  6. How does your speaker work?
  7. Is a speaker the same as a microphone?
  8. Does the shape and size of the plate matter? What if you use a plastic cup?

Click here to go to next lesson on Resonance.

[/am4show]


Resonance happens when two objects that have the same natural frequency are connected together. When one object starts vibrating, it causes the second object to vibrate also.


[am4show have=’p9;p58;’ guest_error=’Guest error message’ user_error=’User error message’ ]


Click here to go to next lesson on Chladni Plates.

[/am4show]


We’ve already looked at standing wave patterns that are created when a reflected wave interferes with an incoming wave. It looks like the wave is fluctuating in place, when really it’s just an optical illusion of two waves interfering with each other. The point is, this effect are created at specific frequencies called harmonics, and now it’s time to learn about vibrational modes using a really cool experiment by Ernst Chladni.


[am4show have=’p9;p58;’ guest_error=’Guest error message’ user_error=’User error message’ ]


Ernst Florens Friedrich Chladni (1756-1827) is considered to be the ‘father of acoustics’. He was fascinated by vibrating things like plates and gases, and his experiments resulted in two new musical instruments to be developed.


When Chladni first did these vibrating plate experiments (as shown in the video below), he used glass plates instead of metal. He was also one of the first to figure out how to calculate the speed of sound through a gas. And it will completely blow your mind. Chladni patterns are formed with a metal plate covered in regular table salt is vibrated through different frequencies.


There are different ways of vibrating the plate – the easiest is by banging it, but this gives you only one frequency and usually makes a mess of the salt. You can alternatively bow the edge of the plate (clamped to a table) with a bass fiddle bow and specific points to get various frequencies… but you will need to practice to get this method to work.


These patterns can also be formed by setting the metal plate on a mechanical driver (like a speaker) controlled by a signal generator. (This way you don’t have to practice your bowing!). The patterns you get this way are different from the bowing patterns, since you are vibrating it from the center instead of the edge.


Click here to go to next lesson on Tacoma Narrows.

[/am4show]


A vibrational mode is the standing wave pattern that give the highest amplitude vibrations with the least amount of energy input. If you vibrate an object at it’s natural frequency, you’ll get the highest amplitude during the vibration. Sometimes the amplitude (which is related to the energy of the vibration) that the object vibrates at is so high that the object will actually will tear itself apart. Here’s a video where the wind was blowing the bridge, which started a natural vibration in the bridge which tore itself apart.


Click here to go to next lesson on Breaking Wine Glass.

Ella Fitzgerald was famous for breaking the wineglass with her voice at the end of the Memorex commercial:


Let’s see this in slow motion using lab equipment (video courtesy of MIT):


Click here to go to next lesson on Harmonics.

There is a pattern relationship between the wavelength and the length of a string that also gives the number of nodes (and antinodes):


[am4show have=’p9;p58;’ guest_error=’Guest error message’ user_error=’User error message’ ]


Click here to go to next lesson on Physics of Musical Instruments.

[/am4show]


There are four general categories of musical instruments: guitars and pianos are examples of vibrational strings, trombones and flutes are examples of the open-and air column instruments, organ pipes are examples of the closed-end air instruments, and drums are examples of vibrational mechanical instruments.


[am4show have=’p9;p58;’ guest_error=’Guest error message’ user_error=’User error message’ ]


All of these instruments work based on the resonance principle. When you strike a drum, pluck a string, blow into the reed, or somehow set the natural frequency in motion for the instrument, it starts vibrating a standing wave pattern. Harmonics refer to the natural frequency of the instrument.


Here’s what you need:


  • two tongue depressors
  • three rubber bands, one at least 1/4″ wide
  • paper
  • tape


In the video above, the rubber band acts like a reed to vibrate the air surrounding it. In a woodwind instrument, the vibrating reed resonates the air inside the tube at one of its natural frequencies so you hear a sound. The holes in a tube change the length of the air column, like with a clarinet.


The rubber band vibrates as you blow across the rubber band and you get a great sound. You can change the pitch by sliding the cuffs (this does take practice).


Troubleshooting: This project is really a variation on the Buzzing Hornets, but instead of using wind to vibrate the string, you use your breath. The rubber band still vibrates, and you can change the vibration (pitch) by moving the cuffs closer together or further apart. If the cuffs don’t slide easily, just loosen the rubber bands on the ends. You can also make additional harmonicas with different sizes of rubber bands, or even stack three harmonicas on top of each other to get unusual sounds.


If you can’t get a sound, you may have clamped down too hard on the ends. Release some of the pressure by untwisting the rubber bands on the ends and try again. Also – this one doesn’t work well if you spit too much – wet surfaces keep the rubber band from vibrating.


Exercises


  1. What is sound?
  2. What is energy?
  3. What is moving to make sound energy?

Click here to go to next lesson on Guitar Strings.

[/am4show]


Mathematically speaking, guitar strings are easy to do calculations because the natural frequencies that the strings vibrate at depend on only the tension, length, and what the string is made out of. Here is how you do it:


[am4show have=’p9;p58;’ guest_error=’Guest error message’ user_error=’User error message’ ]


Click here to go to next lesson on Open-End Air Column Instruments.

[/am4show]


When you blow into the mouthpiece of an instrument, the vibrations create frequencies, and the ones that resonate with the air in the tube inside the instrument are the ones you hear as a loud sound. When an instrument is open at both ends, it’s called an open-end air column. Here’s how to figure out the frequencies of these types of instruments:


[am4show have=’p9;p58;’ guest_error=’Guest error message’ user_error=’User error message’ ]


Click here to go to next lesson on Flute Problem.

[/am4show]


Let’s take a real example of a musician playing a flute:


[am4show have=’p9;p58;’ guest_error=’Guest error message’ user_error=’User error message’ ]


Click here to go to next lesson on Closed-End Air Column Instruments.

[/am4show]


Have you ever blown across a glass bottle? If so, you’ve played one of these instruments! Pipe organs are also closed-end air instruments because one end is sealed. The difference in sealing one end affects the types of frequencies that the instrument can create because the standing wave pattern that is created is from the incident (incoming) waves interfering with the reflected waves bouncing back when they hit the sealed end of the instrument.


[am4show have=’p9;p58;’ guest_error=’Guest error message’ user_error=’User error message’ ]


Click here to go to next lesson on Cardboard Tube Resonator.

[/am4show]


Have you ever put a cardboard tube up to your ear? What you hear depends on whether the tube is right up against your ear or offset so there’s a space between your head and the tube, because it goes from being a closed end to an open end air column, which changes the standing wave pattern inside. Here’s how to figure it out:


[am4show have=’p9;p58;’ guest_error=’Guest error message’ user_error=’User error message’ ]


Click here to go to next lesson on Record Players.

[/am4show]


Once upon a time, people used record players to hear music. Records were these big black discs that played on a machine. Spinning between 33 and 45 times per minute on a turntable, people used to listened to music just like this for nearly a century.


Edison, who had trouble hearing, used to bite down hard on the side of his wooden record player (called a phonograph) and “hear” the music as it vibrated his jaw.


[am4show have=’p9;p58;’ guest_error=’Guest error message’ user_error=’User error message’ ]


Here’s what you need:


  • an old turntable (do you have one in your garage?)
  • old record that can be scratched
  • tack
  • plastic container, like a clean yogurt or butter tub

If you have an old turntable and OLD record that can be scratched, here’s how to listen to the music without using regular speakers!


Yay! You’ve completed this set of lessons! Now it’s your turn to do physics problems on your own.


Download your Sound Problem Set here.

[/am4show]


When most people think of waves, they imagine something like an ocean wave… it moves through the water and isn’t confined to one area. Some waves don’t travel at all – they are called standing waves.


[am4show have=’p9;p58;’ guest_error=’Guest error message’ user_error=’User error message’ ]


Picture two waves traveling in opposite directions. One is going to the right, the other going to the left. What happens when they combine? Using superposition, we can figure out what the interacting waves look like when they interfere with each other.


Did you notice how there are places along the string where the string is not moving at all? It’s at permanent rest… it’ doesn’t vibrate at all. Those places are called nodes. The places where the amplitude is greatest is called the antinodes.


Click here to go to next lesson on Nodes and Antinodes.

[/am4show]


One common misconception is the idea that noes and antinodes are the same as the crest and trough of a wave. They’re not. A node is a place on the wave that is permanently at rest. An antinode is where the wave is at its maximum (it will travel through a large up and a large down displacement).
[am4show have=’p9;p58;’ guest_error=’Guest error message’ user_error=’User error message’ ]


You’ll find standing waves when you look at columns of vibrating air or strings vibrating at resonance. This happens because of two things going on simultaneously:  when the wave hits the barrier, instead of continuing on, it gets reflected back.


The reflected wave constructively interferes with the next incoming waves, and the overall effect is that you have places on the string that never move and places where it’s always at a maximum. This effect is what we call a standing wave.


Nodes and antinodes aren’t really part of the wave because a standing wave really isn’t a wave at all… it’s just a visual effect that looks like a wave that doesn’t move. You have to perfectly time the interference of two (or more) opposite-traveling waves to get this effect.


Click here to go to next lesson on Simple harmonic motion.

[/am4show]


Standing waves are basically two waves traveling in opposite directions that constructively interfere with each other so it looks like the whole system is moving in simple harmonic motion.
[am4show have=’p9;p58;’ guest_error=’Guest error message’ user_error=’User error message’ ]


Simple harmonic motion is when we used Hooke’s Law for the mass-spring system to figure out the displacement, period, or frequency of the system.


First harmonics have 2 nodes and 1 antinode. Second harmonics have 3 notes and 2 antinodes, third harmonics have 4 nodes and 3 antinodes, and so on.


Click here to go to next lesson on Build a Standing Wave Machine.

[/am4show]


Standing wave machines are fun to make because they are easy to build and amazing to watch! Here’s a simple one you can make on your own using the materials from the previous lessons in electricity.


[am4show have=’p9;p58;’ guest_error=’Guest error message’ user_error=’User error message’ ]


Materials:


  • AA batteries (4, cheap “dollar-store” carbon-zinc kind work great)
  • AA battery case (4)
  • Alligator clip leads
  • DC, 3V motor (2)
  • Hot glue gun (and glue sticks)
  • Masking tape
  • Popsicle sticks
  • String
  • Scissors


How many wavelengths can you see in yours? Where are the nodes and antinodes? Change the tension in the strong to get different harmonics to show up! (Note – if you know how to change the motor speed using a potentiometer, you can do that also!)


Also note – if you’re finding that the string wads into a tight ball after only a few seconds, it means that one of your motors is going the wrong direction. Stop both motors and switch the wires in the back of ONE of the motors to reverse the polarity (plus and minus) so the motor spins in the opposite direction. You want the one motor to wind up the string and the other to un-wind it at the same time. Eventually, since the motors spin at slightly different speeds, the string will get wound up and you’ll need a new piece of string.


Click here to go to next lesson on Standing Wave Math.

[/am4show]


It’s easy to calculate the frequency, period, wavelength and speed of waves at different harmonics.
[am4show have=’p9;p58;’ guest_error=’Guest error message’ user_error=’User error message’ ]
For a tight string, there’s a handy equation that we can use to relate the length of the string to the wavelength based on the harmonic number like this:


L = (n/2) λ


where L is the length of the string, and n is the harmonic number. Here’s how to use this equation to find everything we need about the wave:


You’ve finished this section! Now it’s your turn to do physics problems. Click here to download your homework problem set.

[/am4show]


When a wave travels from one medium to another, like sound waves traveling in the air and then through a glass window pane, it crosses a boundary. Whether the wave continues to the new medium (and even how it goes through), or whether it bounces and reflects back, or a bit of both depends on the boundary.
[am4show have=’p9;p58;’ guest_error=’Guest error message’ user_error=’User error message’ ]
Imagine a jump rope attached to a door handle. The last particle of the rope is fixed tot he door handle, and doesn’t move at all. If you grab the free end of the rope and pull it taught, you have a nice, straight line. When you jerk the rope up, the pulse travels through the rope toward the door handle. Some of the energy carried by the pulse is reflected and comes back to you at the same speed and wavelength, but it’s upside down (called a reflected pulse) and not as large amplitude-wise. Some of the energy is also transmitted to the fixed end, causing the door handle to rattle and vibrate.


If you untie the rope from the door handle and instead tie it loosely to a pole (so it’s allowed to slide up and down easily) and repeat this experiment, you’ll find the pulse travels through the rope, turns around and reflects back right side up with the same speed and wavelength.


Now imagine untying the rope and instead attaching a rope denser, thicker rope to the end. The initial pulse travels toward the thicker rope, but two tings happen when it hits the thicker rope: first, a reflected pulse (same speed and wavelength, but inverted) returns back to you, but also some of the energy goes into the thicker rope so a smaller, slower wave (but with the same frequency as the original pulse) will travel along the thicker rope. Waves travel fastest in the least dense medium, so the reflected wave travels faster than the transmitted wave. Even though the waves travel at different speeds in different mediums, they are all vibrating with the same frequency.


What would you expect to happen if a sound wave traveled from the denser rope to a less dense rope? The initial pulse (also called the incident pulse) travels through the denser medium, and when it hits the lesser dense rope, it undergoes partial transmission and partial reflection like this: the reflected pulse  has the same speed and wavelength (and is right side up). Second, the wave transmitted to the less dense rope is right-side up, larger amplitude, and traveling faster than the reflected pulse.


The bottom line? Waves travel fastest in the least dense medium. Frequency doesn’t change when you cross a boundary. The wavelength is always greatest in the least dense rope. The amplitude is always greatest in the initial (incident) wave.


The reflected wave inverts when it moves from a less dense to a more dense rope due to Newton’s Laws of Motion. For the case when the rope is free to slide up and down on the pole, when the initial wave reaches the pole, the rope slides up and because of its inertia, it overshoots and exerts a reaction force on the string, and this reaction force sends a reflected wave back down the string (called a soft reflection). With the case of being fixed on a door handle, when the incident wave reaches the end, it exerts an upward force on the door handle, but Newton’s Third Law states that there’s an equal and opposite (reaction) force that the door handle exerts on the string, which generates an inverted pulse that travels back along the string (called a hard reflection).


Click here to go to next lesson on Wave Reflection.

[/am4show]


Straight waves are what happens when something  moves back and forth in a medium like water. These are interesting when they hit a diagonal plane barrier, because when the incident wave reaches the barrier, the waves always reflect at the same angle that they approached the barrier with (called the Law of Reflection).
[am4show have=’p9;p58;’ guest_error=’Guest error message’ user_error=’User error message’ ]


We’ll look at how waves reflect off curved surfaces(like a parabolic mirror) when we get to our section on light waves.


Click here to go to next lesson on Wave Refraction.

[/am4show]


Waves bend when they go from one medium to another when the speed changes. It’s a really important topic in light (not so much with sound), because it’s how lenses, eyes, cameras, and telescopes work. The bending of sound waves happens naturally in the air above the earth when it’s warmer than the surface of the earth. The sound waves that travel through the warmer air are faster and the ones that travel through cooler air are slower. When the sound waves go from warmer to cooler air (less dense to more dense air), they become bent back down toward the surface.
[am4show have=’p9;p58;’ guest_error=’Guest error message’ user_error=’User error message’ ]


So refraction can bend sound downward which in turn amplifies the sound by adding to the direct (original source) sound. If you’ve ever been near a cool lake, you’ve heard one of nature’s amplifiers!


But why does sound bend? You can imagine a toy car going from a wood floor to carpeting. One wheel hits the carpet first and slows down before the other, causing the toy to turn. The direction of the sound changes in addition to the speed. The slower speed must also shorten its wavelength since the frequency of the wave doesn’t change. Here’s the wave equation again from the previous section:


Note the first v is velocity, and the last ν is frequency in the equation.


Click here to go to next lesson on Diffraction.

[/am4show]


When waves pass around small (we’re talking small compared to the wavelength of the wave) objects, they diffract. People in the audience of a concert can hear really well if they are sitting right behind a pillar because the sound waves are large enough to bend around it (which is actually because of both diffraction and reflection effects). Diffraction helps sound bend around obstacles. You can sometimes hear conversations around corners because of diffraction.
[am4show have=’p9;p58;’ guest_error=’Guest error message’ user_error=’User error message’ ]


Waves also diffract if they spread out after moving through small (again, smaller than wavelength-size) openings, like light going through a slit cut with a razor.


The amount a wave diffracts (bends) depends on the wavelength. Lower frequencies bend around objects better than higher frequencies. If you’ve ever watched a lightning and thunder storm, you know that there’s a lot more sound (like a sharp crack) when the lightning is closer  (you hear both higher and lower frequencies) than when it’s more distant (mostly lower frequencies). Owls use low frequency sounds to transmit sounds further than the higher frequency bird twitters.


Click here to go to next lesson on Superposition.

[/am4show]


Often two (or more) waves travel through the same spot. If you’ve ever listened to an orchestra, you’re hearing the sounds from many different instruments all playing at the same time. If more than two boats are on the lake, their wakes churn up the water together. Here’s how we handle this in physics…
[am4show have=’p9;p58;’ guest_error=’Guest error message’ user_error=’User error message’ ]


The principle of superposition states that when waves interfere with each other, the displacement at any location is the sum of the displacements of the waves at that location. Said another way, you simply add up the waves at the same spot to get the resulting amplitude.


Click here to go to next lesson on Interference.

[/am4show]


What if two waves of the same wavelength and amplitude travel in the same direction along a stretched string? What will the string look like? We know about the idea of superposition adding the waves together, but what does the string actually look like?
[am4show have=’p9;p58;’ guest_error=’Guest error message’ user_error=’User error message’ ]


How waves interact with each other depends on whether the waves are in phase or not. If they are in-step (in phase) with each other, then it’s easy to add up to double the displacement (constructive interference). If they are completely out of step, then they cancel each other out (destructive interference).


Click here to go to next lesson on Constructive Interference.

[/am4show]


When two waves have an increase in displacement when they  interact, it’s constructive interference.
[am4show have=’p9;p58;’ guest_error=’Guest error message’ user_error=’User error message’ ]


Click here to go to next lesson on Destructive Interference

[/am4show]


Destructive interference happens when two waves have opposite displacements. The pulses don’t destroy each other (as the name implies), but rather they cancel out the effect of each other when they interact with each other.
[am4show have=’p9;p58;’ guest_error=’Guest error message’ user_error=’User error message’ ]


They don’t have to cancel each other out completely to be destructive interference. They don’t even have to have the same amplitudes. (And actually, when two waves meet, they don’t even alter their path or alter the waveform itself after the interaction. They simply add or subtract when they interact, and then go on their merry way as they had been before the interaction when they’re done. It’s really quite amazing.)


Click here to go to next lesson on Which kind of interference is it?

[/am4show]


In previous lessons we’ve learned that energy is the ability to do work, and that work is moving something a distance against a force. The concept of energy is fairly easy to see as far as lifting things or pushing things go. We are exerting energy to lift a box against the force of gravity. We are exerting energy to pedal our bike up a hill. But how does this energy stuff relate to light, electricity, or sound? What’s moving against a force there?


[am4show have=’p9;p58;’ guest_error=’Guest error message’ user_error=’User error message’ ]


With energy, what’s happening is that outrageously tiny particles are moving back and forth outrageously tiny amounts, at outrageously high speeds.  With light, you’ve got little photons moving, with electricity little electrons. With sound, you’ve got molecules moving back and forth.


This back and forth motion is called vibration and these vibrations make waves. When one particle moves back and forth it does work on another particle, which does work on another particle and so on. As these particles do work on one another, they cause a wave to move from one place to another.


Energy moves by waves or, in other words, waves are energy-mobiles! Before we get in over our heads talking about waves however, we need to spend some time on this vibration thing.


If you imagine a swing at the park, it’s got a normal resting position (called an equilibrium position). That’s when it’s experiencing a balance of forces: the pull of gravity balances with the tension in the chain holding up the swing, and so forth. Everything adds up to zero, and stays at zero until a kid comes by.


When a kid starts pumping on the swing, the swing is no longer in equilibrium and the swing starts to move back and forth through an arc. This is a slow forced vibration that stops soon after the kid leaves the swing, and the kid needs to keep pumping back and forth to keep swinging at the same rate (or increase the swing rate). Eventually, the kid gets tired and stops pumping, and each repetition of the swing moving back and forth (vibration) is less and less (called damping). Eventually, the swing comes to a stop (equilibrium) until another energetic kid comes along.


Click here to go to next lesson on Damping.

[/am4show]


Let’s practice figuring out which interference is being observed when waves interact…
[am4show have=’p9;p58;’ guest_error=’Guest error message’ user_error=’User error message’ ]


Click here to go to next lesson on Doppler Effect.

[/am4show]


Damping is when a spring, swing, or other vibrating object loses its energy over time. It means that without adding energy into the system, like pumping on a swing or hitting a drum head, the object will eventually come to its non-vibrating (equilibrium) position.


Imagine the kid on the swing again. Why does the kid move past the equilibrium point without stopping?
[am4show have=’p9;p58;’ guest_error=’Guest error message’ user_error=’User error message’ ]
It’s actually because of Newton’s law of inertia. The swing continues on its path as long as there are balanced forces acting on it. As the swing moves past its equilibrium point, a restoring force acts on it to move it back to its original equilibrium position.


The difference between a vibration (like a kid swinging) and translational motion (like a kid on roller skates) is that the kid on skates can be permanently displaced from his starting position. The kid on a swing doesn’t move away from its original equilibrium position for long – it stops, turns around, and comes back due to the restoring force. An object that vibrates actually wiggles and jiggles around a fixed position (the equilibrium position).


Other examples of vibrating objects include tuning forks (which are like inverted swings), piano strings, car suspension systems,  a weight on the end of a spring that bobs up and down, and drum heads. In each of these examples, when the object is disturbed (like hitting the tuning fork or drum head, or pulling the weight at the end of the spring), the object moves from its original resting position, stops and heads back toward its resting position and overshoots, stops and come back toward the resting position and the cycle repeats. The object moves along the same path over and over again, and if there was no friction or drag force (or other energy losses), the object would continue to move back and forth forever.


Did you notice that when you graph out the motion of the mass on a spring, it has a particular shape? The shape is described in math as a sinusoidal wave, or y = sin(x).  Did you notice how it is periodic and that you could also see the damping effect? The damping effect means that energy is being lost or dissipated. (Scientists wouldn’t say that it’s slowing down, because that indicates that the speed is decreasing, which isn’t the case when the mass stops and turns around to head back to the resting position.. it is actually speeding up!)


Click here to go to next lesson on Frequency.

[/am4show]


The concept of frequency is very important to understanding energy. When it comes to electromagnetic waves it is frequency that determines whether the wave is radio, light, heat, microwave or more. It’s all the same type of energy, it’s the frequency that determines what that energy actually does. With sound energy the frequency determines the pitch of the sound.


[am4show have=’p9;p58;’ guest_error=’Guest error message’ user_error=’User error message’ ]


As we move forward with energy, it is quite important that you know that all waves come from some sort of vibrating particle somewhere. The reason you can pick up a signal on your radio is because somewhere, maybe miles away, there is a particle vibrating at some ridiculous speed, creating a wave that moves across distances to finally vibrate the particles inside your radio’s antenna. It’s important to realize, however, that the particle does not move over that distance. The particle that started the wave back at the radio station is still there. It did not move to your radio it just vibrated at the antenna and started the wave.


Frequency is a measure of how many times something moves back and forth. A swing, a pendulum, a leg of a walking person all have a frequency. All those things start at one place, move, and come back to the same position that they started. This moving and coming back is one vibration. The faster something vibrates, the more frequency that something has.


Frequency is measured in Hertz. One Hertz (or Hz for short) is one vibration in one second. The Hertz is named after Heinrich Rudolf Hertz (1857-1894) a German physicist and professor. Hertz proved that electricity can be transmitted in electromagnetic waves, which travel at the speed of light and which possess many other properties of light. His experiments with these electromagnetic waves led to the development of the wireless telegraph and the radio.


A Hertz is a relatively slow vibration so there are also kilohertz (KHz), megahertz (MHz), and gigahertz (GHz). A kilohertz is 1000 Hz, a megahertz is 1,000,000 (a million) Hz, and a gigahertz is 100,000,000 (one thousand million) Hz.


In this experiment you will be adjusting the length of string of a pendulum until you get a pendulum that has a frequency of .5 Hz, 1 Hz and 2 Hz. Remember, a Hz is one vibration (or in this case swing) per second. So .5 Hz would be half a swing per second (swing one way but not back to the start). 1 Hz would be one full swing per second. Lastly, 2 Hz would be two swings per second. A swing is the same as a vibration so the pendulum must move away from where you dropped it and then swing back to where it began for it to be one full swing/vibration.


You’ll need:


  • 3 Foot Long String
  • A Weight that can be tied to the end of the string
  • A Timer or Stopwatch
  • Masking Tape
  • A Table or Chair
  • A Partner is helpful


“Advanced students: Download your What is Frequency?


1. Tie your weight (the official name of the weight on the end is bob. Personally I’ve always preferred the name Shirley, but Bob it is.) to the end of the 3 foot string. If you’ve done the gravity lesson in the Mechanics set of lessons you’ll remember that the weight of the bob doesn’t matter. Gravity accelerates all things equally, so your pendulum will swing at the same speed no matter what the weight of the bob.


2. Tape the string to a table or chair or door jam. Make sure it can swing freely at about 3 feet of length.


3. I would recommend starting with 1 Hz. It tends to be the easiest to find. Then try .5 Hz and then 2 Hz.


4. The easiest way I’ve found to do this is to start the pendulum swinging and at the same time start the timer. Count how many swings you get in ten seconds.


5. Now, adjust the string. Make it longer or shorter and try again. When you get 10 swings in 10 seconds you got it! That’s one swing per second. You should be able to get quite close to one swing per second which is 1 Hz.


6. Now try to get .5 Hz. In this case you will get 5 swings in ten seconds when you find it. (A little hint, the string is pretty long here.)


7. Now speed things up a bit and see if you can get 2 Hz. Be prepared to count quick. That’s 2 swings a second or 20 swings in 10 seconds! (Another little hint, the string is quite short for this one.)


Did you get all three different frequency pendulums? It takes a while but my classes found it rather fun. You’ve created three different frequencies. 2 Hz being the fastest frequency. That was pretty fast right? Can you imagine something going at 10 Hz? 100 Hz? 1,000,000 Hz? I told you things were moving at outrageous speeds!


Some examples of things that work at these frequencies are AM radio stations which broadcast at KHz, FM stations which broadcast at MHz, and microwaves which cook your food with GHz. If your radio is “crankin” tunes from radio station 750 AM, a part of your radio is vibrating at 750,000 times a second. If you’re “pumping wattage into your cottage” with WSCI at 94.2 on your radio dial, a part of your radio is vibrating at 94,200,000 times a second. If your radio happens to be green, then light is vibrating off your radio at 6 x 10¹⁴ Hz. That’s 6 with 14 zeros behind it or 600,000,000,000,000 vibrations in one second. That’s some serious vibes!


(By the way, if you can hear the sound coming out of your radio, your speakers are vibrating anywhere between 20 and 20,000 Hz. See how vibrations are important? They’re everywhere!) Let’s look more carefully at what those vibrations make, and that’s waves.


Click here to go to next lesson on Period.

[/am4show]


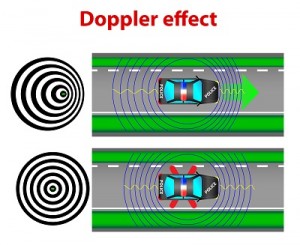
Imagine a police car on the side of the road with lights and sirens on full blast. You’re also parked and you hear the same frequency (say 1,000 Hertz) of the siren. However, if you’re driving at 75 mph toward the police car. you’re going to hear a higher frequency (1096 Hz), and if you’re driving away at 75 mph, you’re going to hear a lower frequency of 904 Hz. Why is that?
[am4show have=’p9;p58;’ guest_error=’Guest error message’ user_error=’User error message’ ]


It has to do with a motion-related frequency change called the Doppler Effect.  This effect was initially conceived by Johann Doppler in 1842 and later tested by Buys Ballot in Holland in 1845 with a locomotive drawing an open car with trumpeters. There’s Doppler Effect for not only sound but also light including microwaves, radio waves, and visible light. Police use the Doppler Effect on their radar guns to track your speed. Astronomers use it to find the motions of stars, galaxies, and quasars… it’s really an amazing tool in our scientific toolbox!


Click here to go to next lesson on Standing Waves.

[/am4show]


The period is the time it takes for one full cycle to complete itself and is measured in seconds per cycle. The frequency is the number of cycles that are make in a period of time, and is measured in cycles per second.


[am4show have=’p9;p58;’ guest_error=’Guest error message’ user_error=’User error message’ ]


Click here to go to next lesson on The Frequency and Period Relationship.

[/am4show]


The frequency is the number of cycles that are made in a given period of time, like 10 swings in 5 seconds, and is measured in cycles per second. The period is the inverse of the frequency, given by this equation: T = 1/ν.


[am4show have=’p9;p58;’ guest_error=’Guest error message’ user_error=’User error message’ ]


Click here to go to next lesson on Amplitude.

[/am4show]


Amplitude is how high or low the wave is from its original equilibrium position. (not vibrating). How high can you get the swing to go? How far does the car system spring travel over that bump? All these are the amplitude of the vibration.


[am4show have=’p9;p58;’ guest_error=’Guest error message’ user_error=’User error message’ ]


Let’s try a sample problem for amplitude:


Click here to go to next lesson on Pendulums.

[/am4show]


The restoring force slows down the object as it moves from its resting but speeds it up when it heads back to the resting position, and that’s what creates the vibration. We’re going to take a look at the forces in a pendulum from the point of view of Newton’s Laws.
[am4show have=’p9;p58;’ guest_error=’Guest error message’ user_error=’User error message’ ]


Click here to go to next lesson on Energy and Vibration.

[/am4show]


There’s more than one way to solve physics problems… and by looking at the total mechanical energy of the system, you’ll be able to solve much more complicated pendulum problems with ease.


[am4show have=’p9;p58;’ guest_error=’Guest error message’ user_error=’User error message’ ]


Click here to go to next lesson on Pendulum Period.

[/am4show]


You’ll need a pendulum for this experiment. A pendulum is really nothing more than a weight at the end of something that can swing back and forth. The easiest way to make one is to get a string and tape it to the edge of a table. (The string should be long enough so that it swings fairly close to the ground.) Tie a weight to the bottom of your string and you’ve got a pendulum.
[am4show have=’p9;p58;’ guest_error=’Guest error message’ user_error=’User error message’ ]


Now, for YOUR part of the experiment we are going to change one of three different things, and only one thing changes at a time. First, we’ll change the length of string and measure the period. Then we’ll change the mass of the object, and then the angle that you start the pendulum from. With each trial you will be changing only ONE of those three things. (The rest of the variables will be constant.)


  1. Make an observation. Play with the pendulum a bit and see how it behaves.
  2. Make a hypothesis. How will the length of string effect the number of swings in 10 seconds? Will there be more, less, or no change in the number of swings as the string gets shorter.
  3. Set a timer for 10 seconds or get someone who has a watch with a second hand to tell you when 10 seconds are up.
  4. Now for the test. Pull the pendulum back as far as you’d like (the pendulum swings smoother if you don’t lift the weight higher than the top of the string).
  5. Start the timer and let go of the weight at the same time.
  6. Count the swings the pendulum makes in 10 seconds. This is your frequency in #cycles per 10 seconds.
  7. Write down what you found (collect the data as shown in the video).
  8. Do two more trials with the string at that same length.
  9. Now change the changing variable. In other words, shorten the string. I would recommend shortening it at least an inch.
  10. Redo steps 3 through 9, recording each time.
  11. Continue shortening the string and doing trials until you get at least five different lengths of string.
  12. Convert frequency to period by taking the inverse. Do this for each trial.

Now report your results. Take a look at your data and see if you find a trend. Do you get more swings as the string shortens, less swings, or does the length of the string matter? Something interesting to notice is that at a certain length you will get 10 swings in 10 seconds or a swing a second. This is why pendulums are used in grandfather clocks. They keep good time!


Click here to go to next lesson on Hooke’s Law.

[/am4show]


How are pendulums like springs? They both vibrate, but how you model them on paper is a little different. Let’s take a look at how you handle springs and what their periodic nature looks like:
[am4show have=’p9;p58;’ guest_error=’Guest error message’ user_error=’User error message’ ]


Click here to go to next lesson on Nature of a Wave.

[/am4show]


Since we can’t see soundwaves as they move through the air, we’re going to simulate one with rope and a friend. This will let you see how a vibration can create a wave. You’ll need at least 10 feet of rope (if you have 25 or 50 feet it’s more fun), a piece of tape (colored if you have it), a slinky, and a partner. Are you ready?


[am4show have=’p8;p9;p16;p43;p64;p75;’ guest_error=’Guest error message’ user_error=’User error message’ ]


1. Give one end of the rope to your partner.


2. Stretch the rope out so that it is a bit slack.


3. Now move your hand up and down. Feel free to do it several times in a row. Your partner should keep his or her hands as still as possible.


4. Watch the waves move from your hand to the other end of the rope.


5. Now let your partner create waves.


6. If you wish, you can try to time your vibrations and create waves with specific frequencies. A frequency of one Hertz is fairly easy to do (one rope shake per second). Can you create rope waves of higher frequencies? You may find that your arm gets tired pretty quickly!


Your hand is the vibrating particle. As your hand vibrated up and down, you moved the particles of the rope up and down. As those particles of rope vibrated, they vibrated the particles next to them. As they vibrated, they vibrated the particles next to them and so on and so forth. So the wave moved from your hand across the room. Did your hands move across the room. Nope, but the wave you created with your vibrating hand did.


This is the way energy travels. Why is the rope wave energy? Because the particles moved a distance against a force. Work was done on the particles. In fact, when you shook the rope, your energy from your body moved across the room with the wave and was transferred (moved to) your partner. Your partner’s hands could feel the energy you put into the rope in the first place. The work you did on the rope was transferred by the rope wave and did work on your partners hand. You have moved energy across the room!


Now… let’s add another element to this experiment…


Transverse Waves

1. Put a piece of (colored if possible) tape in about the middle of the rope.


2. Tie your rope to something or let your friend hold on to one end of it.


3. Now pull the rope so that it is a bit slack but not quite touching the floor.


4. Vibrate your arm. Move your arm up and down once and watch what happens.


5. Now, vibrate your arm a bunch of times (not too fast) and see the results. Notice the action of the tape in the middle of the rope.


transvWhat you’ve done is create a transverse wave. With a transverse wave, if the particle (in this case your hand) moves up and down, the wave will move to the left and/or right of the particle. The word perpendicular means that if one thing is up and down, the other thing is left and right. A transverse wave is a wave where the particle moves perpendicular to the medium. The medium is the material that’s in the wave. The medium in this case is the rope.


For example, in a water wave, the medium is the water. Your hand moved up and down, but the wave created by your hand moved across the room, not up. The wave moved perpendicular to the motion of your hand. Did you take a look at the tape? The tape represents a particle in the wave. Notice that it too, was going up and down. It was not moving along the wave. In any wave the particles vibrate, they do not move along the wave.


Longitudinal Waves

Now that you’ve seen a transverse wave, let’s take a look at a longitudinal wave. Here’s what you do:


1. Put a piece of tape on one slinky wire in the middle or so of the slinky.


2. Let your friend hold on to one end of the slinky or anchor the slinky to a chair or table.


3. Now stretch the slinky out, but not too far.


4. Quickly push the slinky toward your friend, or the table, and then pull it back to its original position. Did you see the wave?


5. Now do it again, back and forth several times and watch where the slinky is bunched up and where it’s spread out.


6. Notice the tape. What is it doing?


longitudinalHere you made a longitudinal wave. A longitudinal wave is where the particle moves parallel to the medium. In other words, your hand vibrated in the same direction (parallel to the direction) the wave was moving in. Your vibrating hand created a wave that was moving in the same direction as the hand was moving in. Did you take a look at the tape? The tape was moving back and forth in the same direction the wave was going.


Do you see the difference between a transverse wave and a longitudinal wave? In a transverse waves the particles vibrate in a different direction (perpendicular) to the wave. In a longitudinal wave the particles vibrate in the same direction (parallel) to the wave.


What’s the Difference between Amplitude and Wavelength?

Here’s an easy way to get a feel for amplitude:


1. Put a piece of tape in about the middle of the rope.


2. Tie your rope to something or let your friend hold on to one end of it.


3. Now pull the rope so that it is a bit slack but not quite touching the floor.


4. Your friend should hold their hands as still as possible.


5. Vibrate your hand but only move it up and down about a foot or so. Have your partner pay attention to how that feels when the wave hits him or her.


6. Now, vibrate your hand but now move it up and down 2 or 3 feet. How does that feel to your partner?


7. Have your partner do the vibrating now and see what you feel.


You created two different amplitude waves. The first wave had a smaller amplitude than the second wave. What you and your partner should have felt was more energy the second time. The wave should have hit your hand with more energy when the wave had more amplitude.


Here’s a great way to visualize wavelength:


1. Tie your rope to something or let your friend hold on to it.


2. Now pull the rope so that it is a bit slack but not quite touching the floor.


3. Your friend should hold their hands as still as possible.


4. Now begin vibrating your hand fairly slowly. In this case, it works better if you move your hand in a circle.


5. Try to make a wavelength with the rope. In other words it will look like you’re playing jump rope.


6. Now try a one and a half wavelengths.


7. Can you get two or more wavelengths? You’ve really got to get your hand moving to get it.


waves


In this image, the left wave is ONE wavelength, the middle is 1.5 wavelegnths, and the right is TWO wavelengths.  See the difference?


Did you notice how the frequency of your hand determined the wavelength of the rope? The faster your hand, moved the more wavelengths you could get.
[/am4show]


Click here to go to next lesson on Motion of Waves.

This is a recording of a recent live teleclass I did with thousands of kids from all over the world. I’ve included it here so you can participate and learn, too!


Sound is a form of energy, and is caused by something vibrating. So what is moving to make sound energy?


Molecules. Molecules are vibrating back and forth at fairly high rates of speed, creating waves. Energy moves from place to place by waves. Sound energy moves by longitudinal waves (the waves that are like a slinky). The molecules vibrate back and forth, crashing into the molecules next to them, causing them to vibrate, and so on and so forth. All sounds come from vibrations.


Materials:


  • 1 tongue-depressor size popsicle stick
  • Three 3″ x 1/4″ rubber bands
  • 2 index cards
  • 3 feet of string (or yarn)
  • scissors
  • tape or hot glue

[am4show have=’p8;p9;p100;’ guest_error=’Guest error message’ user_error=’User error message’ ]


What’s Going On?

Do you remember where all waves come from? Vibrating particles. Waves come from vibrating particles and are made up of vibrating particles.


Here’s rule one when it comes to waves…. the waves move, the particles don’t. The wave moves from place to place. The wave carries the energy from place to place. The particles however, stay put. Here’s a couple of examples to keep in mind.


If you’ve ever seen a crowd of people do the ‘wave’ in the stands of a sporting event you may have noticed that the people only vibrated up and down. They did not move along the wave. The wave, however, moved through the stands.


Another example would be a duck floating on a wavy lake. The duck is moving up and down (vibrating) just like the water particles but he is not moving with the waves. The waves move but the particles don’t. When I talk to you, the vibrating air molecules that made the sound in my mouth do not travel across the room into your ears. (Which is especially handy if I’ve just eaten an onion sandwich!) The energy from my mouth is moved, by waves, across the room.


Questions to Ask

  • Does the shape of the index card matter?
  • What happens if you change the number of rubber bands?
  • What if you use a different thickness rubber band?
  • What happens if you make the string longer or shorter?
  • can you make a double by stacking two together?
  • Can you get a second or third harmonic by swinging it around faster?
  • Why do you need the index card at all?

[/am4show]


Click here to go to next lesson on Energy of a Wave.

Since  the particles don’t travel with the wave, what does a wave carry? Waves transport energy, not particles (or matter).
[am4show have=’p9;p58;’ guest_error=’Guest error message’ user_error=’User error message’ ]


Click here to go to next lesson on Mechanical and Electromagnetic Waves.

[/am4show]


Some waves need a medium to travel through while others do not. Mechanical waves need a medium for the wave to travel through to transport energy. Ocean waves, jump ropes, pendulums, sound, and waves in a stadium are all examples of mechanical waves.
[am4show have=’p9;p58;’ guest_error=’Guest error message’ user_error=’User error message’ ]


Electromagnetic  waves do not need a medium to travel through. Light from the sun reaches up 93 million miles away by traveling though the vacuum of space because it’s an electromagnetic wave. The electromagnetic wave travels through the vacuum of space at the speed of light (299,792,458 m/s). These types of waves are made by vibrating charged particles, and we’re going to look at this more in depth in our next section on Light.


Matter waves are the ones you get to learn about when you study quantum physics, as they describe the way that matter (like a beam of electrons) under certain conditions acts like a wave. That’s way out of our scope here, but I want you to at least be aware that they exist.


Click here to go to next lesson on Properties of a Wave.

[/am4show]


The words particle and wave are two words you’ll see in nearly every area of physics, but they are actually very different from each other. A particle is a tiny concentration of something that can transmit energy, and a wave is a broad distribution of energy that fills the space it passes through. We’re going to look at particles in more depth later, and instead focus on understanding waves.
[am4show have=’p9;p58;’ guest_error=’Guest error message’ user_error=’User error message’ ]
A wave traveling along a stretched string can have different shapes, but every wave will have a frequency and a wavelength. Wavelength refers to the repeating wave shape, and frequency refers to the oscillating source that make the wave in the first place. Waves are defined by a math equation that we’ll get to a little later. First, let’s take a look at the different parts of a wave.


A wave number is the number of waves per unit length.


For longitudinal waves, a rarefaction is the spot where the the wave is traveling and is the most “stretched out” (minimum wave density). The compression is the spot where the wave is most squished together. You can see this easily if you play with a slinky… the coils that are most spread out are a rarefaction point.


Click here to go to next lesson on Period, Frequency, Amplitude and Wavelength.

[/am4show]


A wave can have many different shapes, but it has a very specific frequency ν and wavelength λ.
[am4show have=’p9;p58;’ guest_error=’Guest error message’ user_error=’User error message’ ]


Click here to go to next lesson on Humming Bird.

[/am4show]


Humming birds are really fascinating, because they can beat their wings so fast! Here’s a quick way to calculate the frequency and period of a humming bird’s wings.
[am4show have=’p9;p58;’ guest_error=’Guest error message’ user_error=’User error message’ ]


Click here to go to next lesson on Swinging Kid.

[/am4show]


Kids love swings, and it’s amazingly simple to find the frequency and period of the swing. Here’s how…
[am4show have=’p9;p58;’ guest_error=’Guest error message’ user_error=’User error message’ ]


Click here to go to next lesson on Energy and Wave Amplitude.

[/am4show]


How is the energy related to the wave frequency, amplitude and wavelength?
[am4show have=’p9;p58;’ guest_error=’Guest error message’ user_error=’User error message’ ]


Click here to go to next lesson on Wave Speed.

[/am4show]


Sound is a type of energy, and energy moves by waves. So sound moves from one place to another by waves; longitudinal waves to be more specific. So, how fast do sound waves travel? Well, that’s a bit of a tricky question. The speed of the wave depends on what kind of stuff the wave is moving through. The more dense (thicker) the material, the faster sound can travel through it.
[am4show have=’p9;p58;’ guest_error=’Guest error message’ user_error=’User error message’ ]


Remember that waves move because the particles bounce off one another? Well, the farther the particles are from one another, the longer it takes one particle to bounce off another. Think about a row of dominoes. If you put them all close together and push one over they all fall down pretty quick. If you spread them out a bit, the row falls much more slowly. Sound waves move the same way.


Click here to go to next lesson on More on Wave Speed .

[/am4show]


Sound moves faster in solid objects than it does in air because the molecules are very close together in a solid and very far apart in a gas. For example, sound travels at about 760 mph in air, 3300 mph in water, 11,400 mph in aluminum, and 27,000 mph in diamond!
[am4show have=’p9;p58;’ guest_error=’Guest error message’ user_error=’User error message’ ]


The temperature of the material also makes a difference. The colder the material, the faster the sound. This is why sound seems to be louder or clearer in the winter or at night. The air is a little cooler and since it’s cooler, the molecules are a little more tightly packed.


The speed of a wave is based on the basic distance over time relationship. If you watch the crest of a wave, the speed is how fast the crest is observed to move a distance.


Click here to go to next lesson on Echoes.

[/am4show]


An echo is when a wave travels through one medium (like air) and then meets a different medium (like a cave wall). The sound wave bounces and reflects back to you.
[am4show have=’p9;p58;’ guest_error=’Guest error message’ user_error=’User error message’ ]


Click here to go to next lesson on Bird Waves.

[/am4show]


Let’s do a couple of simpler sample problems, and then I’ll show you how to do problems that are more complex and involve higher level math. First, let’s take a look at the wings of a bird in flight…
[am4show have=’p9;p58;’ guest_error=’Guest error message’ user_error=’User error message’ ]


Click here to go to next lesson on Sitting on the Ocean.

[/am4show]


Ocean waves travel on the surface of the water can be observed and measured. Let’s try one just before a storm…
[am4show have=’p9;p58;’ guest_error=’Guest error message’ user_error=’User error message’ ]


Click here to go to next lesson on Seasick Waves.

[/am4show]


Ever gotten sea sick? It’s usually because the motion of what your body detects is different from what your eyes see. Let’s take a look at how you can calculate the wave speed by watching two boats bobbing up and down (without getting sick).
[am4show have=’p9;p58;’ guest_error=’Guest error message’ user_error=’User error message’ ]


Click here to go to next lesson on Wave Speed on Tight Strings.

[/am4show]


Waves traveling on a tight string, like a climbing rope, are dependent on only two things: the tension of the rope and a physical property of the rope (like what it’s made out of, the diameter, etc.).
[am4show have=’p9;p58;’ guest_error=’Guest error message’ user_error=’User error message’ ]


Click here to go to next lesson on Wave Equations.

[/am4show]


Now it’s time for a little more math because the physics problems are going to get a little harder.
[am4show have=’p9;p58;’ guest_error=’Guest error message’ user_error=’User error message’ ]


The wave equation for transverse and longitudinal waves moving in the +x direction looks like this:


where ym is the amplitude of the wave, κ is the angular wave number, ω is the angular frequency, and (κx-ωt) is the phase.


The wavelength L and the wave number k are found by the following equation: 


where K is the number of waves per meter.


The period (T) and the frequency (ν) are related to ω by the following equation:


The main wave speed equation is given by:


Note that the first letter v is for velocity, and the last letter in the equation is the greek letter “nu” (ν) for frequency.


The problems in the video  involve using the first equation that relates the distance and time to find the amplitude, wave number, and frequency of a wave. (This is a typical problem that you’ll see in college level physics.)


Click here to go to next lesson on Waves on a Stretched String.

[/am4show]


If a wave can travel through mediums like air, water, strings, rocks, etc., then it makes sense that as the wave moves through these mediums, the tiny particles that make up the medium will also vibrate. In order for this to happen, the medium has to have a way for energy (both potential and kinetic) to be stored, so the medium has both inertia and elasticity.
[am4show have=’p9;p58;’ guest_error=’Guest error message’ user_error=’User error message’ ]
The wave equation for a stretched spring is:


where the first letter v is for velocity, μ is the linear density of the string, and the tension is τ.


You can’t send a wave along a straight string without stretching the string. The tension in the string that does the stretching is the elasticity of the string that stores the potential energy as the wave passes through. The amount of tension in the rope will affect the wave speed. The wave speed doesn’t change if you change the frequency, however it will travel faster through a tighter rope.


This means that the speed of the wave depends on the medium, and not the wave itself. For example, waves travel faster through solid rock than they do through air because the particles in the medium are much closer together and can transmit the wave faster.


Here’s the power part of the video above explained in more detail:


Click here to go to next lesson on Behavior of Waves

[/am4show]


It’s easy to see how the current flows through a circuit that has only one component, like one LED connected to the battery. If it’s a 3 Volt battery, then there’s 3 Volts across the LED also.


But what if there are two or three LEDs? How does the voltage look across each one? What if the LEDs are different sizes? Does it matter how you hook them up, meaning does one way make the LED last monger or glow brighter? Let’s take a look at the difference between series and parallel connections.


[am4show have=’p9;p58;’ guest_error=’Guest error message’ user_error=’User error message’ ]


You can have resistors in series, batteries in parallel, motors in series and parallel, and hundreds more different combinations! It all depends on what you want to do and how you want to do it.


For example, a 6V lantern battery is actually made up of four D-cell batteries connected in series. Each D-cell is 1.5V, and when you add four of them up, you get 6V. The older models of these used to have 24 AA batteries which were connected in series and parallel to make 6V. We’re going to learn how to decide whether to use a series or parallel circuit, depending on what we’re building and what we need the circuit to do.


Which bring up another point… what’s the difference between a D-cell and a AAA battery? They both are 1.5 volts. Why use one over the other? And 9V batteries are smaller and lighter than a D-cell but have  6 times the voltage… why wouldn’t yo use 9V for everything?


It has to do with current (the rate of charge flowing through the circuit). A D-cell has much more current than a AAA battery, and you’d use D-cells for things like motors. AAA are perfect for LEDs and other low-current devices that don’t need as much amps to get them going. In your circuit, you want to choose the best option that will still work voltage and amperage-wise, is the least expensive, and lasts long enough so you’re not changing batteries every few minutes.


Click here to go to your next lesson on Series Circuits.

[/am4show]


Each electrical component is connected so that there’s only one option for the current to flow. There’s no branches or alternate routes for the electricity… it’s only got one way to move through the circuit. When you add more electrical components, like motors or LEDs to this circuit, the overall resistance in the circuit decreases since there’s only one path for the current.


[am4show have=’p9;p58;’ guest_error=’Guest error message’ user_error=’User error message’ ]


Let’s look at how charge flows through a series circuit:


Click here to go to your next lesson on Parallel Circuits.

[/am4show]


Each device, like a motor or LED, has its own branch lines in a parallel circuit, which means that the electricity has many different ways that it can travel along the circuit lines. When scientists and engineers draw electrical diagrams, they put one electric component on each branch, even if in reality there’s more than one when you actually build the thing.


[am4show have=’p9;p58;’ guest_error=’Guest error message’ user_error=’User error message’ ]


Unlike series circuits, when you add another branch, you also allow more pathways for the electricity to follow.


Click here to go to your next lesson on Calculating and Measuring Current.

[/am4show]


Current and charge aren’t quite the same thing. Current is rate that charge goes through a circuit (just like acceleration is the rate of change in velocity… acceleration and velocity aren’t the same thing either, but they are related). Remember, charge doesn’t get used up by electrical components like LEDs or resistors.


[am4show have=’p9;p58;’ guest_error=’Guest error message’ user_error=’User error message’ ]


Click here to go to your next lesson on Ohm’s Law and Current.

[/am4show]


One more thing to note about the difference between series and parallel circuits is that in a parallel circuit, the current in each branch can be different, but they all add up to be the same everywhere once you reduce the branches into a single branch. Just like the water analogy, when you connect the main hose into five different smaller hoses, the sum of all five is going to equal flow through the main hose.


[am4show have=’p9;p58;’ guest_error=’Guest error message’ user_error=’User error message’ ]


Click here to go to your next lesson on Ohm’s Law and Power.

[/am4show]


It’s easy to get sucked into doing math and equations all day without understanding how it applies to the real world. Let’s take a look at how to actually hook up series and parallel circuits in everyday life, and how they are different, and when to use each one…


[am4show have=’p9;p58;’ guest_error=’Guest error message’ user_error=’User error message’ ]


Click here to go to your next lesson on Breadboards.

[/am4show]


Although you can’t see electricity, you can certainly detect its effects – a buzzer sounding, a light flashing, a motor turning… all of these happen because of electricity. Which is why electricity experiments are among the most frustrating. You can’t always tell where the problem is in a circuit that refuses to work right.


We’re going to outline the different electronic components (resistors, capacitors, diodes, transistors, etc) so you get a better feel for how to use them in a circuit. While we’re not going to spend time on why each of these parts work (which is a topic best reserved for college courses), we are going to tackle how to use them to get your circuit to do what you want. The steps to building several different electronics projects are outlined very carefully so you can really understand this incredible micro-world.


In this video, you’ll learn how to identify each electronic component.  You’ll also learn how to use a breadboard to quickly build circuits that can be easily changed.  Plus, you’ll learn how to make sure you don’t damage your components.


Before you use a breadboard, you need to know how the “holes” in it connect to each other.  Once you get this, they’re easy to use, but until you understand their secret, they can be totally confusing.  Be sure to pay attention to this part, and it will make things a lot easier.  Once you have this down, you’ll wire up a few simple circuits on the breadboard just to try out your new knowledge.


Which part is which? Click here to access a reference sheet so you can tell which resistor is which.


[am4show have=’p8;p9;p24;p51;p58;’ guest_error=’Guest error message’ user_error=’User error message’ ]


[/am4show]


Click here to go to your next lesson on Series Switches.

Switches are a lot of fun, they allow us to control when a circuit is on and when it’s off. In this experiment we’ll see how two switches can be connected in series to control when a single device is on or off.


[am4show have=’p9;p51;p103;p108;p58;’ guest_error=’Guest error message’ user_error=’User error message’ ]


Click here to go to your next lesson on Parallel Switches.

[/am4show]


We’ve seen how switches can be used to turn stuff on and off, now let’s take a look at how a switch in different locations can turn the same thing on or off. A lot like a doorbell with a button at the front door and a button at the back door.


[am4show have=’p9;p51;p103;p108;p58;’ guest_error=’Guest error message’ user_error=’User error message’ ]


[/am4show]


Click here to go to your next lesson on Light Actuated Circuit.


In this circuit, we’re going to use a special kind of resistor, called a CdS photocell to detect light and dark.  When light is shined on the photocell, the LED will light up.  When it is dark, the LED goes out.  And with just a little light, the LED is dim.  Remember the explanation of how a transistor works?  We talked about having a small voltage (or current) control a larger one, kind of like turning the knob on a light switch dimmer in your house?  That’s what this circuit is doing.


The photocell is a kind of resistor that changes it’s resistance depending on how light or dark it is.  In this circuit, when it is light, the photocell delivers more current to the base lead of the transistor.   When this happens, the transistor allows more voltage to flow from the emitter lead to the collector lead, which in turn lights up the LED.  One resistor are simply used to reduce the amount of current that goes into the transistor (so it doesn’t get too much current)  if the photocell has a really low resistance because of how much light is on it.  The other one is called a pull-down resistor.  Think of it like a door closer spring for electricity.  A door closer closes the door when you let go of it (instead of leaving the door to sway in the wind).  A pull-down resistor makes sure that when the transistor is “off”, it will “spring” toward a connection to the negative side of the battery (a pull-up makes it spring toward the positive).


[am4show have=’p8;p9;p24;p51;p58;’ guest_error=’Guest error message’ user_error=’User error message’ ]


If this is all confusing, don’t worry.  It will make more sense as you build more circuits and look at more schematic diagrams.


Click here for Unit 14 (Lesson 1) schematics.


This light-actuated relay circuit will remain actuated for a brief time after you remove the light.  You can substitute a 1.5-3V buzzer for the LED if you’d rather have a loud circuit.


Materials:


  • breadboard
  • AA battery case
  • 2 AA batteries
  • LED
  • CdS photocell
  • transistor (2N2222A)
  • 4.7k resistor
  • 1k resistor
  • jump wires
  • wire strippers

Here’s what you do:


[/am4show]


Click here to go to your next lesson on Light De-actuated Circuit.

Make sure you’ve already made the Light Actuated Circuit before starting this project!


Photoresistors (also called CdS photocells) are made of a material that reacts with light, very similar to solar cells.  When light hits the material, it knocks a few electrons loose. When you hook up the cell to a circuit, the electrons now have a place to go, and electricity flows through your wires. You’ll notice your CdS cell works when you shine a light on it from either the front side or the back side. If you want to use a phototransistor, make a note as to the frequency of light it’s been tuned to – some will only work with IR light (like your remote control or sunlight).


In this circuit, the LED is actuated only when the photoresistor is dark. If you want a faster response to your light, you can substitute a phototransistor for the photoresistor (CdS cell) and adjust the value of the 1-kOhm resistor (change it lower or higher, or use a potentiometer) to control the sensitivity.


This is basically the same as the light-actuated circuit.  The difference is that the transistor is connected to control power to the LED in the opposite way as the light-actuated circuit.  So, as there is more light on the photocell (and the base lead gets more current), the voltage to the transistor is reduced.


Click here for Unit 14 (Lesson 1) schematics.


Notice what is the same in the circuit, and what is different.


[am4show have=’p8;p9;p24;p51;p58;’ guest_error=’Guest error message’ user_error=’User error message’ ]


Materials:


  • breadboard
  • AA battery case
  • 2 AA batteries
  • LED
  • CdS photocell
  • transistor (2N2222A)
  • 4.7k resistor
  • 1k resistor
  • jump wires
  • wire strippers


[/am4show]


Click here to go to your next lesson on How to Read Schematics.

Do you remember the first time you tried to read a map? There were all those weird symbols and curving lines that you had to figure out before you could get anywhere. Electric circuits are kind of the same way… people use schematic diagrams to write down how their circuit is wired so others can build it, too.


[am4show have=’p8;p9;p24;p51;p58;’ guest_error=’Guest error message’ user_error=’User error message’ ]


Now that you’ve built a couple of the breadboard circuits, it’s time to figure out how to read the symbols and build a circuit from a diagram. At first, it may seem a bit overwhelming with all the strange symbols and lines drawn all over the page, but don’t worry – after a couple of circuits, you’ll be cruising through these like a pro.


The first thing you need to do is download the schematics (if you haven’t already) and then watch this video:


Click here to go to your next lesson on Transistor Circuits.

[/am4show]


This Flashing Circuit used to be a real ‘wowser!’ with students before LEDs become commonplace (around 1995). You’re going to build a circuit that has a control knob that will allow you to set the flash speed of the LED. You can try different LEDs or mini-lamps to see what kind of an effect you get. Are you ready?


NPN and PNP transistors are similar in that when current is applied to the base, electricity flows through them.  But, they way they are used is different.  NPN transistors are often used to control whether a circuit is completed by connecting it to ground or not, where PNP control the positive current going into a device (or portion of a circuit).  NPN transistors are often used where larger currents need to be controlled, because it’s easier for a transistor to control the ground side of a circuit than the plus power side of it.


So, why does the LED flash?  Remember, a capacitor is like a storage tank for electricity.  You fill it up, then empty it out.  But, it takes time to fill up and empty.  This circuit uses the time it takes to fill and empty as a delay for turning the LED on and off.  How fast it fills up depends on the value of the resistor that is connected to it.  We’re using a variable resistor, so we can adjust how fast it fills up, and thus adjust the flash rate.


Click here for Unit 14 (Lesson 1) schematics.


[am4show have=’p8;p9;p24;p51;p58;’ guest_error=’Guest error message’ user_error=’User error message’ ]


Materials:


  • breadboard
  • AA battery case
  • 2 AA batteries
  • LED
  • potentiometer
  • transistor (2N2222A and 2N4403)
  • 5.6k resistor
  • 1k resistor
  • 10k resistor
  • jump wires
  • wire strippers


[/am4show]


Click here to go to your next lesson on Audible Probes.

Resistors look like candy-striped hot dogs. Their job is to limit current to keep sensitive electronics from being overloaded. If you break open a resistor, you’ll find a pile of graphite. If you have a digital multimeter, draw a line on a sheet of paper with a graphite pencil, and place one probe near the end of the line. You can measure the change in resistance along the line with your other multimeter probe!


Make sure you’ve made the Light Flasher before starting this circuit. This circuit, the Audible Light Probe, is actually a very sensitive circuit that will emit all sorts of sounds reminiscent of junior high school boys locker rooms. The frequency from the speaker will change as the light intensity changes. One of the neat features about this circuit is that it will allow you to test different transistors (both PNP and NPN) to see (hear) the changes. You can also play with the capacitor and resistor values to change the range.


Click here for Unit 14 (Lesson 1) schematics.


TIP: If your tones won’t stop, or are too high to hear, try operating your circuit in a very dark room before adding the light. Can you get your speaker to *click*?


[am4show have=’p8;p9;p24;p51;p107;p58;’ guest_error=’Guest error message’ user_error=’User error message’ ]


Materials:


  • breadboard
  • AA battery case
  • 2 AA batteries
  • LED
  • CdS photocell
  • transistor (2N2222A and 2N4403)
  • 1k resistor
  • 0.47-?f electrolytic capacitor
  • 8-ohm speaker
  • jump wires
  • wire strippers


[/am4show]


Click here to go to your next lesson on Lie Detectors.

Lie Detectors are electronic circuits that are able to measure your skin’s resistance. When you sweat (or if your skin is wet), the resistance is different than if it’s dry.


However since most people don’t sweat when they lie, this type of detector isn’t the most reliable type of detector around, but it’s one of the simplest to create. We’re going to build one from simple electronic components like resistors, capacitors, and transistors.


Our lie detector uses a speaker that changes pitch depending on the resistance of your skin – it’s much more entertaining than blinking an LED on or off. You can think of this circuit as more of a skin humidity indicator. Are you ready?


[am4show have=’p8;p9;p24;p51;p107;p58;’ guest_error=’Guest error message’ user_error=’User error message’ ]
Materials:


  • Breadboard (2″x3″, 400-hole)
  • Hookup wire (AWG 22g, solid), 6 feet
  • 4.7K-ohm resistor
  • 100K-ohm resistor
  • PN2222A or 2N3904 (NPN) transistor
  • 2N3906 or 2N4403 (PNP) transistor
  • 0.01 micro-f (mf) capacitor – Code on capacitor: 103
  • 8-ohm speaker
  • 9V battery snap and fresh 9V battery


Download your Current Electricity Problem Set here.

[/am4show]


This is a recording of a recent live teleclass I did with thousands of kids from all over the world. I’ve included it here so you can participate and learn, too! (Click here if you’re looking for the more recent version that also includes Chemical Engineering.)


When you think of slime, do you imagine slugs, snails, and puppy kisses? Or does the science fiction film The Blob come to mind? Any way you picture it, slime is definitely slippery, slithery, and just plain icky — and a perfect forum for learning real science. But which ingredients work in making a truly slimy concoction, and why do they work? Let’s take a closer look…


Materials:


  • Sodium tetraborate (also called “Borax” – it’s a laundry whitener) – about 2 tablespoons
  • Clear glue or white glue (clear works better if you can find it) – about 1/2 cup
  • Yellow highlighter
  • Pliers or sharp razor (with adult help). (PREPARE: Use this to get the end off your highlighter before class starts so you can extract the ink-soaked felt inside. Leave the felt inside highlighter with the end loosely on (so it doesn’t dry out))
  • Resuable Instant Hand Warmer that contains sodium acetate (Brand Name: EZ Hand Warmer) – you’ll need two of these
  • Scissors
  • Glass half full of COLD water (PREPARE: put this in the fridge overnight)
  • Mixing bowl full of ice (PREPARE: leave in freezer)
  • Salt
  • Disposable aluminum pie place or foil-wrapped paper plate
  • Disposable cups for solutions (4-6)
  • Popsicle sticks for mixing (4-6)
  • Rubber gloves for your hands
  • Optional: If you want to see your experiments glow in the dark, you’ll need a fluorescent UV black light (about $10 from the pet store – look in cleaning supplies under “Urine-Off” for a fluorescent UV light). UV flashlights and UV LEDs will not work.

[am4show have=’p8;p9;p11;p38;p101;’ guest_error=’Guest error message’ user_error=’User error message’ ]


Key Concepts

If you’ve ever mixed together cornstarch and water, you know that you can get it to be both a liquid and a solid at the same time. (If you haven’t you should definitely try it! Use a 2:1 ratio of cornstarch:water.) The long molecular chains (polymers) are all tangled up when you scrunch them together (and the thing feels solid), but the polymers are so slick that as soon as you release the tension, they slide free (and drips between your fingers like a liquid).


Scientists call this a non-Newtonian fluid. You can also fill an empty water bottle or a plastic test tube half-full with this stuff and cap it. Notice that when you shake it hard, the slime turns into a solid and doesn’t slosh around the tube. When you rotate the tube slowly, it acts like a liquid.


Long, spaghetti-like chains of molecules (called polymers) don’t clump together until you cross-link the molecule strands (polymers) together into something that looks more like a fishnet. This is how we’re going to make slime.


What’s Going On?

Imagine a plate of spaghetti. The noodles slide around and don’t clump together, just like the long chains of molecules (called polymers) that make up slime. They slide around without getting tangled up. The pasta by itself (fresh from the boiling water) doesn’t hold together until you put the sauce on. Slime works the same way. Long, spaghetti-like chains of molecules don’t clump together until you add the sauce – something to cross-link the molecule strands together.


The borax mixture holds the glue mixture together in a gloppy, gelatinous mass. In more scientific terms, the sodium tetraborate cross-links the long polymer chains in the glue to form the slime.


Why does the slime glow? Note that a black light emits high-energy UV light. You can’t see this part of the spectrum (just as you can’t see infrared light, found in the beam emitted from the remote control to the TV), which is why “black lights” were named that. Stuff glows because fluorescent objects absorb the UV light and then spit light back out almost instantaneously. Some of the energy gets lost during that process, which changes the wavelength of the light, which makes this light visible and causes the material to appear to glow.


Questions to Ask

  1. What happens when you freeze your slime? Is there a color change?
  2. How long does it take to thaw your slime in the microwave?
  3. Do you see the little bubbles in your slime?
  4. How many states of matter do you have in your slime now?
  5. Does this work with any laundry detergent, or just borax?
  6. What happens if you omit the water in the 50-50- glue-water mixture, and just use straight glue? (Hint – use the glow juice with the borax to keep the glowing feature.)
  7. Does your slime pick up newsprint from a newspaper?
  8. What other kinds of glue work well with this slime?

[/am4show]


As electrons move through a load in an electric circuit (devices like a LED, buzzer, motor, etc.), they experience resistance (even through the wire itself), which corresponds to a drop in energy . This drop in energy is referred to as a voltage drop.  Resistance hinders the flow of electrons, even in the water itself.  You can think of resistance as the friction between the water and the pipe along the inside of the pipe.


The pipe, just like the wire, has a certain diameter and length. The longer the wire, the more resistance the electron will encounter, just as with a long pipe of water. If you increase the pipe diameter, more water will flow through it. The thicker the wire, the more current flows through it. The amount of resistance the charge encounters also depends on what the wire is made out of. Certain materials are more electrically conductive than others, with silver, copper and gold being at the very low end of electrical resistance (which is why most wires are made from copper, which is the least expensive of the three).


[am4show have=’p9;p58;’ guest_error=’Guest error message’ user_error=’User error message’ ]


It’s easy to find the resistance of objects using a simple mathematical equation that relates the length of the wire, the cross-sectional area, and the resistivity of the material. Here’s an example of how to do it:


Click here to go to your next lesson on Resistance over Distance.

[/am4show]


Resistors are a very important part of electronics, in fact without them we wouldn’t even have electronics. Resistors help us control the flow of current through a circuit and protect components from being damaged. This video talks about what resistors are, how to read them, and how to use them.


[am4show have=’p9;p51;p103;p108;p58;’ guest_error=’Guest error message’ user_error=’User error message’ ]


[/am4show]


Click here to go to your next lesson on Potentiometers.

potSo now you know how to hook up a motor, and even wire it up to a switch so that it goes in forward and reverse. But what if you want to change speeds? This nifty electrical component will help you do just that.


Once you understand how to use this potentiometer in a circuit, you’ll be able to control the speed of your laser light show motors as well as the motors and lights on your robots. Ready?


[am4show have=’p8;p9;p20;p47;p106;p108;p76;p97;p58;’ guest_error=’Guest error message’ user_error=’User error message’ ]


Here’s what you need:


  • 2 AA batteries
  • AA battery case
  • 3 alligator wires
  • potentiometer
  • 1.5-3V DC motor
  • LED (any you choose)


Download Student Worksheet & Exercises


Exercises


  1. How does a potentiometer work?
  2. Does the potentiometer work differently on the LED and the motor?
  3. Name three places you’ve used potentiometers in everyday life.
  4. How do you think you might wire up an LED, switch, and potentiometer?

Click here to go to your next lesson on Measuring Voltage and Current.

[/am4show]


meterOne of the most useful tools a scientist can have! A digital multimeter can quickly help you discover where the trouble is in your electrical circuits and eliminate the hassle of guesswork. When you have the right tool for the job, it makes your work a lot easier (think of trying to hammer nails with your shoe).

We'll show you how to get the most out of this versatile tool that we're sure you're going to use all the way through college. This project is for advanced students.

[am4show have='p9;p47;p107;p76;p58;' guest_error='Guest error message' user_error='User error message' ]


Download Student Worksheet & Exercises

Exercises

  1. If you measure 2.65 volts from your battery pack, do you need new batteries or will they work?
  2. How do you think you would measure the resistance of an LED?
  3. Reset your meter for a quick practical test: Remove the wires from your DMM and set the dial at OFF. Wave your hand wildly and show how you can use the meter (you can add probes and turn it on now) to test the voltage on your LED in a simple circuit doing the steps from the experiment.

[/am4show]

Click here to go to your next lesson on Ohm's Law.