This experiment is for advanced students. Did you know that eating a single peanut will power your brain for 30 minutes? The energy in a peanut also produces a large amount of energy when burned in a flame, which can be used to boil water and measure energy.
Peanuts are part of the bean family, and actually grows underground (not from trees like almonds or walnuts). In addition to your lunchtime sandwich, peanuts are also used in woman’s cosmetics, certain plastics, paint dyes, and also when making nitroglycerin.
What makes up a peanut? Inside you’ll find a lot of fats (most of them unsaturated) and antioxidants (as much as found in berries). And more than half of all the peanuts Americans eat are produced in Alabama. We’re going to learn how to release the energy inside a peanut and how to measure it.
[am4show have=’p9;p50;p88;p91;’ guest_error=’Guest error message’ user_error=’User error message’ ]
Materials:
- raw peanuts
- chemistry stand with glass test tube and holder (watch video)
- flameproof surface (large ceramic tile or cookie sheet)
- paper clip
- alcohol burner or candle with adult help
- fire extinguisher
Download Student Worksheet & Exercises
What’s Going On? There’s chemical energy stored inside a peanut, which gets transformed into heat energy when you ignite it. This heat flows to raise the water temperature, which you can measure with a thermometer. You should find that your peanut contains 1500-2100 calories of energy! Now don’t panic… this isn’t the same as the number of calories you’re allowed to eat in a day. The average person aims to eat around 2,000 Calories (with a capital “C”). 1 Calorie = 1,000 calories. So each peanut contains 1.5-2.1 Calories of energy (the kind you eat in a day). Do you see the difference?
But wait… did all the energy from the peanut go straight to the water, or did it leak somewhere else, too? The heat actually warmed up the nearby air, too, but we weren’t able to measure that. If you were a food scientist, you’d use a nifty little device known as a bomb calorimeter to measure calorie content. It’s basically a well-insulated, well-sealed device that catches nearly all the energy and flows it to the water, so you get a much more accurate temperature reading. (Using a bomb calorimeter, you’d get 6.1-6.8 Calories of energy from one peanut!)
How do you calculate the calories from a peanut?
Let’s take an example measurement. Suppose you measured a temperature increase from 20 °C to 100 °C for 10 grams of water, and boiled off 2 grams. We need to break this problem down into two parts – the first part deals with the temperature increase, and the second deals with the water escaping as vapor.
The first basic heat equation is this:
Q = m c T
Q is the heat flow (in calories)
m is the mass of the water (in grams)
c is the specific heat of water (which is 1 degree per calorie per gram)
and T is the temperature change (in degrees)
So our equation becomes: Q = 10 * 1 * 80 = 800 calories.
If you measured that we boiled off 2 grams of water, your equation would look like this for heat energy:
Q = L m
L is the latent heat of vaporization of water (L= 540 calories per gram)
m is the mass of the water (in grams)
So our equation becomes: Q = 540 * 2 = 1080 calories.
The total energy needed is the sum of these two:
Q = 800 calories + 1080 calories = 1880 calories.
A peanut is not a nut, but actually a seed. In addition to containing protein, a peanut is rich in fats and carbohydrates. Fats and carbohydrates are the major sources of energy for plants and animals.
The energy contained in the peanut actually came from the sun. Green plants absorb solar energy and use it in photosynthesis. During photosynthesis, carbon dioxide and water are combined to make glucose. Glucose is a simple sugar that is a type of carbohydrate. Oxygen gas is also made during photosynthesis.
The glucose made during photosynthesis is used by plants to make other important chemical substances needed for living and growing. Some of the chemical substances made from glucose include fats, carbohydrates (such as various sugars, starch, and cellulose), and proteins.
Photosynthesis is the way in which green plants make their food, and ultimately, all the food available on earth. All animals and nongreen plants (such as fungi and bacteria) depend on the stored energy of green plants to live. Photosynthesis is the most important way animals obtain energy from the sun.
Oil squeezed from nuts and seeds is a potential source of fuel. In some parts of the world, oil squeezed from seeds-particularly sunflower seeds-is burned as a motor fuel in some farm equipment. In the United States, some people have modified diesel cars and trucks to run on vegetable oils.
Fuels from vegetable oils are particularly attractive because, unlike fossil fuels, these fuels are renewable. They come from plants that can be grown in a reasonable amount of time.
[am4show have=’p8;p9;p22;p49;p70;p75;p84;’ guest_error=’Guest error message’ user_error=’User error message’ ]
Materials
- Shelled peanut
- Small pair of pliers
- Match or lighter
- Sink
Download Student Worksheet & Exercises
Procedure
ASK AN ADULT TO HELP YOU WITH THIS EXPERIMENT. DO NOT DO THIS EXPERIMENT BY YOURSELF. The fuel from the peanut can flare up and burn for a longer time than expected.
Close the drain in the kitchen sink. Fill the sink with water until the bottom of the sink is just covered.
Using a small pair of pliers, hold the peanut over the sink containing water. Ask an adult to hold the flame of a lit match or lighter directly under the peanut. When the peanut starts to burn, the lit match or lighter can be removed.
Allow the peanut to burn for one minute. MAKE SURE AN ADULT REMAINS PRESENT AND MAKE SURE TO HOLD THE PEANUT OVER THE SINK. To extinguish the burning peanut, drop it into the water. After you have extinguished the peanut, allow it to cool and then examine it carefully.
Observations
How long does it take for the peanut to start to burn? Does the peanut burn with a clean flame or a sooty flame? What color is the flame? What color does the peanut turn when it burns? Did the size of the peanut change after it has burned for several minutes?
Discussion
You should find that the peanut ignites and burns after a lit match or lighter is held under it for a few seconds. Although you only let the peanut burn for one minute as a safety measure, the peanut would burn for many minutes.
In this experiment, when the peanut burns, the stored energy in the fats and carbohydrates of the peanut is released as heat and light. When you eat peanuts, the stored energy in the fats and carbohydrates of the peanut is used to fuel your body.
Other Things to Try
Hold one end of a piece of uncooked spaghetti in a pair of pliers. Ask an adult to hold the flame of a lit match or lighter under the other end of the spaghetti. When the spaghetti starts to burn, place it in an aluminum pie pan that is in the sink. Make sure to extinguish the burning spaghetti with water when you are finished with the experiment. How does the burning of the spaghetti compare with the burning of the peanut?
Exercises
- What is the process called where plants get food from the sun?
- Osteoporosis
- Photosynthesis
- Chlorophyll
- Metamorphosis
- Where does all life on the planet get its food?
- List two ways that we could use the energy in a peanut:
[/am4show]
Click here to go to next lesson on Thermostat.


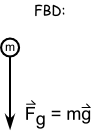 The FBD of projectiles is simply a downward pointing arrow to indicate the weight. If it looks strange to have a force not in the direction of the object’s travel path, just remember that a force isn’t needed to sustain motion… it’s actually the opposite! Objects stop moving because of the forces applied to it. The FBD are always a snapshot of the forces acting on the object in that moment. The object can be moving in one direction and the force acting in another.
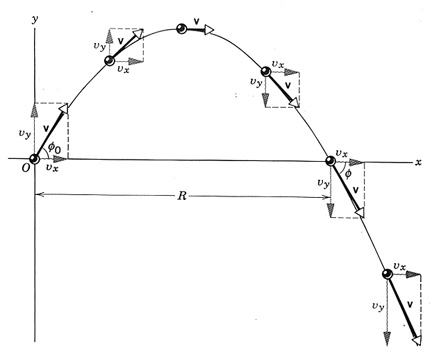
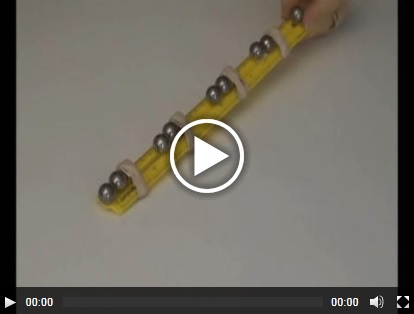
 What’s going on? We’re utilizing the “springy-ness” in the popsicle stick to fling the ball around the room. By moving the fulcrum as far from the ball launch pad as possible (on the catapult), you get a greater distance to press down and release the projectile. (The fulcrum is the spot where a lever moves one way or the other – for example, the horizontal bar on which a seesaw “sees” and “saws”.)
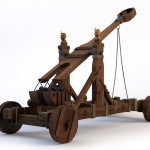 Since you've worked so hard, I thought you'd enjoy making a marshmallow launcher just for fun. You can calculate the horizontal and vertical acceleration based on the time of flight, you can also figure out the initial speed based on how far it went, or you can just make it and have fun with it. Here it is:
 This experiment is for Advanced Students. For ages, people have been hurling rocks, sticks, and other objects through the air. The trebuchet came around during the Middle Ages as a way to break through the massive defenses of castles and cities. It’s basically a gigantic sling that uses a lever arm to quickly speed up the rocks before letting go. A trebuchet is typically more accurate than a catapult, and won’t knock your kid’s teeth out while they try to load it.
 Let’s take a good look at Newton’s Laws in motion while making something that flies off in both directions. This experiment will pop a cork out of a bottle and make the cork fly go 20 to 30 feet, while the vehicle moves in the other direction!
 The image shown here is a real picture of an aircraft as it breaks the sound barrier. This aircraft is passing the speed at which sounds travel. The white cloud you see in the photo is related to the shock waves that are forming around the craft as it moves into supersonic speeds. Because the aircraft is moving through air, which is a gas, the gas can compress and results in a shock wave.
