A common misconception in science is that centrifugal and centripetal force (or acceleration) are the same thing. These two terms constantly throw students into frenzy, mostly because there is no clear definition in most textbooks. Here’s the scoop: centripetal and centrifugal force are NOT the same thing!
This experiment is mostly for Advanced Students, but here's a quick lesson you can do with your younger students...
[am4show have='p8;p9;p12;p39;p92;' guest_error='Guest error message' user_error='User error message' ]
Before we jump in, let's recap what we've learned so far. A ball sitting still has a position you can chart on a map (latitude, longitude, and altitude), but no velocity or acceleration, because it's not moving. When you kick the ball, that's when it gets interesting. The second your toe touches the ball, things start to change. Velocity is a change of position. If you kick the ball ten feet, and it takes five seconds to go the distance, the average speed of the ball is 2 feet per second (about 1.4 MPH).
The trickier part of this scenario has to do with acceleration, which is the change in velocity. When you drive on the freeway at a constant 65 MPH, your acceleration is zero. Your speed does not change, so you have no acceleration. Your position is constantly changing, but you have constant speed. For example, when you enter the freeway, your speed changes from zero to 65 MPH in, say, ten seconds. Your acceleration is greatest when your foot first hits the gas – when your speed changes the most – when you’re moving from zero to a higher speed.
There's an interesting effect that happens when you travel in a curve. You can feel the effect of a different type of acceleration when you suddenly turn your car to the right – you will feel a push to the left. If you are going fast enough and you take the turn hard enough, you can get slammed against the door. So -
who pushed you?
Think back to the first law of motion. An object in motion tends to stay in motion unless acted upon by an external force. This is the amazing part – the car is the external force. Your body was the object in motion, wanting to stay in motion in a straight line. The car turns, and your body still tries to maintain its straight path, but the car itself gets in the way. When you slam into the car door, the car is turning itself into your path, forcing you to change direction.
This effect is true when you travel in a car or in a roller coaster. It's the reason the water stays in the bucket when you swing it over your head. Physical motion is everywhere, challenging toddlers learning to walk as well as Olympic downhill skiers to go the distance. Here's a quick experiment you can do right now to wrap your head around this idea:
Here's what you need to find for these experiments:
- bucket
- water
- outdoor area
- you
- clear tubing (about 12-18" long)
- nylon or metal barbed union that fits inside the tubing
- empty soda bottle
- clean wine cork
- string
Bucket Splash
Fill a bucket half-full with water. Grasp the handle and swing it over your head in a circle in the vertical direction. Try spinning around while holding the handle out in front of your chest to swing it in the horizontal plane. Vary your spin speed to find the minimum!
Now let's take a deeper look at centripetal, centrifugal, and how you can measure the g-force when taking a sharp turn in your car:
[/am4show][am4show have='p9;p39;' guest_error='Guest error message' user_error='User error message' ]
For Advanced Students:
Centripetal (translation = “center-seeking” )
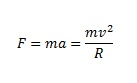
is the force needed to keep an object following a curved path. Remember how objects will travel in a straight line unless they bump into something or have another force acting on it (gravity, drag force, etc.)? Well, to keep the bucket of water swinging in a curved arc, the centripetal force can be felt in the tension experienced by the handle (or your arm, in our case). Swinging an object around on a string will cause the rope to undergo tension (centripetal force), and if your rope isn’t strong enough, it will snap and break, sending the mass flying off in a tangent (straight) line until gravity and drag force pull the object to a stop. This force is proportional to the square of the speed - the faster you swing the object, the higher the force.
Centrifugal (translation = “center-fleeing”)
force has two different definitions, which also causes confusion. The
inertial centrifugal force is the most widely referred to, and is purely mathematical, having to do with calculating kinetic forces using reference frames, and is used with Newton’s laws of motion. It’s often referred to as the ‘fictitious force’.
Reactive centrifugal force happens when objects move in a curved path. This force is actually the same magnitude as centripetal force, but in the opposite direction, and you can think of it as the reaction force to the centripetal force. Think of how you stand on the Earth… your weight pushes down on the Earth, and a reaction force (called the “normal” force) pushes up in reaction to your weight, keeping you from falling to the center of the Earth. A centrifugal governor (spinning masses that regulate the speed of an engine) and a centrifugal clutch (spinning disk with two masses separated by a spring inside) are examples of this kind of force in action.
Say WHAT?!?
Don't worry if these ideas make your brain turn into a pretzel. Most college students take three courses in this before it makes sense to them. Here's one more example: imagine driving a car along a banked turn. The road exerts a centripetal force on the car, keeping the car moving in a curved path (the “banked” turn). If you neglected to buckle your seat belt and the seats have a fresh coat of Armor-All (making them slippery), then as the car turns along the banked curve, you get “shoved” toward the door. But who pushed you? No one – your body wanted to continue in a straight line but the car keeps moving in your path, turning your body in a curve.
The push of your weight on the door is the reactive centrifugal force, and the car pushing on you is the centripetal force.
What about the fictitious (inertial) centrifugal force? Well, if you imagine being inside the car as it is banking with the windows blacked out, you suddenly feel a magical ‘push’ toward the door away from the center of the bend. This “push” is the fictitious force invoked because the car’s motion and acceleration is hidden from you (the observer) in the reference frame moving within the car.
Okay, enough talk for now. Let's make two acceleration-measuring instruments (called 'accelerometers') so you can jump, run, swing, and zoom around to find out how many g's you can pull. You're going to make a cork-accelerometer and a g-force ring, both of which are used by my students when I teach mechanical engineering dynamics.
Cork Accelerometer
Fill an empty soda bottle to the top with water. Modify the soda bottle cap as follows: attach a string 8-10" long to a clean wine cork. Hot glue the free end of the string to the inside of the cap. Place the cork and string inside the bottle and screw on the top (try to eliminate the air bubbles). The cork should be free to bob around when you hold the bottle upside-down.
Download Student Worksheet & Exercises
To use the accelerometer: invert the bottle and try to make the cork move about. Remember – it is measuring acceleration, which is the change in speed. It will only move when your speed
changes. You can do this experiment in a car while doing your other vehicle experiment:
Why Bother With Seatbelts?. The trouble with this accelerometer is that there are no measurements you can take - it's purely visual. This next activity is more accurate at measuring the number of g-s you pull in a sharp turn (whether in a vehicle or in a roller coaster!)
G-Force Ring Accelerometer
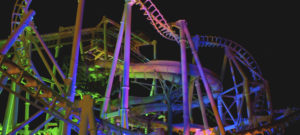
One more university-level gadget for demonstrating the fascinating world of physical dynamics. This quick homemade device roughly measures acceleration in “g’s”. We used it to measure the g-force on roller coasters at Six Flags Magic Mountain, and it worked just as well as the expensive ones you buy in scientific catalogs!
Get about a foot of tubing – the bigger the diameter, the easier it will be to read. Also get a barbed union (plastic barbs work just fine). Fill your tube halfway with COLORED water (it’s impossible to read when it’s clear). Blue, green, red… your choice of food dye additive. Make an O-shape using your barb to water-seal the junction. Grab hold of one side and hold the circle vertical, with the barb-end pointing to the sky. The water should fill the bottom half, and air fills the top half. Make sure there are equal amounts of water and air in your tube. Make a mark on the tube where the water meets the air with a black marker. This is your 0-g reading (relative, of course). No acceleration. Not a whole lot of fun.
Now, for your 1-g mark – measure up 45 degrees from the first mark. (If the top of the circle is 90 degrees, and the 0-g mark is zero degrees, find the halfway point and label it).
The 2-g mark is 22.5 degrees up from the 1-g mark.
3-g mark is 11.25 degrees up from the last mark. And 4-g is 5.6 degrees up from the last mark. (See a pattern? You can prove this mathematically in college, and it’s kind of fun to figure out!)
Now, next time mom drives around town, hold the tube in your hand so that the water line starts at the zero mark. When she pulls a turn, see how far it sloshes up and tell her how many g’s she pulled. We also used to have contests to see who could pull the most g’s while spinning in a circle. Have fun!
Advanced Students:
Advanced Students: Download your
G-Force lab here.
Exercises
- Which accelerometer was better at giving a visual representation of accelerating?
- Which one do you prefer? Why?
- What activity did you do that created the most acceleration?
- What does that tell you about acceleration?
Click here to go to next lesson on Rotating Candles.
[/am4show]


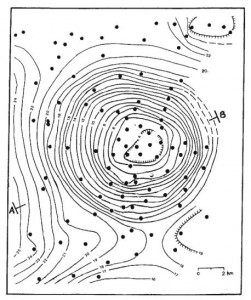 First, the crust is not uniform. There are lumps and clumps everywhere that vary the density add up to make small variations in the force of gravity that we can actually measure with objects in free-fall motion. It’s actually how scientists find pockets of oil in the earth. They measure the surface gravity and plot it out, and if there’s a large enough deviation, it means there’s something interesting underground.
 Centrifugal (translation = “center-fleeing”) force has two different definitions, which causes even more confusion. The inertial centrifugal force is the most widely referred to, and is purely mathematical, having to do with calculating kinetic forces using reference frames, and is used with Newton’s laws of motion. It’s often referred to as the ‘fictitious force’.

 As Phillip holds the ball at the top of the building, the ball has 100 Joules of potential energy (the number is just an example). When he drops it, the potential energy of the ball drops since the height of the ball gets less and less. At the same time, however, kinetic energy increases because the speed of the ball increases. All the way down, the sum of the two energies equals 100. No energy gets lost, it only gets transferred. Energy is conserved.
Now here’s a question you may be asking yourself, “If energy is neither created or destroyed in a closed system then why doesn’t a pendulum swing forever?”
That’s a very good question. Energy is neither created or destroyed, but it can be transferred into non- useful energy.
In the case of a pendulum, every swing loses a little bit of energy,which is why each swing goes slightly less high (achieves slightly less PE) than the swing before it. Where does that energy go? To heat. The second law of thermodynamics states basically that eventually all energy ends up as heat. If you could measure it, you’d find that the string, and the weight have a slightly higher temperature then they did when they started due to friction. The energy of your pendulum is lost to heat!
If you could prevent the loss of energy to useless energy, you could create a perpetual motion machine. A machine that works forever! There have been a lot of folks who have spent a lot of time trying to make a perpetual motion machine. So far, they have all failed. A perpetual motion machine is one that is said to be 100% energy efficient. In other words all the energy that goes into it goes to useful energy.
Your pendulum could be said to be about 90% efficient.Very little energy is converted into useless energy. In most systems, energy is converted to useless heat and sound energy.
As Phillip holds the ball at the top of the building, the ball has 100 Joules of potential energy (the number is just an example). When he drops it, the potential energy of the ball drops since the height of the ball gets less and less. At the same time, however, kinetic energy increases because the speed of the ball increases. All the way down, the sum of the two energies equals 100. No energy gets lost, it only gets transferred. Energy is conserved.
Now here’s a question you may be asking yourself, “If energy is neither created or destroyed in a closed system then why doesn’t a pendulum swing forever?”
That’s a very good question. Energy is neither created or destroyed, but it can be transferred into non- useful energy.
In the case of a pendulum, every swing loses a little bit of energy,which is why each swing goes slightly less high (achieves slightly less PE) than the swing before it. Where does that energy go? To heat. The second law of thermodynamics states basically that eventually all energy ends up as heat. If you could measure it, you’d find that the string, and the weight have a slightly higher temperature then they did when they started due to friction. The energy of your pendulum is lost to heat!
If you could prevent the loss of energy to useless energy, you could create a perpetual motion machine. A machine that works forever! There have been a lot of folks who have spent a lot of time trying to make a perpetual motion machine. So far, they have all failed. A perpetual motion machine is one that is said to be 100% energy efficient. In other words all the energy that goes into it goes to useful energy.
Your pendulum could be said to be about 90% efficient.Very little energy is converted into useless energy. In most systems, energy is converted to useless heat and sound energy.
 If you’re finding that the marbles fall out before the bobsled reaches the bottom of the slide, you need to either crimp the foil more closely around the marbles or decrease your hill height.
 Imagine an arrow is shot from a bow and by the time it hits an apple it is traveling with 10 Joules of kinetic energy (kinetic energy is the energy of motion). What’s meant by kinetic energy is that when it hits something, it can do that much work on whatever is hit.