This is a recording of a recent live teleclass I did with thousands of kids from all over the world. I’ve included it here so you can participate and learn, too! (Click here if you’re looking for the more recent version that also includes Chemical Engineering.)


When you think of slime, do you imagine slugs, snails, and puppy kisses? Or does the science fiction film The Blob come to mind? Any way you picture it, slime is definitely slippery, slithery, and just plain icky — and a perfect forum for learning real science. But which ingredients work in making a truly slimy concoction, and why do they work? Let’s take a closer look…


Materials:


  • Sodium tetraborate (also called “Borax” – it’s a laundry whitener) – about 2 tablespoons
  • Clear glue or white glue (clear works better if you can find it) – about 1/2 cup
  • Yellow highlighter
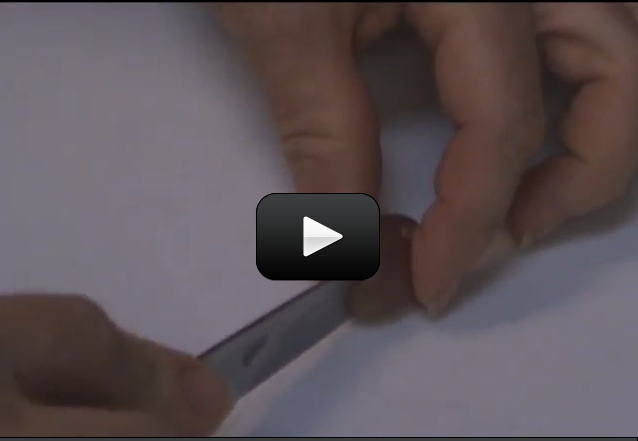
  • Pliers or sharp razor (with adult help). (PREPARE: Use this to get the end off your highlighter before class starts so you can extract the ink-soaked felt inside. Leave the felt inside highlighter with the end loosely on (so it doesn’t dry out))
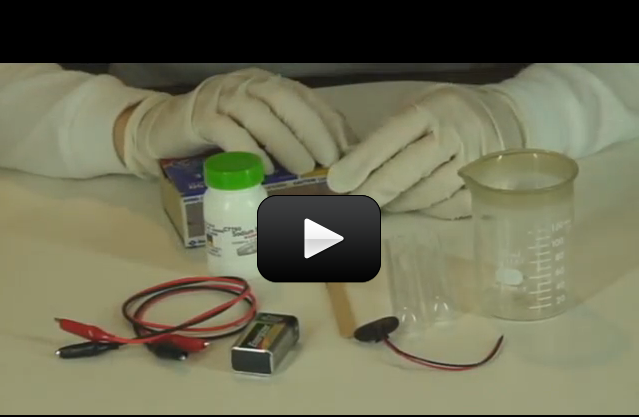
  • Resuable Instant Hand Warmer that contains sodium acetate (Brand Name: EZ Hand Warmer) – you’ll need two of these
  • Scissors
  • Glass half full of COLD water (PREPARE: put this in the fridge overnight)
  • Mixing bowl full of ice (PREPARE: leave in freezer)
  • Salt
  • Disposable aluminum pie place or foil-wrapped paper plate
  • Disposable cups for solutions (4-6)
  • Popsicle sticks for mixing (4-6)
  • Rubber gloves for your hands
  • Optional: If you want to see your experiments glow in the dark, you’ll need a fluorescent UV black light (about $10 from the pet store – look in cleaning supplies under “Urine-Off” for a fluorescent UV light). UV flashlights and UV LEDs will not work.

[am4show have=’p8;p9;p11;p38;p101;’ guest_error=’Guest error message’ user_error=’User error message’ ]


Key Concepts

If you’ve ever mixed together cornstarch and water, you know that you can get it to be both a liquid and a solid at the same time. (If you haven’t you should definitely try it! Use a 2:1 ratio of cornstarch:water.) The long molecular chains (polymers) are all tangled up when you scrunch them together (and the thing feels solid), but the polymers are so slick that as soon as you release the tension, they slide free (and drips between your fingers like a liquid).


Scientists call this a non-Newtonian fluid. You can also fill an empty water bottle or a plastic test tube half-full with this stuff and cap it. Notice that when you shake it hard, the slime turns into a solid and doesn’t slosh around the tube. When you rotate the tube slowly, it acts like a liquid.


Long, spaghetti-like chains of molecules (called polymers) don’t clump together until you cross-link the molecule strands (polymers) together into something that looks more like a fishnet. This is how we’re going to make slime.


What’s Going On?

Imagine a plate of spaghetti. The noodles slide around and don’t clump together, just like the long chains of molecules (called polymers) that make up slime. They slide around without getting tangled up. The pasta by itself (fresh from the boiling water) doesn’t hold together until you put the sauce on. Slime works the same way. Long, spaghetti-like chains of molecules don’t clump together until you add the sauce – something to cross-link the molecule strands together.


The borax mixture holds the glue mixture together in a gloppy, gelatinous mass. In more scientific terms, the sodium tetraborate cross-links the long polymer chains in the glue to form the slime.


Why does the slime glow? Note that a black light emits high-energy UV light. You can’t see this part of the spectrum (just as you can’t see infrared light, found in the beam emitted from the remote control to the TV), which is why “black lights” were named that. Stuff glows because fluorescent objects absorb the UV light and then spit light back out almost instantaneously. Some of the energy gets lost during that process, which changes the wavelength of the light, which makes this light visible and causes the material to appear to glow.


Questions to Ask

  1. What happens when you freeze your slime? Is there a color change?
  2. How long does it take to thaw your slime in the microwave?
  3. Do you see the little bubbles in your slime?
  4. How many states of matter do you have in your slime now?
  5. Does this work with any laundry detergent, or just borax?
  6. What happens if you omit the water in the 50-50- glue-water mixture, and just use straight glue? (Hint – use the glow juice with the borax to keep the glowing feature.)
  7. Does your slime pick up newsprint from a newspaper?
  8. What other kinds of glue work well with this slime?

[/am4show]


This experiment is just for advanced students. If you guessed that this has to do with electricity and chemistry, you’re right! But you might wonder how they work together. Back in 1800, William Nicholson and Johann Ritter were the first ones to split water into hydrogen and oxygen using electrolysis. (Soon afterward, Ritter went on to figure out electroplating.) They added energy in the form of an electric current into a cup of water and captured the bubbles forming into two separate cups, one for hydrogen and other for oxygen.

This experiment is not an easy one, so feel free to skip it if you need to. You don’t need to do this to get the concepts of this lesson but it’s such a neat and classical experiment (my students love it) so you can give it a try if you want to. The reason I like this is because what you are really doing in this experiment is ripping molecules apart and then later crashing them back together.

Have fun and please follow the directions carefully. This could be dangerous if you’re not careful. The image shown here is using graphite from two pencils sharpened on both ends, but the instructions below use wire.  Feel free to try both to see which types of electrodes provide the best results.

[am4show have='p8;p9;p11;p38;p92;p40;p76;p91;p58;' guest_error='Guest error message' user_error='User error message' ]

You will need:

  • 2 test tubes or thin glass or plastic something closed at one end. I do not recommend anything wider than a half inch in diameter.
  • 2 two wires, one needs to be copper, at least 12 inches long. Both wires need to have bare ends.
  • 1 cup
  • sodium sulfate OR salt
  • Water
  • One 9 volt battery
  • Long match or a long thin piece of wood (like a popsicle stick) and a match
  • Rubber bands
  • Masking tape

Download Student Worksheet & Exercises
1. Fill the cup with water.

2. Put a tablespoon of salt or sodium sulfate into the water and stir it up. (The salt allows the electricity to flow better through the water.)

2. Put one wire into the test tube and rubber band it to the test tube so that it won’t come out (see picture).

3. Use the masking tape to attach both wires to the battery. Make sure the wire that is in the test tube is connected to the negative (-) pole of the battery and that the other is connected to the positive (+) pole. Don’t let the bare parts of the different wires touch. They could get very hot if they do.

4. Fill the test tube to the brim with the salt water.

5. This is the tricky part. Put your finger over the test tube, turn it over and put the test tube, open side down, into the cup of water. (See picture.)

6. Now put the other wire into the water. Be careful not to let the bare parts of the wires touch.

7. You should see bubbles rising into the test tube. If you don’t see bubbles, check the other wire. If bubbles are coming from the other wire either switch the wires on the battery connections or put the wire that is bubbling into the test tube and remove the other. If you see no bubbles check the connections on the battery.

8. When the test tube is half full of gas (half empty of salt water depending on how you look at it) light the long match or the wooden stick. Then take the test tube out of the water and let the water drain out. Holding the test tube with the open end down, wait for five seconds and put the burning stick deep into the test tube (the flame will probably go out but that’s okay). You should hear an instant pop and see a flash of light. If you don’t, light the stick again and try it another time. For some reason, it rarely works the first time but usually does the second or third.

A water molecule, as you saw before, is two hydrogen atoms and one oxygen atom. The electricity encouraged the oxygen to react with the copper wire leaving the hydrogen atoms with no oxygen atom to hang onto. The bubbles you saw were caused by the newly released hydrogen atoms floating through the test tube in the form of hydrogen gas. Eventually that test tube was part way filled with nothing but pure hydrogen gas.

But how do you know which bubbles are which? You can tell the difference between the two by the way they ignite (don’t’ worry – you’re only making a tiny bit of each one, so this experiment is completely safe to do with a grown up).

It takes energy to split a water molecule. (On the flip side, when you combine oxygen and hydrogen together, it makes water and a puff of energy. That’s what a fuel cell does.) Back to splitting the water molecule - as the electricity zips through your wires, the water molecule breaks apart into smaller pieces: hydrogen ions (positively charged hydrogen) and oxygen ions (negatively charged oxygen). Remember that a battery has a plus and a minus charge to it, and that positive and negative attract each other.

So, the positive hydrogen ions zip over to the negative terminal and form tiny bubbles right on the wire. Same thing happens on the positive battery wire. After a bit of time, the ions form a larger gas bubble. If you stick a cup over each wire, you can capture the bubbles and when you’re ready, ignite each to verify which is which.

If the match burns brighter, the gas is oxygen. If you hear a POP!, the gas is hydrogen. Oxygen itself is not flammable, so you need a fuel in addition to the oxygen for a flame. In one case, the fuel is hydrogen, and hence you hear a pop as it ignites. In the other case, the fuel is the match itself, and the flame glows brighter with the addition of more oxygen.

When you put the match to it, the energy of the heat causes the hydrogen to react with the oxygen in the air and “POP”, hydrogen and oxygen combine to form what? That’s right, more water. You have destroyed and created water! (It’s a very small amount of water so you probably won’t see much change in the test tube.)

The chemical equations going on during this electrolysis process look like this:

A reduction reaction is happening at the negatively charged cathode. Electrons from the cathode are sticking to the hydrogen cations to form hydrogen gas:

2 H+(aq) + 2e- --> H2(g)

2 H2O(l) + 2e- --> H2(g) + 2 OH-(aq)

The oxidation reaction is occurring at the positively charged anode as oxygen is being generated:

2 H2O(l)  --> O2(g) + 4 H+(aq) + 4e-

4 OH-(aq) --> O2(g) + 2 H2O(l) + 4 e-

Overall reaction:

2 H2O(l)  --> 2 H2(g) + O2(g)

Note that this reaction creates twice the amount of hydrogen than oxygen molecules. If the temperature and pressure for both are the same, you can expect to get twice the volume of hydrogen to oxygen gas (This relationship between pressure, temperature, and volume is the Ideal Gas Law principle.)

This is the idea behind vehicles that run on sunlight and water.  They use a solar panel (instead of a 9V battery) to break apart the hydrogen and oxygen and store them in separate tanks, then run them both back together through a fuel cell, which captures the energy (released when the hydrogen and oxygen recombine into water) and turns the car's motor. Cool, isn't it?

Note: We're going to focus on Alternative Energy in Unit 12 and create all sorts of various energy sources including how to make your own solar battery, heat engine, solar & fuel cell vehicles (as described above), and more!

Exercises

  1. Why are bubbles forming?
  2. Did bubbles form at both wires, or only one? What kind of bubbles are they?
  3. What would happen if you did this experiment with plain water? Would it work? Why or why not?
  4. Which terminal (positive or negative) produced the hydrogen gas?
  5. Did the reaction create more hydrogen or more oxygen?

[/am4show]


CAUTION!! Be careful with this!! This experiment uses a knife AND a microwave, so you’re playing with things that slice and gets things hot. If you’re not careful you could cut yourself or burn yourself. Please use care!


We’re going to create the fourth state of matter in your microwave using food.  Note – this is NOT the kind of plasma doctors talk about that’s associated with blood.  These are two entirely different things that just happen to have the same name.  It’s like the word ‘trunk’, which could be either the storage compartment of a car or an elephant’s nose.  Make sense?


Plasma is what happens when you add enough energy (often in the form of raising the temperature) to a gas so that the electrons break free and start zinging around on their own.  Since electrons have a negative charge, having a bunch of free-riding electrons causes the gas to become electrically charged.  This gives some cool properties to the gas.  Anytime you have charged particles (like naked electrons) off on their own, they are referred to by scientists as ions.  Hopefully this makes the dry textbook definition make more sense now (“Plasma is an ionized gas.”)


So here’s what you need:


[am4show have=’p8;p9;p13;p40;p68;’ guest_error=’Guest error message’ user_error=’User error message’ ]


  • microwave (not a new or expensive one)
  • a grape
  • a knife with adult help


Download Student Worksheet & Exercises


1. Carefully cut the grape almost in half. You want to leave a bit of skin connecting the two halves.


2. Open the grape like a book. In other words, so that the two halves are next to one another still attached by the skin.


3. Put the grape into the microwave with the outside part of the grape facing down and the inside part facing up.


4. Close the door and set the microwave for ten seconds. You may want to dim the lights in the room.


s2You should see a bluish or yellowish light coming from the middle section of the grape. This is plasma! Be careful not to overcook the grape. It will smoke and stink if you let it overcook. Also, make sure the grape has time to cool before taking it out of the microwave.


Other places you can find plasma include neon signs, fluorescent lights, plasma globes, and small traces of it are found in a flame.


Note: This experiment creates a momentary, high-amp short-circuit in the oven, a lot like shorting your stereo with low-resistance speakers. It’s not good to operate a microwave for long periods with little to nothing in them.  This is why we only do it for a few seconds. While this normally isn’t a problem in most microwaves, don’t do this experiment with an expensive microwave or one that’s had consistent problems, as this might push it over the edge.


[/am4show]


emperorpenguinsDensity is basically how tightly packed atoms are. Mathematically, density is mass/volume. In other words, it is how heavy something is, divided by how much space it takes up. If you think about atoms as marbles (which we know they’re not from the last lessons but it’s a useful model), then something is more dense if its marbles are jammed close together.


For example, take a golf ball and a ping pong ball. Both are about the same size or, in other words, take up the same volume. However, one is much heavier, has more mass, than the other. The golf ball has its atoms much more closely packed together than the ping pong ball and as such the golf ball is denser.


This experiment builds on the Play With Your Food experiment, so we’ll be learning more about density.  Are you ready?


[am4show have=’p8;p9;p13;p40;’ guest_error=’Guest error message’ user_error=’User error message’ ]


Gather your materials:


  • small paper cups
  • a scale that measures small masses (a kitchen scale is good)
  • bunches of different small stuff (pennies, cereal, marbles, etc.)
  • a little water and/or other liquids (milk, syrup, etc.)
  • pencil, paper
  • measuring cup (optional)
  • container that’s larger and deeper then the small paper cup (optional)

1. Put a line with a pencil on the inside and on the outside of the paper cup about half an inch (centimeter) from the top.


2. Fill the cup to the line with whatever kind of stuff you’re using.


3. Weigh the cup and record its mass.


4. Empty the cup and fill it with something else. Record its mass as well.


5. Continue until you’ve done at least five different masses.


For advanced students:

[/am4show][am4show have=’p9;p40;’ guest_error=’Guest error message’ user_error=’User error message’ ]


The following steps are optional. They will help you find out the volume of the materials you’re using. I recommend doing this only if the math won’t turn you off to the concept.


6. Take your larger container, fill it to the brim and place it into your bowl.


7. Take your paper cup and push it into the larger container. Push it in until it reaches the line on the outside of your cup. You should have water coming out of your glass and going into your bowl. Pull the paper cup out of the container and pull the container out of the bowl.


8. Take the water in the bowl and pour it into the measuring cup. Write down the measurement. This is the volume of the cup. Since you are using the same volume for each measurement, (you’re filling the cup to the same line each time) you only need to do this once.


9. Lastly, take your masses and divide each one by the volume. This will give you the density of each material.


So, there you go. Density is mass and volume. How heavy is it and how much space does it take up. If something has a great density, its atoms are very tightly packed together.


There’s a great story about Archimedes and density. The story goes that the king gave a crown maker a hunk of gold and the crown maker was supposed to make a crown using all the gold. Later the king got the crown but, being suspicious, wondered if the crown maker really used all the gold or if he cheated and kept some of it.


Supposedly the king was really bothered by this and felt he needed to find out. He went to Archimedes and asked him to find out if, indeed, he had been cheated or not. At the time, this was a very difficult question. Archimedes knew how heavy it should be if it was a certain volume, but only knew how to get the volume by multiplying length x width x height. How do you do that with an ornate crown? Needless to say the king was against smashing the crown into a cube!


The story goes that this problem possessed Archimedes and he spent so much time thinking about it that he rarely ate, rarely slept and never bathed! Supposedly, that behavior wasn’t that uncommon for him when he was tackling tough problems. Finally his servants, who could no longer stand it, dragged him kicking and screaming to the bath.


The story goes that Archimedes noticed, as he slipped into the bath, that the water rose around him. He discovered that the water he displaced was a way to measure his volume and lo and behold the same method could be used to measure the volume of the crown! Supposedly, he was so excited about this that he jumped out of the tub and ran through the streets stark naked yelling “Eureka! Eureka!” Which means “I found it! I found it!”. He used this method on the crown and to the king’s disappointment (and the crown maker’s too) the crown was indeed missing some gold.


[/am4show]


Density is basically how tightly packed atoms are. (Mathematically, density is mass divided by volume.) For example, take a golf ball and a ping pong ball. Both are about the same size or, in other words, take up the same volume.


However, one is much heavier, has more mass, than the other. The golf ball has its atoms much more closely packed together than the ping pong ball and as such the golf ball is denser.


These are quick and easy demonstrations for density that use simple household materials:
[am4show have=’p8;p9;p13;p40;p68;’ guest_error=’Guest error message’ user_error=’User error message’ ]


Density Jar

You will need to find:


  • glass jar
  • water
  • vegetable oil
  • liquid dish soap
  • honey
  • corn syrup
  • molasses
  • rubbing alcohol
  • lamp oil (optional)

Fill a clear glass partway with water. Drizzle in cooking oil. What do you see happening? Try adding in liquid dish soap (make sure it’s a different color form the water and the oil for better visibility.)


What else can you add in? What about honey, corn syrup, molasses, rubbing alcohol, or lamp oil? Use a turkey baster to help you pour the liquids in very slowly so they don’t mix. You’ll get the best results if you start with the heaviest liquids.


Download Student Worksheet & Exercises


Hot & Cold Swirl

To clearly illustrate how hot and cold air don’t mix, find two identical glasses.  Fill one glass to the brim with hot water.  Add a drop or two of red food coloring and watch the patterns.  Now fill the other glass to the top with very cold water and add drops of blue dye.  Do you notice a difference in how the food coloring flows?


Get a thick sheet of heavy paper (index cards work well) and use it to cap the blue glass.  Working quickly, invert the glass and stack it mouth-to-mouth with the red glass.  This is the tricky part: When the glasses are carefully lined up, remove the card.  Is it different if you invert the red glass over the blue?


[/am4show]


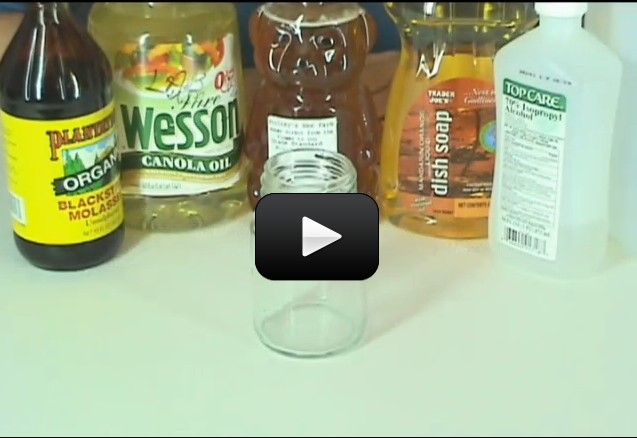
This is a simple experiment that really shows the relationship of mass, volume, and density.  You don't need anything fancy, just a piece of bread.  If you do have a scale that can measure small masses (like a kitchen scale), bring it out, but it is not essential.

Here's what you do: [am4show have='p8;p9;p13;p40;' guest_error='Guest error message' user_error='User error message' ]

1. Grab a piece of bread.

2. If you have a scale, weigh the bread to get the mass of the bread.

3. Now, have a little fun and squish the bread into the smallest ball you can!

4. Check the weight (mass) again.

Soooo, what happened? The bread had the same mass before and after squishification right? But did it have the same density? Nope. You, very cleverly and with great strength squeezed those bread atoms closer together. So the bread ball, had a much higher density than the slice of bread did. Same mass, different volume.

Download Student Worksheet [/am4show]

A gram of water (about a thimble of water) contains 1023 atoms. (That’s a ‘1’ with 23 zeros after it.) That means there are 1,000,000,000,000,000,000,000,000 atoms in a thimble of water! That’s more atoms than there are drops of water in all the lakes and rivers in the world.


Nearly all the mass of an atom is in its nucleus which occupies less than a trillionth of the volume of the atom. They are very dense. If you could pack nuclei like marbles, into something the size of a large pea, they would weigh about a billion tons! That’s 2,000,000,000,000 pounds! More than the weight of 20,000 battle ships! That’s a heavy pea!


[am4show have=’p8;p9;p13;p40;p80;’ guest_error=’Guest error message’ user_error=’User error message’ ]


The distance from the nucleus to the electron is 100,000 times the diameter of the nucleus itself. So, if you were to somehow blow up a nucleus to be the size of a golf ball, the electron would be 8,300 feet away or more than 1.5 miles from the golf ball. If you put that golf ball on the ground, you would need to climb to the top of five and a half Sears Towers to get to the electron!


Danish physicist David Bohr, a famous scientist who won the Nobel Prize in Physics in 1922 for his work with the atomic structure.

Let’s compare this to the Sun and the Earth. (In the picture on the left, the tiny dot in the left size is the actual size of the Earth. The Earth is really not this close to the sun – we just wanted you to get a feel for the sizes of both.) We’ll be doing more about distances and sizes when we do our lesson in Astronomy, but for now, we’ll just use this quick example:


If you shrank the Sun down to a golf ball, the Earth would only be 9 inches away. Nine inches vs. 1.5 miles! There is 11,000 times more distance (to scale) between the nucleus and an electron than there is between the Sun and the Earth!


Here’s one last example – if you enlarged the hydrogen atom (one proton in the nucleus and one electron in a shell) so that it’s the size of the Earth, the electron would be skimming along on the surface of the Earth while the nucleus (just a proton in this instance) would be only the size of a basketball deep inside the core. The rest, from the core to the surface, is empty space.  (Look out your window – can you even see the curvature of the Earth from where you are?  Probably not – it’s just too vast a distance!)


Are you mind-boggled? What this is basically saying, is that matter is virtually empty. The nucleus, which is incredibly tiny and quite heavy for it’s size, is outrageously far away from its electrons. An atom has almost nothing in it and yet everything we come in contact with is made of this ‘nothing’! I don’t know about you, but I find that fantastic!


We will talk more about this wacky atom thing and we’ll get into more detail about the even wackier electron. In the meantime, try to think about everything as a bunch of atoms. The next time you drink milk, you’re drinking atoms. The next time you feel wind, you’re feeling atoms. A lot of things become a bit clearer if you think of objects as being nothing more than bunches of small particles stuck together.


[/am4show]


We're going to watch how density works by making a simple lava lamp that doesn't need electricity! If you like to watch blob-type shapes shift and ooze around, then this is something you're going to want to experiment with.  but don't feel that you have to use the materials mentioned below - feel free to experiment with other liquids you have around the house, and be sure to let me know what you've found in the comment section below.

All you need is about 10 minutes and a few quick items you already have around the house.  Are you ready?

[am4show have='p8;p9;p13;p40;p68;p79;' guest_error='Guest error message' user_error='User error message' ] Here's what you need to find:
  • empty glass jar with straight sides (if possible)
  • vegetable oil
  • salt
  • water
  • food dye


Fill a water glass halfway with colored water, and add a 1/2" layer of oil on top. Shake salt over the oil layer and watch the lava lamp start to work! You'll see the bottom oil layer move as a salt-oil-drop falls to the bottom of the glass. Over a few minutes, the oil breaks free of the salt and moves back up to rejoin the oil layer on top.


Download Student Worksheet

What's happening? You're actually watching the salt itself fall through the oil. However, the oil sticks to the salt to form a larger object, and since the salt is heavier than oil and water, the whole mess plunks to the bottom of the glass. At the bottom of your cup, the oil breaks free of the salt (eventually) and rises back up. Does it matter if you heat the oil, chill the water, or vice versa? Is there anything that works better than salt?

Going Further: Unscrew the camp and add a broken-up effervescent tablet (like alka-seltzer) to your bottle. Cap it and watch what happens! Did it react with water, oil or both? What if you turn off the lights and shine a flashlight through it? [/am4show]