Before we get too technical with sound and learning about what it is, let’s have some fun looking at sound waves. Make sure you’re not doing this experiment with good speakers, because you may damage them!
[am4show have=’p9;p58;’ guest_error=’Guest error message’ user_error=’User error message’ ]
Here’s what you need:
- a radio or some sort of music player
- a balloon
- a mixing bowl
- water
- your parent’s permission
1. Turn on your music player and turn it up fairly loud. (Tell your parents that it’s for science!)
2. Take a look at your speaker. You should be able to see it vibrating. If there’s a song with a lot of bass, you should really be able to see it moving.
3. Put your hand on the speaker. Can you feel the vibrations?
4. ASK YOUR PARENTS if you can carefully put a half-filled bowl of water on top of your speaker. You should be able to see the water vibrate.
Remember that sound is nothing more than vibrating molecules. All speakers do is get molecules of air to vibrate, creating longitudinal waves. They push air. Your eardrums vibrate just like the speakers do when the longitudinal waves of sound energy hit your ears.
How to Feel the Beat
1. Inflate the balloon. Get it fairly large.
2. Turn the music on loud (the more bass the better).
3. Put both hands lightly on the balloon.
4. Walk around the room holding the balloon lightly between your hands.
5. Try to feel the balloon vibrating.
6. Does the balloon vibrate more for low sounds or high sounds?
7. If you have a synthesizer (piano keyboard) you may want to try turning it up a bit and playing one note at a time. You should notice that the balloon vibrates more or less as you go up and down the musical scale. At very high notes, your balloon may not vibrate at all. We’ll talk more about why this happens later.
What’s causing the balloon to vibrate? Energy. Energy causes objects to move a distance against a force. The sound energy coming from the speakers is causing the balloon to vibrate. Your ear drums move in a very similar way to the balloon. Your ear drum is a very thin membrane (like the balloon) that is moved by the energy of the sound. Your ear drum, however, is even more sensitive to sounds than the balloon which is why you can hear sounds when the balloon is not vibrating. If you ear drum doesn’t vibrate, you don’t hear the sound.
What to do this experiment but no speakers?
Here’s another version of the same idea – I’ll bet you did this experiment when you were a small baby! You need: a mixing bowl (one of those metal bowls), something to hit it with ( a wooden spoon works well), and water.
1. Take the mixing bowl and put it on the table.
2. Smack it with the wooden spoon.
3. Listen to the sound.
4. Put your ear next to the bowl and try to hear how long the sound continues.
5. Now hit the bowl again.
6. Touch the bowl with your hand a second or two after you hit it. You should hear the sound stop. This is called dampening.
7. Now, for fun, fill the bowl with water up to an inch or so from the top.
8. Smack the bowl again and look very carefully at where the bowl touches the water.
9. When you first hit the bowl, you should see very small waves in the water.
I want you to notice two things here. Sound is vibration. When the bowl is vibrating, it’s making a sound. When you stop it from vibrating, it stops making sound. Any sound you ever hear, comes from something that is vibrating. It may have vibrated once, like a balloon popping. Or it may be vibrating consistently, like a guitar string.
The other thing I want you to notice is that you can actually see the vibrations. If you put water in the bowl, the tiny waves that are formed when you first hit the bowl are caused by the vibrating sides of the bowl. Those same vibrations are causing the sound that you hear.
 If your mom’s worried about making a mess with water (and it’s not bath night tonight) then try this alternate experiment: you’ll need a mixing bowl, wooden spoon, and rubber bands.
1. Stretch a few rubber bands around the box or the bowl. If possible, use different thicknesses of rubber bands.
2. Strum the rubber bands.
3. Feel free to adjust how stretched the bands are. The more stretched, the higher the note.
4. Try plucking a rubber band softly.
5. Now pluck it fairly hard. The hard pluck should be louder.
Again I’d like you to notice three things here. Just like the last experiment, you should see that the sound is coming from the vibration. As long as the rubber band vibrates, you hear a sound. If you stop the rubber band from vibrating, you will stop the sound. Sound is vibration.
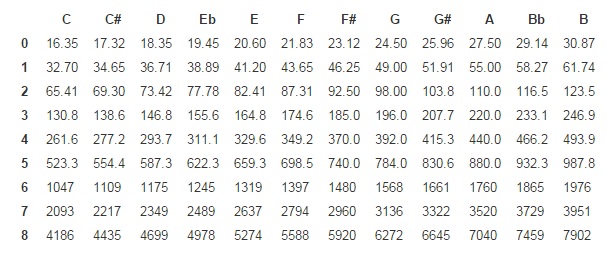
The second thing I’d like you to notice is that the rubber bands make different pitched sounds. The thinner the rubber band, or the tighter it’s stretched, the faster it vibrates. Another way to say “vibrating faster” is to say higher frequency. In sound, the higher the frequency of vibration, the higher the pitch of the note. The lower the frequency, the lower the pitch of the note. The average human ear can hear sound at as high a frequency as 20,000 Hz, and as low as 20 Hz. Pianos, guitars, violins and other instruments have strings of various sizes so that they can vibrate at different frequencies and make different pitched sounds. When you talk or sing, you change the tension of your vocal cords to make different pitches.
One last thing to notice here is what happened when you plucked the rubber band hard or softly. The rubber band made a louder noise the harder you plucked it right? Remember again that sound is energy. When you plucked that rubber band hard, you put more energy into it than when you plucked it softly. You gave energy (moved the band a distance against a force) to the rubber band. When you released the rubber band, it moved the air against a force which created sound energy. For sound, the more energy it has, the louder it is. Remember when we talked about amplitude a few lessons back? Amplitude is the size of the wave. The more energy a wave has the bigger it is. When it comes to sound, the larger the wave (the more energy it has) the louder it is. So when you plucked the rubber band hard (gave it lots of energy), you made a louder sound.
I said this in the beginning but I’ll repeat it here, hoping that now it makes more sense. When something vibrates, it pushes particles against a force (creates energy). These pushed particles create longitudinal waves. If the longitudinal waves have the right frequency and enough energy (loudness), your ear drum antennas will pick it up and your brain will translate the energy into what we call sound.
Exercises
- What is sound?
- How does the rubber band make different sounds?
- What difference does it make how hard or soft you pluck the rubber bands?
Click here to go to next lesson on Sound Properties.
[/am4show]
 Charles Benhamho (1895) created a toy top painted with the pattern (images on next page). When you spin the disk, arcs of color (called “pattern induced flicker colors”) show up around the disk. And different people see different colors!
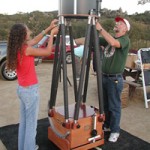 So you’ve played with lenses, mirrors, and built an optical bench. Want to make a real telescope? In this experiment, you’ll build a Newtonian and a refractor telescope using your
 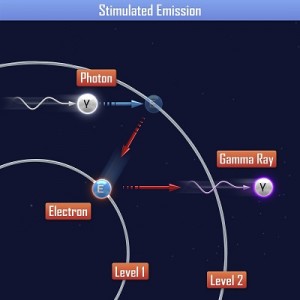 Have you ever wondered why you just can’t just shine a flashlight through a lens and call it a laser? It’s because of the way a laser generates light in the first place.
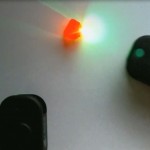 Gummy bears are a great way to bust one of the common misconceptions about light reflection. The misconception is this: most students think that color is a property of matter, for example if I place shiny red apple of a sheet of paper in the sun, you’ll see a red glow on the paper around the apple.
 Sound can change according to the speed at which it travels. Another word for sound speed is pitch. When the sound speed slows, the pitch lowers. With clarinet reeds, it’s high. Guitar strings can do both, as they are adjustable. If you look carefully, you can actually see the low pitch strings vibrate back and forth, but the high pitch strings move so quickly it’s hard to see. But you can detect the effects of both with your ears.
 So why do we hear a boom at all? Sonic booms are created by air pressure (think of how the water collects at the bow of a boat as it travels through the water). The vehicle pushes air molecules aside in such a way they are compressed to the point where shock waves are formed. These shock waves form two cones, at the nose and tail of the plane. The shock waves move outward and rearward in all directions and usually extend to the ground.
 Sound is everywhere. It can travel through solids, liquids, and gases, but it does so at different speeds. It can rustle through trees at 770 MPH (miles per hour), echo through the ocean at 3,270 MPH, and resonate through solid rock at 8,600 MPH.