A pigment takes incoming light, absorbs certain wavelengths, and reflects the rest so you see a particular color. Pigments change the color of reflected light (or transmitted light, which we’ll get to soon when we cover colored filters.)


[am4show have=’p9;p58;’ guest_error=’Guest error message’ user_error=’User error message’ ]


Pigments are used in fabrics, paints, ink, make-up, food, and many other materials. A pigment is different from a dye in that a dye is usually a liquid or can be made into a liquid by mixing in solution, whereas a pigment is a powder.


Click here to go to next lesson on Color Filters

[/am4show]


When you change the wavelength, you change the color of the light. If you pass a beam white light through a glass filled with water that’s been dyed red, you’ve now got red light coming out the other side. The glass of red water is your filter. But what happens when you try to mix the different colors together?


[am4show have=’p9;p58;’ guest_error=’Guest error message’ user_error=’User error message’ ]


Here’s a second video that shows you how to make your own with nail polish and flashlights…


How does that work? Why do you only see certain wavelengths? Here’s a video on the physics behind it…


Click here to go to next lesson on Paint and Light

[/am4show]


[am4show have=’p9;p58;’ guest_error=’Guest error message’ user_error=’User error message’ ]
Imagine you’re a painter and you’ve only got three colors to paint with. Which colors do you have on your palette?


You should be thinking: red, yellow, and blue. (And yes, you are right if you’re thinking that the real primary colors are cyan, magenta, and yellow, but some folks still prefer to think of the primary colors as red-yellow-blue, but either way, it’s really not important which primary set you choose for this particular lesson. We’ll get more specific and use the right colors in the next lesson, so stick with me for now…)


Here’s a trick question – can you make the color “yellow” with only red, green, and blue as your color palette? If you’re a scientist, it’s not a problem. But if you’re an artist, you’re in trouble already.


The key is that we would be mixing light, not paint. Mixing the three primary colors of light gives white light. If you took three light bulbs (red, green, and blue) and shined them on the ceiling, you’d see white. And if you could magically un-mix the white colors, you’d get the rainbow (which is exactly what prisms do.)


If you’re thinking yellow should be a primary color – it is a primary color, but only in the artist’s world. Yellow paint is a primary color for painters, but yellow light is actually made from red and green light.


Click here to go to next lesson on How to Paint with Light

[/am4show]


It’s true that the primary colors of paint are cyan, yellow, and magneta. The question is, why? It has to do with how pigments reflect light.


[am4show have=’p9;p58;’ guest_error=’Guest error message’ user_error=’User error message’ ]


Your brain doesn’t know the difference between yellow light and two lights overlapping to make yellow light. To the brain, these are the same thing.


Click here to go to next lesson on Rods and Cones

[/am4show]


Your eyes have two different light receptors located on the back of the eyeball. These are the rods, which see black, white and grays can detect different intensities. The cones can detect color when the light strikes the cells that have a color-sensing chemical reaction that gets activated and sends a pulse to the brain. There are three cones: red, which can detect red wavelengths and some orange and yellow, green cones (which can also detect blue and yellow) are the most sensitive to light, and blue cones.


[am4show have=’p9;p58;’ guest_error=’Guest error message’ user_error=’User error message’ ]


So when white light hits your retina, all three cones are activated, and all three cones send signals to the brain, which puts these messages together to see white light.


In order to adapt to the dark, our eyes make a chemical called visual purple. This helps the rods to see and transmit what you see in situations where there is little light.


Your pupils also increase in diameter in the darkness. This allows for a slight increase in the amount of light entering your eye. This combination of visual purple and more light makes it possible for you to see in darker situations. We’ll talk more about this later when we look at The Eye.


Click here to go to next lesson on Light Absorption

[/am4show]


When light hits an object, it can do a number of things: it can transform into heat, be completely absorbed by the object, be reflected and bounce off the object, or be transmitted through the object.


[am4show have=’p9;p58;’ guest_error=’Guest error message’ user_error=’User error message’ ]


The electrons inside of atoms vibrate at different frequencies. When light at the same natural frequency as the electrons in the atom, the electrons absorb the light wave energy and turn it into vibrational motion, which gets transformed into thermal energy (and not reflected or transmitted).


If the frequency of the incoming light matches that of the electrons in the object that the light is striking, then the wavelengths are absorbed. If they don’t match, then reflection and transmission happen.


Click here to go to next lesson on How does light get absorbed?

[/am4show]


Gummy bears are a great way to bust one of the common misconceptions about light reflection. The misconception is this: most students think that color is a property of matter, for example if I place shiny red apple of a sheet of paper in the sun, you’ll see a red glow on the paper around the apple.

Where did the red light come from? Did the apple add color to the otherwise clear sunlight? No. That’s the problem. Well, actually that’s the idea that leads to big problems later on down the road. So let’s get this idea straightened out.


[am4show have=’p8;p9;p19;p46;p89;p99;’ guest_error=’Guest error message’ user_error=’User error message’ ]


Materials:


  • flashlight
  • laser
  • red and green gummy bear


Download your student worksheet here! This download is provided by Laser Classroom. Check out their website for more free downloads and really cool lasers!


It’s really hard to understand that when you see a red apple, what’s really happening is that most of the wavelengths that make up white light (the rainbow, remember?) are absorbed by the apple, and only the red one is reflected. That’s why the apple is red.


When the light hits something, it gets absorbed and either converted to heat, reflected back like on a mirror, or transmitted through like through a window.


When you shine your flashlight light through the red gummy bear, the red gummy is acting like a filter and only allowing red light to pass through, and it absorbs all the other colors. The light coming from out the back end of the gummy bear is monochromatic, but it’s not coherent, not all lined up or in synch with each other. What happens if you shine your flashlight through a green gummy bear? Which color is being absorbed or not absorbed now?


Now remember, the gummy bear does NOT color the light, since white light is made up of all visible colors, red and green light were already in there. The red gummy bear only let red through and absorbed the rest. The green gummy bear let green through and absorbed the rest.


Now…take out your laser. There’s only one color in your laser, right? Shine your laser at your gummy bears. Which gummy bear blocks the light, and which lets it pass through?  Why is that? I’ll give you one minute to experiment with your gummy bears and your lasers.


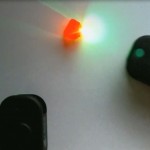
In the image above, the two on the left are green gummy bears, and the two on the right are red gummy bears. The black thing is a laser. The dot on the black laser tells you what color the laser light is, so the laser on the far left is a red laser shining on a green gummy bear. Do you see how the light is really visible out the back end of the gummy bear in only two of the pictures? What does that tell you about light and how it gets transmitted through an object?


[/am4show]


Click here to go to next lesson on Martian Sunsets

Have you ever wondered why the sky is blue? Or why the sunset is red? Or what color our sunset would be if we had a blue giant instead of a white star? This lab will answer those questions by showing how light is scattered by the atmosphere.


[am4show have=’p9;p58;’ guest_error=’Guest error message’ user_error=’User error message’ ]


Particles in the atmosphere determine the color of the planet and the colors we see on its surface. The color of the star also affects the color of the sunset and of the planet.


The colors you see in the sky depends on how light bounces around. The red/orange colors of sunset and sunrise happen because of the low angle the Sun makes with the atmosphere, skipping the light off dust and dirt (not to mention solid aerosols, soot, and smog). Sunsets are usually more spectacular than sunrises, as more “stuff” floats around at the end of the day (there are less particles present in the mornings). Sometimes just after sunset, a green flash can be seen ejecting from the setting Sun.


The Earth appears blue to the astronauts in space because the shorter, faster wavelengths are reflected off the upper atmosphere. The sunsets appear red because the slower, longer wavelengths bounce off the clouds.


Sunsets on other planets are different because they are farther (or closer) to the Sun, and also because they have a different atmosphere than planet Earth. The image shown here is a sunset on Mars. Uranus and Neptune appear blue because the methane in the upper atmosphere reflects the Sun’s light and the methane absorbs the red light, allowing blue to bounce back out.


Click here to go to next lesson on Two-Point Source Interference

[/am4show]


Lasers light is different from light from a flashlight in a couple of different ways. Laser light is monochromatic, meaning that it’s only one color.


[am4show have=’p9;p58;’ guest_error=’Guest error message’ user_error=’User error message’ ]


Laser light is also coherent, which means that the light is all in synch with each other, like soldiers marching in step together. Since laser light is coherent, which means that all the light waves peaks and valleys line up. The dark areas are destructive interference, where the waves cancel each other out. The areas of brightness are constructive interference, where the light adds, or amplifies together. LED light is not coherent because the light waves are not in phase.


Materials:


  • laser
  • flashlight


Download your student worksheet here! This download is provided by Laser Classroom. Check out their website for more free downloads and really cool lasers!


Hold your flashlight very, very close to a sheet of paper at a small angle and look at the light on the paper. Do you see any dark spots, or is it all the same brightness? (It should be the same brightness.)


Now try this with a red laser (do NOT use a green laser). Hold it very close to the paper again at a small angle and look for tiny dark spots, like speckles. Those are coherent waves interfering with each other. It’s really hard to see this, so you may not be able to find it with your eyes. (You can pass the light through a filter (like a gummy bear) to cut down on the intensity so the speckle pattern shows up better.)


What’s happening is this: light travels in waves, and when those waves are in phase (coherent) they interfere with each other in a special way. They cancel each other out (destructive interference) or amplify (constructive interference). This pattern isn’t found with sunlight or light from a bulb because that kind of light all out of phase and doesn’t have this kind of distinct interference pattern.


Light travels in waves, and when those waves are in phase (coherent) they interfere with each other in a special way. They cancel each other out (destructive interference) or amplify (constructive interference). This pattern isn’t found with sunlight or light from a bulb because that kind of light all out of phase and doesn’t have this kind of distinct interference pattern.


[/am4show]


Click here to go to next lesson on Path Difference

Imagine you have a coherent light in a shoebox, and you cut two narrow slits out the side and shine the light on the far wall. The distance from one slit to the wall isn’t going to be exactly the same as the other, so there’s a “path difference”.


[am4show have=’p9;p58;’ guest_error=’Guest error message’ user_error=’User error message’ ]


The path difference refers to the difference in distance two waves from the same light source will travel to reach the same point. At this point, their crests line up in such a way as to interfere with each other. Here’s a more complicated approach to using it. (HINT: if you get lost, skip to the next lesson.. it’s much easier and niftier because it involves airplanes…)


Click here to go to next lesson on When Path Difference Matters

[/am4show]


Here’s a neat way to calculate the height of an airplane in flight using the interference from a radio transmitter…


[am4show have=’p9;p58;’ guest_error=’Guest error message’ user_error=’User error message’ ]


Click here to go to next lesson on Measure the Track Spacing of a DVD and CD

[/am4show]


We’re going to use a laser pointer and a protractor to measure the microscopic spacing of the data tracks on a DVD and a CD. The really cool part is that you’re going to use an interference pattern to measure the spacing of the tracks, something that you can’t normally see with your eyes.


[am4show have=’p9;p58;’ guest_error=’Guest error message’ user_error=’User error message’ ]


We’re going to measure the data track spacing using a diffraction pattern and a little math.


Click here to go to next lesson on Wave-Particle Duality

[/am4show]


This experiment is also known as Young’s Experiment, and it demonstrates how the photon (little packet of light) is both a particle and a wave, and you really can’t separate the two properties from each other. If the idea of a ‘photon’ is new to you, don’t worry – we’ll be covering light in an upcoming unit soon. Just think of it as tiny little packets or particles of light. I know the movie is a little goofy, but the physics is dead-on. Everything that “Captain Quantum” describes is really what occurred during the experiment. Here’s what happened…


[am4show have=’p9;p58;’ guest_error=’Guest error message’ user_error=’User error message’ ]


So basically, any modification of the experiment setup actually determines which slit the electrons go through. This experiment was originally done with light, not electrons. and the interference pattern was completely destroyed (as shown in the end of the video) by an ‘observer’. This shows you that light can either be a wave or a particle, but not both at the same time, and it has the ability to flip between one and the other very quickly.


So, both light and electrons have wave-particle characteristics. Now, take your brain this last final step… it’s easier to see how this could be true for light, you can imagine as a massless photon. But an electron has mass. Which means that matter can also act as a wave. (Twilight zone anyone?)


Click here to go to next lesson on Easy Light Wave-Particle Demonstration

[/am4show]


To show how light acts like a wave, you can pass light through a glass of water and watch the rainbow reflections on the wall. Why does this happen? We’ve already covered this in a previous lesson, but basically when the light passes through the glass and the water, it bends to give different frequencies of light and therefore different colors.
[am4show have=’p9;p58;’ guest_error=’Guest error message’ user_error=’User error message’ ]
Imagine dipping your fingers in a bathtub of water. Can you see the ripples traveling along the top surface? Light travels just like the waves on the surface of the water.


What what about light acting like a particle? Use a camera flash to quickly charge a glow-in-the-dark toy in a dark closet. The light particles (photons) hit the electrons in the toy and transfer energy to the electron. The result is that the electron emits another light particle of a different wavelength, which is why glow-in-the-dark toys don’t reflect back the same color light they were charged with.


Yay! You completed this section! Now it’s time for you to solve physics problems on your own:


Download your Light Waves Problem Set here.

[/am4show]


This is a recording of a recent live teleclass I did with thousands of kids from all over the world. I’ve included it here so you can participate and learn, too!


Sound is a form of energy, and is caused by something vibrating. So what is moving to make sound energy?


Molecules. Molecules are vibrating back and forth at fairly high rates of speed, creating waves. Energy moves from place to place by waves. Sound energy moves by longitudinal waves (the waves that are like a slinky). The molecules vibrate back and forth, crashing into the molecules next to them, causing them to vibrate, and so on and so forth. All sounds come from vibrations.


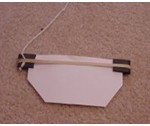
Materials:


  • 1 tongue-depressor size popsicle stick
  • Three 3″ x 1/4″ rubber bands
  • 2 index cards
  • 3 feet of string (or yarn)
  • scissors
  • tape or hot glue

[am4show have=’p8;p9;p100;’ guest_error=’Guest error message’ user_error=’User error message’ ]


What’s Going On?

Do you remember where all waves come from? Vibrating particles. Waves come from vibrating particles and are made up of vibrating particles.


Here’s rule one when it comes to waves…. the waves move, the particles don’t. The wave moves from place to place. The wave carries the energy from place to place. The particles however, stay put. Here’s a couple of examples to keep in mind.


If you’ve ever seen a crowd of people do the ‘wave’ in the stands of a sporting event you may have noticed that the people only vibrated up and down. They did not move along the wave. The wave, however, moved through the stands.


Another example would be a duck floating on a wavy lake. The duck is moving up and down (vibrating) just like the water particles but he is not moving with the waves. The waves move but the particles don’t. When I talk to you, the vibrating air molecules that made the sound in my mouth do not travel across the room into your ears. (Which is especially handy if I’ve just eaten an onion sandwich!) The energy from my mouth is moved, by waves, across the room.


Questions to Ask

  • Does the shape of the index card matter?
  • What happens if you change the number of rubber bands?
  • What if you use a different thickness rubber band?
  • What happens if you make the string longer or shorter?
  • can you make a double by stacking two together?
  • Can you get a second or third harmonic by swinging it around faster?
  • Why do you need the index card at all?

[/am4show]


Click here to go to next lesson on Pressure Waves.

A sound wave is different from a light wave in that a sound is a mechanical wave, which requires particle interaction in order to exist. Light waves can travel in the vacuum of space, and we’ll talk more about this in our next section when we get to light.


[am4show have=’p9;p58;’ guest_error=’Guest error message’ user_error=’User error message’ ]


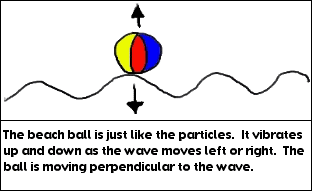
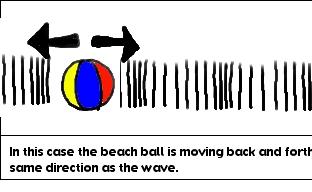
Sound waves are longitudinal waves, meaning that the particles vibration in the same direction as the wave moves in. If a wave is moving left to right, then the particles are also vibrating from left to right.


As the particles move back and forth, they creates small differences in pressure. For example, if we slow the vibrating fork WAY down, we see that when it moves to the right, it pushes on the air around it and moves those particles to the right, causing the particles to be compressed a little. As the fork vibrates back to the left, it opens up the space and lowers the pressure of the air, causing the particles to move to the left now, and this back and forth motion sets up the wave.


Sound waves have compressions (higher density areas, or higher pressure) and rarefactions (lower density areas, or lower pressure) since they are longitudinal waves. This is useful because when we measure the wavelength, we usually measure from one rarefaction to another, or one compression to another.Sound waves are longitudinal pressure waves, because they are a pattern of higher and lower pressure areas moving through the air (or other medium) in the same direction that they are traveling in.


Click here to go to next lesson on Seeing Sound Waves.

[/am4show]


Using the properties of light and sound waves, we’ll be able to actually see sound waves when we aim a flashlight at a drum head and pick up the waves on a nearby wall.


[am4show have=’p9;p58;’ guest_error=’Guest error message’ user_error=’User error message’ ]


You will be adjusting the length of string of a pendulum until you get a pendulum that has a frequency of .5 Hz, 1 Hz and 2 Hz. Remember, a Hz is one vibration (or in this case swing) per second. So .5 Hz would be half a swing per second (swing one way but not back to the start). 1 Hz would be one full swing per second. Lastly, 2 Hz would be two swings per second. A swing is the same as a vibration so the pendulum must move away from where you dropped it and then swing back to where it began for it to be one full swing/vibration.


Click here to go to next lesson on Frequency.

[/am4show]


If you haven’t already done this next experiment about frequency, do it now:


[am4show have=’p9;p58;’ guest_error=’Guest error message’ user_error=’User error message’ ]


1. Tie your weight (the official name of the weight on the end is bob. Personally I’ve always preferred the name Shirley, but Bob it is.) to the end of the 3 foot string. If you’ve done the gravity lesson in the Mechanics set of lessons you’ll remember that the weight of the bob doesn’t matter. Gravity accelerates all things equally, so your pendulum will swing at the same speed no matter what the weight of the bob.


2. Tape the string to a table or chair or door jam. Make sure it can swing freely at about 3 feet of length.


3. I would recommend starting with 1 Hz. It tends to be the easiest to find. Then try .5 Hz and then 2 Hz.


4. The easiest way I’ve found to do this is to start the pendulum swinging and at the same time start the timer. Count how many swings you get in ten seconds.


5. Now, adjust the string. Make it longer or shorter and try again. When you get 10 swings in 10 seconds you got it! That’s one swing per second. You should be able to get quite close to one swing per second which is 1 Hz.


6. Now try to get .5 Hz. In this case you will get 5 swings in ten seconds when you find it. (A little hint, the string is pretty long here.)


7. Now speed things up a bit and see if you can get 2 Hz. Be prepared to count quick. That’s 2 swings a second or 20 swings in 10 seconds! (Another little hint, the string is quite short for this one.)


Did you get all three different frequency pendulums? It takes a while but my classes found it rather fun. You’ve created three different frequencies. 2 Hz being the fastest frequency. That was pretty fast right? Can you imagine something going at 10 Hz? 100 Hz? 1,000,000 Hz? I told you things were moving at outrageous speeds!


Click here to go to next lesson on Seeing Sound Waves using Water.

[/am4show]


Before we get too technical with sound and learning about what it is, let’s have some fun looking at sound waves. Make sure you’re not doing this experiment with good speakers, because you may damage them!


[am4show have=’p9;p58;’ guest_error=’Guest error message’ user_error=’User error message’ ]


Here’s what you need:


  • a radio or some sort of music player
  • a balloon
  • a mixing bowl
  • water
  • your parent’s permission


1. Turn on your music player and turn it up fairly loud. (Tell your parents that it’s for science!)


2. Take a look at your speaker. You should be able to see it vibrating. If there’s a song with a lot of bass, you should really be able to see it moving.


3. Put your hand on the speaker. Can you feel the vibrations?


4. ASK YOUR PARENTS if you can carefully put a half-filled bowl of water on top of your speaker. You should be able to see the water vibrate.


Remember that sound is nothing more than vibrating molecules. All speakers do is get molecules of air to vibrate, creating longitudinal waves. They push air. Your eardrums vibrate just like the speakers do when the longitudinal waves of sound energy hit your ears.


How to Feel the Beat

1. Inflate the balloon. Get it fairly large.


2. Turn the music on loud (the more bass the better).


3. Put both hands lightly on the balloon.


4. Walk around the room holding the balloon lightly between your hands.


5. Try to feel the balloon vibrating.


6. Does the balloon vibrate more for low sounds or high sounds?


7. If you have a synthesizer (piano keyboard) you may want to try turning it up a bit and playing one note at a time. You should notice that the balloon vibrates more or less as you go up and down the musical scale. At very high notes, your balloon may not vibrate at all. We’ll talk more about why this happens later.


What’s causing the balloon to vibrate? Energy. Energy causes objects to move a distance against a force. The sound energy coming from the speakers is causing the balloon to vibrate. Your ear drums move in a very similar way to the balloon. Your ear drum is a very thin membrane (like the balloon) that is moved by the energy of the sound. Your ear drum, however, is even more sensitive to sounds than the balloon which is why you can hear sounds when the balloon is not vibrating. If you ear drum doesn’t vibrate, you don’t hear the sound.


What to do this experiment but no speakers?

Here’s another version of the same idea – I’ll bet you did this experiment when you were a small baby! You need: a mixing bowl (one of those metal bowls), something to hit it with ( a wooden spoon works well), and water.


1. Take the mixing bowl and put it on the table.


2. Smack it with the wooden spoon.


3. Listen to the sound.


4. Put your ear next to the bowl and try to hear how long the sound continues.


5. Now hit the bowl again.


6. Touch the bowl with your hand a second or two after you hit it. You should hear the sound stop. This is called dampening.


7. Now, for fun, fill the bowl with water up to an inch or so from the top.


8. Smack the bowl again and look very carefully at where the bowl touches the water.


9. When you first hit the bowl, you should see very small waves in the water.


I want you to notice two things here. Sound is vibration. When the bowl is vibrating, it’s making a sound. When you stop it from vibrating, it stops making sound. Any sound you ever hear, comes from something that is vibrating. It may have vibrated once, like a balloon popping. Or it may be vibrating consistently, like a guitar string.


The other thing I want you to notice is that you can actually see the vibrations. If you put water in the bowl, the tiny waves that are formed when you first hit the bowl are caused by the vibrating sides of the bowl. Those same vibrations are causing the sound that you hear.


item4mIf your mom’s worried about making a mess with water (and it’s not bath night tonight) then try this alternate experiment: you’ll need a mixing bowl, wooden spoon, and rubber bands.



1. Stretch a few rubber bands around the box or the bowl. If possible, use different thicknesses of rubber bands.


2. Strum the rubber bands.


3. Feel free to adjust how stretched the bands are. The more stretched, the higher the note.


4. Try plucking a rubber band softly.


5. Now pluck it fairly hard. The hard pluck should be louder.


Again I’d like you to notice three things here. Just like the last experiment, you should see that the sound is coming from the vibration. As long as the rubber band vibrates, you hear a sound. If you stop the rubber band from vibrating, you will stop the sound. Sound is vibration.


The second thing I’d like you to notice is that the rubber bands make different pitched sounds. The thinner the rubber band, or the tighter it’s stretched, the faster it vibrates. Another way to say “vibrating faster” is to say higher frequency. In sound, the higher the frequency of vibration, the higher the pitch of the note. The lower the frequency, the lower the pitch of the note. The average human ear can hear sound at as high a frequency as 20,000 Hz, and as low as 20 Hz. Pianos, guitars, violins and other instruments have strings of various sizes so that they can vibrate at different frequencies and make different pitched sounds. When you talk or sing, you change the tension of your vocal cords to make different pitches.


One last thing to notice here is what happened when you plucked the rubber band hard or softly. The rubber band made a louder noise the harder you plucked it right? Remember again that sound is energy. When you plucked that rubber band hard, you put more energy into it than when you plucked it softly. You gave energy (moved the band a distance against a force) to the rubber band. When you released the rubber band, it moved the air against a force which created sound energy. For sound, the more energy it has, the louder it is. Remember when we talked about amplitude a few lessons back? Amplitude is the size of the wave. The more energy a wave has the bigger it is. When it comes to sound, the larger the wave (the more energy it has) the louder it is. So when you plucked the rubber band hard (gave it lots of energy), you made a louder sound.


I said this in the beginning but I’ll repeat it here, hoping that now it makes more sense. When something vibrates, it pushes particles against a force (creates energy). These pushed particles create longitudinal waves. If the longitudinal waves have the right frequency and enough energy (loudness), your ear drum antennas will pick it up and your brain will translate the energy into what we call sound.


Exercises 


  1. What is sound?
  2. How does the rubber band make different sounds?
  3. What difference does it make how hard or soft you pluck the rubber bands?

Click here to go to next lesson on Sound Properties.

[/am4show]


Think of your ears as ‘sound antennas’.  There’s a reason you have TWO of these – and that’s what this experiment is all about.  You can use any noise maker (an electronic timer with a high pitched beep works very well), a partner, a blindfold (not necessary but more fun if you have one handy), and earplugs (or use your fingers to close the little flap over your ear – don’t stick your fingers IN your ears!).


[am4show have=’p8;p9;p16;p43;p64;’ guest_error=’Guest error message’ user_error=’User error message’ ]


Here’s what you need:


  • noisemaker
  • partner
  • you
  • blindforld
  • earplugs


Download Student Worksheet & Exercises


1. Sit or stand in the middle of a room.


2. Close your eyes or put on the blind fold.


3. Have your partner walk to another part of the room as quietly as possible.


4. Have your partner make the noisemaker make a noise.


5. With your eyes still closed, point to where you think the sound came from.


6. Try it several times and then let your partner have a turn.


How well did you do? Probably pretty well. Your ears are very good at determining where sounds are coming from. The reason your ears are so good at detecting the direction of a sound is due to the fact that sound hits one ear slightly before it hits the other ear. You brain does an amazing bit of quick math to make its best guess as to where the sound is coming from and how far away it is. Let’s do a little more with this.


1. Sit or stand in the middle of a room.


2. Close your eyes or put on the blindfold.


3. Have your partner walk to another part of the room as quietly as possible.


4. Have you partner move the sound maker around the room like before, but this time make sure your partner makes the sound directly in front of you, behind you and over your head as well.


5. With your eyes still closed, point to where you think the sound came from.


6. Try it several times and then let your partner have a turn.


Did you get fooled this time? This works sometimes, but not always. What I hope happened was when the noisemaker was above your head, directly in front of you or directly behind you, you had trouble determining where the sound was coming from. Can you guess why this might have happened? Your ears are placed directly across from one another. If a noise happens directly in front of you, it hits your both ears at the exact same time. Your brain has no clues as to where the sound is coming from if the sound hits both ears at the same time so it makes its best guess. In this case, its best guess may be wrong. Let’s try one more thing here.


1. Sit or stand in the middle of a room.


2. Close your eyes or put on the blindfold.


3. Put an ear plug in one of your ears. If you don’t have one, use your finger to cover your ear. Be very careful not to put your finger into your ear. Just use your finger to cover the hole in your ear.


4. Have your partner walk to another part of the room as quietly as possible.


5. Have your partner make the noisemaker make a noise. This will work best if the noise is not too loud.


6. With your eyes still closed, point to where you think the sound came from.


7. Try it several times and then let your partner try to find the sound.


How did you do with just one ear? Did you get fooled a little more often this time? Your brain has fewer clues to work with so it does the best it can with what it has.


Exercises 


  1. How do your two ears work together to determine the location of a sound?
  2. Does it matter what frequency (how high or low) the sound is? Are some frequencies easier to detect than others with only one ear?

[/am4show]


Click here to go to next lesson on Speed of Sound.

Sound is a type of energy, and energy moves by waves. So sound moves from one place to another by waves; longitudinal waves to be more specific. So, how fast do sound waves travel? Well, that’s a bit of a tricky question. The speed of the wave depends on what kind of stuff the wave is moving through. The more dense (thicker) the material, the faster sound can travel through it.


[am4show have=’p9;p58;’ guest_error=’Guest error message’ user_error=’User error message’ ]


Remember that waves move because the particles bounce off one another? The farther the particles are from one another, the longer it takes one particle to bounce off another. Think about a row of dominoes. If you put them all close together and push one over they all fall down pretty quick. If you spread them out a bit, the row falls much more slowly. Sound waves move the same way. Sound moves faster in solid objects than it does in air because the molecules are very close together in a solid and very far apart in a gas. For example, sound travels at about 760 mph in air, 3300 mph in water, 11,400 mph in aluminum, and 27,000 mph in diamond!


The temperature of the material also makes a difference. The colder the material, the faster the sound. This is why sound seems to be louder or clearer in the winter or at night. The air is a little cooler and since it’s cooler, the molecules are a little more tightly packed.


Do you remember when we talked about frequency and Hertz? Those are both terms to describe vibrations, right? Frequency describes how fast something is vibrating. Hertz is a measurement of frequency and one Hertz is one vibration per second.


Our ears are our sound antennas. When something vibrates it causes energy to move by longitudinal waves, from the object vibrating to our ears. If that something is vibrating between about 60 Hz and 20,000 Hz it will cause your ear drum to vibrate. This is sound. You can tell one frequency from another by how it sounds. A high note on the piano (like high C) sounds different than a lower note (like middle C). High C is 523.3 Hz, and middle C is 261.6 Hz. Some folks have amazing abilities of being able to distinguish between as little as 2 Hz on the piano! In case you’re curious, here’s the frequencies for the notes on the piano:


When you play more than one note on the piano at the same time, the sound waves interfere and form a wave pattern using the superposition principle. Two waves that have a frequency ratio of 2:1 (one wave is half of the frequency of the other) is separated by an octave, like middle and high C.


Click here to go to next lesson on Decibel Scale.

[/am4show]


When something vibrates, it pushes particles. These pushed particles create a longitudinal wave. If the longitudinal wave has the right frequency and enough energy, your ear drum antennas will pick it up and your brain will turn the energy into what we call sound. The higher the amplitude, the more energy the wave has. Intensity of a measure of a wave’s power per unit area, and is measured in Watts per square meter.


[am4show have=’p9;p58;’ guest_error=’Guest error message’ user_error=’User error message’ ]


Waves spread out in circular (or spherical for 3-D) patterns, like ripples on the surface of a pond. The ripples close to the source at the center will have greater intensity that the ones further out. The intensity decreases the further you get from the source by the inverse square law.


Human ears can detect very low intensities (on the order of 10-12 W/m2, which corresponds to the threshold of hearing (TOH), which is at 0 dB (decibels). A sound 10 times greater has a level of 10 dB, or 10-11 W/m2. A sound 100 greater is 20 dB (10-10 W/m2). This measurement of intensity is called the decibel scale.


A whisper is around 20 dB, traffic is around 70 dB, and jets taking off are 140 dB. Eardrum damage occurs over 150 dB.


Everyone perceives intensity differently. Have you ever noticed how older people have hearing issues? That’s because two sounds with the same intensity but different frequencies are not necessarily going to be heard at the same loudness.


Click here to go to next lesson on How You Hear.

[/am4show]


It may seem like walking across a balance beam and listening to your favorite song are very different activities, but they both depend on your ears. Ears are the sense organs that control hearing, which is the ability to detect sound. Ears also sense the position of the body and help maintain balance when you walk a balance beam or ride a bike.


Imagine a pebble being dropped into a lake. Waves of water go off in all directions. A similar thing happens when a car driving down the street honks its own. Waves go off from the car in all direction. The difference is that these are not waves of water, but instead are sound waves, which travel through the air. If you are nearby, some of those sound waves make it to your ear.


Here’s a video that shows you how everything works together so you can hear:


The pinna, or outer ear, which is the part of your ear that you can see, gathers up some of the sound waves, sends them down the ear canal, and eventually they strike the eardrum. The eardrum is a thin membrane that vibrates like a drum when the waves hit it. The vibrations pass three tiny bones, called the hammer, anvil, and stirrup, as well as a membrane called the oval window, causing them all to vibrate.


From the oval window, the vibrations go to the cochlea, liquid-filled space lined with hairs. The vibrations make waves in the cochlea’s liquid, just like waves in a pond, causing the hairs to move. The movement of the hairs sends a nerve impulse through the auditory nerve to the brain. The brain interprets the message and “tells” you what you have heard.


This video is an old instructional film shown to pre-med students in the early 50s you might enjoy watching:


Along with hearing, the ears play a major role in balance. Inside the ears are semicircular canals which are lined with hairs and full of liquid. When the body moves in one direction, the liquid in the semicircular canals move, causing the hairs to move. This sends a message to your brain, which gives instructions for the body’s muscles to contract or relax. This keeps you balanced.


There’s a cool video of a camera going inside the ear… watch out for the wax!


Click here to go to next lesson on Big Ears.

How do you think animals know we’re around long before they see us? Sure, most have a powerful sense of smell, but they can also hear us first. In this activity, we are going to simulate enhanced tympanic membranes (or ear drums) by attaching styrofoam cups to your ears. This will increase the number of sound waves your ears are able to capture.


[am4show have=’p8;p9;p29;p56;p81;p87;’ guest_error=’Guest error message’ user_error=’User error message’ ]


Here’s what you need


    • 2 styrofoam cups, 12 oz.
    • 2 styrofoam cups, 32 oz.
    • 1 pair of scissors
    • 1 kitchen timer


Download Student Worksheet & Exercises


Here’s what you do


  1. Set the timer and put it on a table or desk. Walk about 6 feet away and face the timer. Listen for the ticking sound. Now, turn your back on the clock so that you are facing the other direction. How has your ability to hear the ticking changed? We can increase the sounds you hear by using the cups.
  2. Get an adult to help with cutting the cups. They will hold one of the smaller cups with one hand and make a cut about an inch (3 cm) from the rim toward the bottom of the cup.
  3. Draw a circle at the end of the cut that is about the size of your ear where it attaches to your hear. Cut out the circle.
  4. Repeat steps 2 and 3 with the other 12 oz. cup. Carefully put them on your ears with their openings pointing forward. You have just added to the size of your ears and they should be able to collect more sound vibrations. Try listening to the timer now with the cups on your ears.
  5. Now repeat steps 2 through 4 with the larger cups. Set the timer one more time and listen to the timer. Compare what you hear with what you heard with your unenhanced ears, and what you hear with the 12 oz. ears.
  6.  On a scale of 0-10, how much did the cups improve what you were able to hear? Note where you would place both the 12 oz. cups and the 32 oz. cups on the scale if 0 is the starting point equal to what you can hear with your own ears.
  7. Repeat step 5 with the bag of water and again with the baggie of air. Note the clarity of the speech you hear through each bag. Rank each bag from loudest, to medium, to quietest.

What’s going on?


Hearing is based on movement. The initial process involves the actual waves coming toward your ear, which are funneled inside to your tympanic membrane.


In this experiment we focused on the initial funneling process. This is done by the visible, external part of your ear, known as the pinna. By making the pinna larger, you also increased their ability to pick up sound vibrations. This enabled you to hear much more, and at louder levels.


The pinna also help to determine the direction from which sound is coming. If a sound is coming from the left, your left ear hears it a little bit before the right. This lets your brain know where the sound originates.


Exercises


  1. Which part of the ear is this experiment testing?
  2. What happens when you change your variable in this experiment?
  3. Did this experiment change your ability to detect which direction a sound came from?

[/am4show]


Click here to go to next lesson on Elasticity and Inertia.

The speed of a wave depends on what the wave is traveling through. Two factors affect the sound speed: elasticity and inertia.


[am4show have=’p9;p58;’ guest_error=’Guest error message’ user_error=’User error message’ ]


Sound waves traveling through steel, a material that is rigid, will not deform like it would if it were traveling through rubber. The atoms that make up steel are bound tightly together, so when a force tries to move them around or pry them apart, it’s very hard to do. Steel has a high modulus of elasticity, which means that it’s rigid (at least in the solid state). Materials usually have the highest modulus of elasticity when they are in their solid state and least in the gaseous state, which means that longitudinal sound waves will travel faster in solids than liquids and gases.


Sound travels faster in less dense materials, so it will travel faster in helium than it will in air for example (ever used a balloon to change the pitch of your voice?) The greater the density of the individual particles, the less responsive they are to interacting with their neighboring particles, so the wave travels slower. More massive particles like air molecules take more energy to move around than lighter particles like helium molecules.


If you have to choose between inertial and elastic effects having the greatest influence on the speed of a wave, the elastic effects have a greater impact, so the speed of a wave in solids is generally faster than through liquid, and sound waves traveling through liquids are faster than through gases.


Click here to go to next lesson on Lightning and Thunder.

[/am4show]


Have you ever been in a thunders storm? Here’s how you can use wave speed to figure out how far away that lightning strike really was.


[am4show have=’p9;p58;’ guest_error=’Guest error message’ user_error=’User error message’ ]


When there’s lightning, thunder is not far behind.  Even if you don’t live in a tropical thunderstorm area, you can still simulate this experiment using the variations below and get the most out of the main ideas about sound waves and light waves.


For starters, let’s assume you’re waiting for a good storm. When one’s brewing, grab a timer and a pencil with paper and wait inside the house near a window.


Here’s what you need:


  • two hunks of wood or a pair of baseball bats
  • a neighborhood block
  • a partner

1. Wait until you see a lightning flash (do this indoors please!).


2. Start your timer (or count “one Mississippi, two Mississippi”, etc.)


3. Stop counting when you hear the thunder.


4. Take whatever number you’ve reached and divide it by 5. That number is how many miles the lightning strike is away from you. So if you’ve counted for about 3 seconds the lightning strike is about a half mile away. If you’ve counted for 5 seconds the lightning is 1 mile away. If you’ve counted for 8 seconds the lightning is about 1.5 miles away.


Remember, sound travels at about 1000 ft/sec. A mile is a little over 5000 feet (5280 ft. to be exact). So it takes sound about 5 seconds to go 1 mile!


“Advanced students: Download your Thunder and Lightning


Want to do this experiment without a storm?

You’ll need two hunks of wood or a pair of baseball bats, a neighborhood block, and a partner.


1. Give your partner the two bats or hunks of wood.


2. Have them walk a half a block away or at least 250 feet.


3. When they get there have them clack together the two pieces of wood (be careful not to smash fingers, you want to hear the wood, not the scream of you friend!).


4. Have them do it several times. Try to notice a difference between when you see the wood crashing together and when you hear it. If you don’t hear a difference, get farther apart from one another.


5. Trade places so that your partner can see the delay of sound (just like on one of those old Japanese movies).


Sound travels at about 760 mph. That’s the same as about 1000 ft/sec. If your friend was standing about 250 feet away from you, it took a quarter of a second for the sound to get from your partner to you.


The next time you’re at a baseball game or a fireworks display try to time the difference between the time you see something and the time you hear something. Remember that sound travels 1000 ft/sec. If the distance is great enough you may be able to figure out how far away it is and amaze your friends!


[/am4show]


Click here to go to next lesson on Estimating Distances with Echoes.