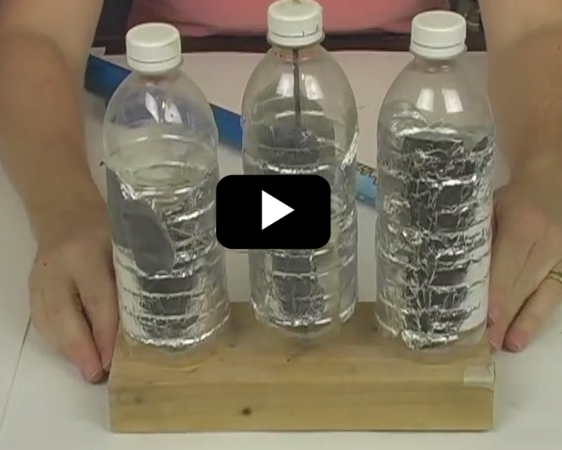
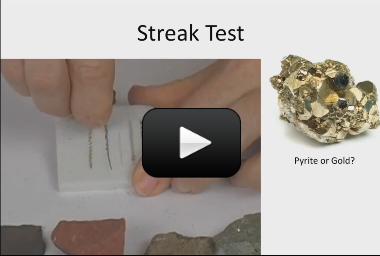
If you have a Fun Fly Stick, then pull it out and watch the video below. If not, don't worry - you can do most of these experiments with a charged balloon (one that you've rubbed on your hair). Let' play with a more static electricity experiments, including making things move, roll, spin, chime, light up, wiggle and more using  static electricity! [am4show have='p8;p9;p97;p58;' guest_error='Guest error message' user_error='User error message' ] Materials:
  • sheet of paper
  • two empty, clean soup cans
  • aluminum foil
  • long straight pin
  • three film canisters (or M&M containers or small plastic bottles)
  • penny
  • neon bulb (optional)
  • small styrofoam ball or single packing peanut
  • fishing line or thread
  • chopstick
  • foam cup
  • small aluminum pie tins or make your own from aluminum foil
  • hot glue with glue sticks
  • Fun Fly Stick (also called "Wonder Fly Stick")
This video show you how to get the most out of your Fun Fly Stick. If you don't have a Fly Stick, simply use an inflated balloon that you've rubbed on your head. In the video, the Electrostatic Lab is mounted on a foam meat tray I found at the grocery store.
  Download Student Worksheet & Exercises The triboelectric series is a list that ranks different materials according to how they lose or gain electrons. Near the top of the list are materials that take on a positive charge, such as air, human skin, glass, rabbit fur, human hair, wool, silk, and aluminum. Near the bottom of the list are materials that take on a negative charge, such as amber, rubber balloons, copper, brass, gold, cellophane tape, Teflon, and silicone rubber. When you turn on your Fun Fly Stick (or rub your head with a balloon), one end of the Fun Fly Stick takes on a positive charge and the other end holds the negative charge. When you rub your head with a balloon, the hair takes on a positive charge and the balloon takes on a negative charge. When you scuff along the carpet, you build up a static charge (of electrons). Your socks insulate you from the ground, and the electrons can’t cross your sock-barrier and zip back into the ground. When you touch someone (or something grounded, like a metal faucet), the electrons jump from you and complete the circuit, sending the electrons from you to them (or it). Exercises
  1. What is common throughout all these experiments that make them work?
  2. What makes the neon bulb light up? What else would work besides a neon bulb?
  3. Does it matter how far apart the soup cans are?
  4. Why does the foil ball go back and forth between the two cans?
  5.  Why do the pans take on the same charge as the Fly Stick?
  6.  When sticking a sheet of paper to the wall, does it matter how long you charge the paper for?
  7.  Draw a diagram to explain how the electrostatic motor works. Label each part and show where the charges are and how they make the rotor turn.
[/am4show]  


This is a recording of a recent live teleclass I did with thousands of kids from all over the world. I’ve included it here so you can participate and learn, too! Learn about the world of rocks, crystals, gems, fossils, and minerals by moving beyond just looking at pretty stones and really being able to identify, test, and classify samples and specimens you come across using techniques that real field experts use. While most people might think of a rock as being fun to climb or toss into a pond, you will now be able to see the special meaning behind the naturally occurring material that is made out of minerals by understanding how the minerals are joined together, what their crystalline structure is like, and much more.


Materials:


[am4show have=’p8;p9;p11;p38;’ guest_error=’Guest error message’ user_error=’User error message’ ]


[/am4show]


Imagine you have a thin rope attached to a thick rope, and you jerk the thin rope so it creates a pulse that travels down the rope. When it hits the boundary between the two ropes, the wave just doesn’t stop and go away. Some of the energy from the wave is reflected back toward the source along the thin rope, and some of the energy is transmitted to the thicker (more dense) rope.


[am4show have=’p9;p58;’ guest_error=’Guest error message’ user_error=’User error message’ ]


Since light is a wave, when it goes from a less dense to a more dense medium, some of the energy gets reflected back while some of it gets transmitted through. Aim a flashlight at a window and you’ll find when the light goes from air to glass, it will both reflect back and transmit through the window.


When the light hits the glass, it not only reflects and transmits, it also changes speed and wavelength as it crosses the boundary AND it also changes directions. When it bends to change direction, it’s called refraction.


Click here to go to next lesson on Broken Pencil

[/am4show]


If you stick a pencil is a glass of water and look through the side of the glass, you’ll notice that the pencil appears shifted. The speed of light is slower in the water (140,000 miles per second) than in the air (186,282 miles per second), called optical density, and the result is bent light beams and broken pencils.


[am4show have=’p9;p58;’ guest_error=’Guest error message’ user_error=’User error message’ ]


When light rays strikes a surface, part of the beam passes through the surface and the rest reflects back, like a ball bouncing on the ground. Where it bounces depends on how you throw the ball.


Have you ever looked into a pool of clear, still water and seen your own face? The surface of the water acts like a mirror and you can see your reflection. (In fact, before mirrors were invented, this was the only way people had to look at themselves.) If you were swimming below the surface, you’d still see your own face – the mirror effect works both ways.


Have you ever broken a pencil by sticking it into a glass of water?  The pencil isn’t really broken, but it sure looks like it!  What’s going on?


Tall glass of water, with a red pensil inside.When a beam of light hits a different substance (like the water), the wavelength changes because the speed of the light changes. If you’re thinking that the speed of light is always constant, you’re right… in a vacuum like outer space between two reference frames.


But here on Earth, we can change the speed of light just by shining a light beam through different materials, like water, ice, blue sunglasses, smoke, fog, even our own atmosphere. How much the light speed slows down depends on what the material is made of.  Mineral oil and window glass will slow light down more than water, but not as much as diamonds do.


How broken the pencil appears also depends on where you look.  In some cases, you’ll see a perfectly intact pencil.  Other times, you’ll guess neither piece is touching.  This is why not everyone can see a rainbow after it rains.  The sun must be at a low angle in the sky, and also behind you for a rainbow to appear.  Most times, you aren’t at the right spot to see the entire arc touch the ground at both ends, either.


Lenses work to bend light the way you want them to. The simplest lenses are actually prisms.  Prisms unmix light into its different wavelengths. When light hits the prism, most of it passes through (a bit does reflect back) and changes speed.  Since the sunlight is made up of many different wavelengths (colors), each color gets bent by different amounts, and you see a rainbow out the other side.


Double Your Money

Here are a few neat activities that experiment with bending light, doubling your money, and breaking objects. Here’s what you do:


Materials:


  • glass jar (or water glass)
  • penny
  • eyeballs


Download Student Worksheet & Exercises


Here’s what you do:


1. Toss one coin into a water glass (pickle jars work great) and fill with an inch of water. Hold the glass up and find where you need to look to see TWO coins. Are the coins both the same size? Which one is the original coin? (Answer at the bottom of this page.)


2. Look through the top of the glass – how many coins are there now? What about when you look from the side?


3. Toss in a second coin – now how many are there?


4. Remove the coins turn out the lights. Shine a flashlight beam through the glass onto a nearby wall. (Hint – if this doesn’t work, try using a square clear container.) Stick a piece of paper on the wall where your light beam is and outline the beam with a pencil.


5. Shine the light at an angle up through the water so that it bounces off the surface of the water from underneath. Trace your new outline and compare… are they both the same shape?


6. Add a teaspoon of milk and stir gently. (No milk? Try sprinkling in a bit of white flour.) Now shine your flashlight through the container as you did in steps 4 and 5 and notice how the beam looks.


7. Use a round container instead of square… what’s the difference?


Answers:
1. The smaller coin is the reflection.
2. One coin when glanced from above, two from the side.
3. Four.
4. Beam is a circle.
5. Beam is an oval.
6. I can see the beam through the water!!
7. The round container distorts the beam, and the square container keeps the light beam straight. Both are fun!


The coin water trick is a neat way for kids to see how refraction works. In optics, refraction happens when light  waves travel from one medium with a certain refractive index (air, for example) to another medium which has a different refractive index (like water).  At the boundary between the two (where air meets water), the wave changes direction.


The wavelength increases or decreases but the frequency remains constant. When you sine light through a prism, the wavelength changes and you see a rainbow as the prism un-mixes white light into its different colors.The light wave changed direction when it traveled from air to glass, and then back to air again as it leaves the backside of the prism.


Did you try the pencil experiment? Did you notice how if you look at the pencil (placed at a slant) partially in the water, it appears to bend at the water’s surface? The light waves bend as they travel from water to air. To further complicate things, the way the eye received information about the position of the pencil actually makes the pencil to appear higher and the water shallower than they really are! Can you imagine how important this is for trying to spear a fish? The fish might appear to be in a different place, so you need to account for this when you take aim!


Click here for the Disappearing Beaker experiment!


Exercises


  1. When one coin is in the water, you can actually see two:  Are the coins both the same size? Which one is the original coin?
  2. In step 2 of the experiment: How many coins are there when viewed from the top of the glass? What about when you look from the side?
  3. What happened when you tossed in a second coin?
  4. How did your outlines compare?

[/am4show]


You’ll notice that the pencil doesn’t always appear broken. Depending on where your eyeballs are, you can see an intact or broken pencil. When light enters a new substance (like going from air to water) perpendicular to the surface (looking straight on), refraction does not occur.


However, if you look at the glass at an angle, then depending on your sight angle, you’ll see a different amount of shift in the pencil. Where do you need to look to see the greatest shift in the two halves of the pencil? (Hint: move the pencil back and forth slowly.)


Click here to go to next lesson on Refractive Index

The refractive index provides a measure of the relative speed of light in that particular medium which allows us to figure out speeds in other mediums as well as predict which way light will bend.


[am4show have=’p9;p58;’ guest_error=’Guest error message’ user_error=’User error message’ ]


Click here to go to next lesson on Disappearing Glass

[/am4show]


We’re going to bend light to make objects disappear. You’ll need two glass containers (one that fits inside the other), and the smaller one MUST be Pyrex. It’s okay if your Pyrex glass has markings on the side. Use cooking oil such as canola oil, olive oil, or others to see which makes yours truly disappear. You can also try mineral oil or Karo syrup, although these tend to be more sensitive to temperature and aren’t as evenly matched with the Pyrex as the first choices mentioned above.


Here’s what you need:


  • two glass containers, one of which MUST be Pyrex glass
  • vegetable oil (cheap canola brand is what we used in the video

Published value for light speed is 299,792,458 m/s = 186,282 miles/second = 670,616,629 mph


  • sink

[am4show have=’p8;p9;p10;p37;p66;’ guest_error=’Guest error message’ user_error=’User error message’ ]


When a beam of light hits a different substance (like glass), the speed of light changes. The color of the light (called the wavelength) can also change. In some cases, the change of wavelength turns into a change in the direction of the beam.


For example, if you stick a pencil is a glass of water and look through the side of the glass, you’ll notice that the pencil appears shifted. The speed of light is slower in the water (140,000 miles per second) than in the air (186,000 miles per second), called optical density, and the result is bent light beams and broken pencils.


You’ll notice that the pencil doesn’t always appear broken. Depending on where your eyeballs are, you can see an intact or broken pencil.


This is a very fine point about refraction: when light enters a new substance (like going from air to water) perpendicular to the surface (looking straight on), refractions do not occur.


However, if you look at the glass at an angle, then depending on your sight angle, you’ll see a different amount of shift in the pencil. Where do you need to look to see the greatest shift in the two halves of the pencil? (Hint: move the pencil back and forth slowly.)


Depending on if the light is going from a lighter to an optically denser material (or vice versa), it will bend different amounts. Glass is optically denser than water, which is denser than air.


Here’s a chart:


Vacuum 1.0000
Air 1.0003
Ice 1.3100
Water 1.3333
Pyrex 1.4740
Cooking Oil 1.4740
Diamond 2.4170


This means if you place a Pyrex container inside a beaker of vegetable oil, it will disappear. This also works for some mineral oils and Karo syrup. Note however that the optical densities of liquids vary with temperature and concentration, and manufacturers are not perfectly consistent when they whip up a batch of this stuff, so some adjustments are needed.


Not only can you change the shape of objects by bending light (broken or whole), but you can also change the size. Magnifying lenses, telescopes, and microscopes use this idea to make objects appear different sizes.


Questions to Ask


  • Does the temperature of the oil matter?
  • What other kinds of oil work? Blends of oils?
  • Does it work with mineral oil or Karo syrup?
  • Is there a viewing angle that makes the inside container visible?
  • Which type of lighting makes the container more invisible?
  • Can we see light waves?

[/am4show]


Click here to go to next lesson on Why does light bend? 

But why does light bend? You can imagine a toy car going from a wood floor to carpeting. One wheel hits the carpet first and slows down before the other, causing the toy to turn. The direction of the wave changes in addition to the speed. The slower speed must also shorten its wavelength since the frequency of the wave doesn’t change.


[am4show have=’p9;p58;’ guest_error=’Guest error message’ user_error=’User error message’ ]


The bottom line is that bending is caused by the change in speed of light when it crosses a boundary. This is true everywhere, even in the vacuum of space if it’s going from space to our atmosphere.


Click here to go to next lesson on Bending Light Right or Left?

[/am4show]


Do you remember the eye balloon that you made earlier? The white portion of the balloon represents your sclera, which you may have already guessed is also the white part of your eye. It is actually a coating made of protein that covers the various muscle in your eye and holds everything together.


[am4show have=’p9;p58;’ guest_error=’Guest error message’ user_error=’User error message’ ]


Of course, the lens you inserted represents the actual lens in your eye. The muscles surrounding the lens are called ciliary muscles and they are represented by the rubber neck of your balloon. The ciliary muscles help to control the amount of light entering your eyes.


The retina is in the back of your eye, which is represented by the inside back of your balloon. The retina supports your rods and cones. They collect information about light and color and send it to your brain.


Click here to go to next lesson on Benham’s Disk

[/am4show]


How does light know which way to bend? It depends on whether the wave is speeding up or slowing down when it moves across the boundary, which depends on the optical density of the mediums.


[am4show have=’p9;p58;’ guest_error=’Guest error message’ user_error=’User error message’ ]


Click here to go to next lesson on Spear Fishing

[/am4show]


Wowza… you’ve made it through the ENTIRE course in Advanced Physics! Wa-hoo!!


Time for one more video… ready?


If you’ve ever tried to skewer something under the water from above it, you know that you can’t aim directly at the object, because of the way light bends when it goes from a slower to a faster medium. Can you guess the one condition where light doesn’t bend as it crosses a boundary?


[am4show have=’p9;p58;’ guest_error=’Guest error message’ user_error=’User error message’ ]


Click here to go to next lesson on Mathematics of Refraction

[/am4show]


How much incident light bends as it crosses a boundary can be calculated and measured if we know about the mediums, including information about the index of refraction. Snell’s Law is a mathematical relationship between the refractive and incident angles of light and the optical density of the different mediums.


[am4show have=’p9;p58;’ guest_error=’Guest error message’ user_error=’User error message’ ]


Click here to go to next lesson on Lasers and Jell-O Using Snell’s Law

[/am4show]


If you’re scratching your head during math class, wondering what you’ll ever use this stuff for, here’s a cool experiment that shows you how scientists use math to figure out the optical density of objects, called the “index of refraction”.


How much light bends as it goes through one medium to another depends on the index of refraction (refractive index) of the substances. There are lots of examples of devices that use the index of refraction, including fiber optics. Fiber optic cables are made out of a transparent material that has a higher index of refraction than the material around it (like air), so the waves stay trapped inside the cable and travel along it, bouncing internally along its length.  Eyeglasses use lenses that bend and distort the light to make images appear closer than they really are.
[am4show have=’p8;p9;p19;p46;p89;p99;’ guest_error=’Guest error message’ user_error=’User error message’ ]


Materials:


  • Paper
  • Laser
  • Pencil
  • Protractor
  • Ruler
  • Gelatin (1 box)
  • 1/2 cup sugar
  • 2 containers
  • Hot (boiling) water with adult help
  • Knife with adult help


Download Student Worksheet & Exercises


 Experiment:


  1. Mix two packets of gelatin with one cup of boiling water and stir well.
  2. To one of the containers, add 1/2 cup sugar. Label this one as “sugar” and put the lid on and store it in the fridge.
  3. Label the other as “plain” and also store it in the fridge. It takes about 2 hours to solidify. Wait, and then:
  4. Cut out a 3”x3” piece of gelatin from the plain container.
  5. On your sheet of paper, mark a long line across the horizontal, and then another line across the vertical (the “normal” line) as shown in the video.
  6. Mark the angle of incidence of 40o. This is the path your laser is going to travel on.
  7. Lay down the gelatin so the bottom part is aligned with the horizontal line.
  8. Shine your laser along the 40o angle of incidence. Make sure it intersects the origin.
  9. Measure the angle of refraction as the angle between the bent light in the gelatin and the normal line. (It’s 32o in the video.)
  10. Use Snell’s Law to determine the index of refraction of the gelatin: n1 sin θ1 = n2 sin θ2
  11. Repeat steps 4-10 with the sugar gelatin. Did you expect the index of refraction to be greater or less than the plain version, and why?

 Questions to Ask:


  1. Does reflection or refraction occur when light bounces off an object?
  2. Does reflection or refraction occur when light is bent?
  3. What type of material is used in a lens?
  4. What would happen if light goes from air to clear oil?

Click here to go to next lesson on Snell’s Law and Prisms

[/am4show]


Incoming light refracts as it crosses two boundaries of a prism. Notice how prisms have non-parallel sides for a reason…


[am4show have=’p9;p58;’ guest_error=’Guest error message’ user_error=’User error message’ ]


Click here to go to next lesson on Snell’s Law and the Index of Refraction

[/am4show]


Now let’s take a look at how to use Snell’s Law to figure out the optical density of a medium by measuring how much the light bends when it goes from one medium to another.


[am4show have=’p9;p58;’ guest_error=’Guest error message’ user_error=’User error message’ ]


Click here to go to next lesson on Total Internal Reflection

[/am4show]


The Law of Reflection states that when light reflects off the surface, the angle of incidence is equal to the angle of reflection. Snell’s Law states that when light crosses into a new medium, the relationship between the angle of incidence (θi) and angle of refraction (θr) are related by the equation:


[am4show have=’p9;p58;’ guest_error=’Guest error message’ user_error=’User error message’ ]


where n is the index of refraction.


There’s actually a connection between light reflection and refraction, since they usually happen at the same time.


Total internal reflection happens at large incident angles and when light travels from a more optically dense medium to a lesser dense medium. Total refers to no loss in intensity (plane mirrors have a loss of about 4%).


For total internal reflection to occur, two things have to happen: light must be going from more optically dense to less dense mediums, and the angle of incidence is greater than the critical angle.


Total internal reflection happens when light travels from water to air, not from air to water. It also happens when light bends away from the normal at large angles of incidence. For water-to-air, it’s greater than 48.6o. Each set of mediums have their own critical angle.


Click here to go to next lesson on Total Internal Reflection and Prisms

[/am4show]


Let’s take a look at a glass prism and total internal reflection critical angles to determine the optical density of the glass.


[am4show have=’p9;p58;’ guest_error=’Guest error message’ user_error=’User error message’ ]


Click here to go to next lesson on Total Internal Reflection and Diamonds

[/am4show]


Let’s look at total internal reflection and diamonds.


[am4show have=’p9;p58;’ guest_error=’Guest error message’ user_error=’User error message’ ]


Click here to go to next lesson on Fiber Optics

[/am4show]


Fiber Optics are one application of total internal reflection.  Optical fibers are flexible, transparent fibers made from plastic or glass about the size of a human hair that can serve as a "light pipe" to transmit light from one location to another. The bundle of fibers is used in medical applications where doctors can see inside the body by attaching a small camera to one side of the cable. To make the project below, you can order this Fiber Optics kit.

[am4show have='p9;p58;' guest_error='Guest error message' user_error='User error message' ]

Materials:

  • Fiber Optics kit.
  • Soldering iron with solder
  • Pliers
  • Wire strippers
  • Diagonal cutters
  • Optional: "helping hands" stand (makes it easier to solder components to the board, but not required to build the project)


Lightwave communication over optical fiber networks are used today everywhere in fiber optic communications. These transmit over long distances at higher bandwidths than metal cables and don't have problems with electromagnetic interference or losses typical with copper wiring.

Click here to go to next lesson on Interesting Refraction Phenomena

[/am4show]


Dispersion is when visible light is separated into the colors that make up the light. We’ve already seen how optical density is a measure of how much a medium slows down light that travels through it. The index of refraction depends on the frequency of the light.


[am4show have=’p9;p58;’ guest_error=’Guest error message’ user_error=’User error message’ ]


The index of refraction is 1.51 for red light and 1.53 for violet, which means that as light goes through glass, it slows down the violet light just a little it more than it does the red. Because of this, prisms can unmix light by dispersion because the prism has two (or more) boundaries where this effect adds to separate white light into its colors.


Click here to go to next lesson on Liquid Prisms

[/am4show]


In this experiment, water is our prism. A prism un-mixes light back into its original colors of red, green, and blue. You can make prisms out of glass, plastic, water, oil, or anything else you can think of that allows light to zip through.


What’s a prism? Think  of a beam of light.  It zooms fast on a straight path, until it hits something (like a water drop).  As the light goes through the water drop, it changes speed (refraction). The speed change depends on the angle that the light hits the water, and what the drop is made of.  (If it was a drop of mineral oil, the light would slow down a bit more.) Okay, so when white light passes through a prism (or water drop), changes speed, and turns colors.  So why do we see a rainbow, not just one color coming out the other side?


[am4show have=’p8;p9;p19;p46;p66;p89;’ guest_error=’Guest error message’ user_error=’User error message’ ]


The secret is because the light is made up of different wavelengths, and each gets bent by different amounts when they hit a new material. So one wave changes speed to red, another to yellow, another to green, etc. when the beam hits the prism. And water drops are tiny prisms.


The light passing through a water drop gets refracted twice, not once.  The first time is when it enters the water drop, the second when it bounces off the other side of the drop and reflects back through the water drop and out again (some of the light does make it out the other side of the drop, but most of it bounces back).  When the light emerges from the water drop, it changes speed again, and presto! You have a rainbow.


Natural rainbows (the ones that you see after it rains) happen when water drops (tiny prisms) in the air are hit by sunlight from behind you at just the right angle (which is relatively a low angle, near the ground).  The best rainbows can be seen when half of the sky is darkened with rainclouds and you’re in a clear patch with sun behind you. And guess what?  You can even see a nighttime rainbow (called a moonbow), although they’re pretty rare, usually near full moon.


Here’s what you do:


Materials:


  • mirror
  • shallow baking dish
  • water
  • sunlight


Download Student Worksheet & Exercises


Set a clear tray of water in sunlight. Lean a mirror against an inside edge and adjust so that a rainbow appears on the wall. You can also use a light bulb shining through a slit in a flat cardboard piece as a light source.


Troubleshooting: This is one of the easiest experiments to do, and the most beautiful. The trouble is, you don’t know where the water shadow will show up, so make sure you point the mirror to the sky and play with the angle of the mirror until you find the wavering rainbow. Because the shadow is constantly moving, you can snap a few pictures when you’ve got it so you can look over the finer details later. If this project still eludes you, take a large sheet and use it instead of the tiny index card.


Exercises


  1.   What serves as the prism in this experiment?
  2.   What property can help make something a good prism material?
  3. What are some other items that could be used as prisms?

[/am4show]


Click here to go to next lesson on Water Drops and Rainbows

Ever notice how water has to be involved before you get a rainbow? Rainbows never happen on dry, clear days.


[am4show have=’p9;p58;’ guest_error=’Guest error message’ user_error=’User error message’ ]


I remember how surprised I was when I saw a rainbow appear on a cloudless day while I was misting a soapy car with the garden hose. I was so amazed that the arc was larger than I realized that I climbed up a ladder before I realized that I could make the rainbow form in a cull circle!


Moonbows (also known as lunar rainbows) form from light reflected off the moon form in the atmosphere. Since they are formed from reflected sunlight, they tend to be very faint. If you want to find one, look in the opposite part of the sky from the moon. It will look like a white instead of the usual rainbow colors, but that’s because the eye has a hard time seeing colors in the dark. If you take a long-exposure photograph, the colors will appear. Aristotle himself recorded observing moonbows on dark nights when the weather conditions were just right!


Click here to go to next lesson on Spectrometer

[/am4show]


spectrometer2Spectrometers are used in chemistry and astronomy to measure light. In astronomy, we can find out about distant stars without ever traveling to them, because we can split the incoming light from the stars into their colors (or energies) and “read” what they are made up of (what gases they are burning) and thus determine their what they are made of. In this experiment, you’ll make a simple cardboard spectrometer that will be able to detect all kinds of interesting things!


SPECIAL NOTE: This instrument is NOT for looking at the sun. Do NOT look directly at the sun. But you can point the tube at a sheet of paper that has the sun’s reflected light on it.


Usually you need a specialized piece of material called a diffraction grating to make this instrument work, but instead of buying a fancy one, why not use one from around your house?  Diffraction gratings are found in insect (including butterfly) wings, bird feathers, and plant leaves.  While I don’t recommend using living things for this experiment, I do suggest using an old CD.


CDs are like a mirror with circular tracks that are very close together. The light is spread into a spectrum when it hits the tracks, and each color bends a little more than the last. To see the rainbow spectrum, you’ve got to adjust the CD and the position of your eye so the angles line up correctly (actually, the angles are perpendicular).


You’re looking for a spectrum (the rainbow image at left) – this is what you’ll see right on the CD itself. Depending on what you look at (neon signs, chandeliers, incandescent bulbs, fluorescent bulbs, Christmas lights…), you’ll see different colors of the rainbow. For more about how diffraction gratings work, click here.


Materials:


  • old CD
  • razor
  • index card
  • cardboard tube

[am4show have=’p8;p9;p19;p46;p105;p83;p89;p91;p101;’ guest_error=’Guest error message’ user_error=’User error message’ ]


Download Student Worksheet & Exercises


Find an old CD and a cardboard tube at least 10 inches long.  Cut a clean slit less than 1 mm wide in an index card or spare piece of cardboard and tape it to one end of the tube.  Align your tube with the slit horizontally, and on the top of the tube at the far end cut a viewing slot about one inch long and ½” inch wide.  Cut a second slot into the tube at a 45 degree angle from the vertical away from the viewing slot.  Insert the CD into this slot so that it reflects light coming through the slit into your eye (viewing slot).


Aim the 1 mm slit at a light source such as a fluorescent light, neon sign, sunset, light bulb, computer screen, television, night light, candle, fireplace… any light source you can find.  Look through the open hole at the light reflected off the compact disk (look for a rainbow in most cases) inside the cardboard tube.


Troubleshooting: This is a quick and easy way to bypass the need for an expensive diffraction grating. Use your spectrometer to look at computer screens, laptops, night lights, neon lights, candles, campfires, fluorescent lights, incandescent lights, LEDs, stoplights, street lights, and any other light sources you can find, even the moon through a telescope.


Exercises


  1. Name three more light sources that you think might work with your spectroscope.
  2.   Why is there a slit at the end of the tube instead of leaving it open?

Click here to go to next lesson on Mirages

[/am4show]


Mirages happen on sunny days when the roads are heated by the sun to a point where it also heats the air above the road. Since hot air is less (optically) dense that cool air, the light refracts as it travels through it.


[am4show have=’p9;p58;’ guest_error=’Guest error message’ user_error=’User error message’ ]


Click here to go to next lesson on Image Formation by Lenses

[/am4show]


Like sound, light travels in waves. These waves of light enter your eyes through the pupil, which is the small black dot right in the center of your colored iris. Your lens bends and focuses the light that enters your eye. In this experiment, we will study this process of bending light and we will look at the difference between concave and convex lenses.


[am4show have=’p8;p9;p29;p56;p81;p87;’ guest_error=’Guest error message’ user_error=’User error message’ ]


Here’s what you need


    • 1 washer, 3/8 inch inside diameter
    • 1 microscope slide
    • 1 container of petroleum jelly
    • 1 piece of newsprint with a lot of type
    • 1 pipette, 1 mL
    • water


Download Student Worksheet & Exercises


Here’s what you do


  1. Apply a little petroleum jelly on the washer’s flat side. NOTE: washers have flat and founded sides, so be sure you are putting the petroleum jelly on the flat side of the washer.
  2. Put the washer, petroleum jelly side down, on the middle of the microscope slide. Twist the washer a bit to seat it on the slide and make a seal. This should keep the water in place.
  3. Put the washer and slide on the newsprint. Fill the pipette with water. Use the pipette to slowly place water in the washer. Fill the washer until the water makes a domed shape. You have just made a convex lens!
  4. Find a letter e on the newspaper and put the lens over it. Draw a diagram of what the e looks like through the convex lens.
  5. Now use the pipette to remove water from the washer. Your goal is to create a dip in the surface of the water. Now find the same e and place your new concave lens over the letter. Draw a picture of what the e  looks like through the new lens.

What’s going on?


You can see that a convex lens bends outward and a concave lens bends inward. What does this do to light?


In a convex lens, the domed surface means that if light waves come in through the flat bottom surface, they will be spread out, or refracted, as they exit the curved portion of the lens. But since a concave lens dips inward it creates the opposite effect. When light waves exit the concave surface, they are brought together. This makes images appear smaller.


The lens does all the focusing work but it is actually the shape of the eye that determines what you see. If you have a tall, oblong eye, you are far-sighted. And conversely, if your eyes are short and fat, you are near-sighted. In either case, the lenses are functioning properly but the actual shape of the eye needs a slight adjustment.


Exercises


  1. What are the two main types of lenses?
  2. How are the two main types of lenses shaped
  3. How do the two main types of lenses work?

[/am4show]


Click here to go to next lesson on Concave Lenses

When I was in grad school, I needed to use an optical bench to see invisible things. I was trying to ‘see’ the exhaust from a  new kind of F15 engine, because the aircraft acting the way it shouldn’t – when the pilot turned the controls 20o left, the plane only went 10o. My team had traced the problem to an issue with the shock waves, and it was my job to figure out what the trouble was. (Anytime shock waves appear, there’s an energy loss.)


Since shock waves are invisible to the human eye, I had to find a way to make them visible so we could get a better look at what was going on. It was like trying to see the smoke generated by a candle – you know it’s there, but you just can’t see it. I wound up using a special type of photography called Schlieren.
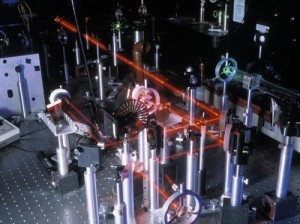

An optical table gives you a solid surface to work on and nails down your parts so they don’t move. This is an image taken with Schlieren photography. This technique picks up the changes in air density (which is a measure of pressure and volume).


The air above a candle heats up and expands (increases volume), floating upwards as you see here. The Schlieren technique shines a super-bright xenon arc lamp beam of light through the candle area, bounces it off two parabolic mirrors and passes it through a razor-edge slit and a neutral density filter before reaching the camera lens. With so many parts, I needed space to bolt things down EXACTLY where I wanted them. The razor slit, for example, just couldn’t be anywhere along the beam – it had to be right at the exact point where the beam was focused down to a point.


I’m going to show you how to make a quick and easy optical lab bench to work with your lenses. Scientists use optical benches when they design microscopes, telescopes, and other optical equipment. You’ll need a bright light source like a flashlight or a sunny window, although this bench is so light and portable that you can move it to garage and use a car headlight if you really want to get creative. Once your bench is set up, you can easily switch out filters, lenses, and slits to find the best combination for your optical designs. Technically, our setup is called an optical rail, and the neat thing about it is that it comes with a handy measuring device so you can see where the focal points are for your lenses. Let’s get started:
[am4show have=’p8;p9;p19;p46;p105;p66;p89;’ guest_error=’Guest error message’ user_error=’User error message’ ]


Materials:


  • lenses (glass or plastic), magnifying lenses work also
  • two razor blades (new)
  • index cards (about four)
  • razor
  • old piece of wood
  • single hair from your head
  • tape
  • aluminum foil
  • clothespins (2-4)
  • laser pointer
  • popsicle sticks (tongue-depressor size)
  • hot glue gun
  • scissors and a sharp razor
  • meter sticks (2)
  • bright light source (ideas for this are on the video)

Your lenses are curved pieces of glass or plastic designed to bend (refract) light. A simple lens is just one piece, and a compound lens is like the lens of a camera – there’s lots of them in there. The first lenses were developed by nature – dewdrops on plant leaves are natural lenses. The light changes speed and bends when it hits the surface of the drop, and things under the drop appear larger. (Read more about refraction here.) The earliest written records of lenses are found in the Greek archives and described as being glass globes filled with water.


Concave Lenses

Concave lenses are shaped like a ‘cave’ and curve inward like a spoon. Light that shines through a concave lens bends to a point (converging beam). Ever notice how when you peep through the hole in a door (especially in a hotel), you can see the entire person standing on the doorstep? There’s a concave lens in there making the person appear smaller.


You’ll also find these types of lenses in ‘shoplifting mirrors’. Store owners post these mirrors around help them see a larger area than a flat mirror shows, although the images tend to be a lot smaller.


If you have a pair of near-sighted glasses, chances are that the lenses are concave. Near-sighted folks need help seeing things that are far away, and the concave lenses increase the focal point to the right spot on their retina.


Concave lenses work to make things look smaller, so there not as widely used as convex lenses. You’ll find concave lenses inside camera lenses and binoculars to help clear weird optical problems that happen around the edges of a convex lens (called aberration).


Here’s a video on lenses, both convex and concave:


Convex lenses bulge outwards, bending the light out in a spray (diverging beam). A hand-held magnifying glass is a single concave lens with a handle. These lenses have been used as ‘burning glasses’ for hundreds of years – by placing a small piece of paper at its focal point and using the sun as a light source, you can focus the light energy so intensely that you reach the flash point of the paper (the paper auto-ignites around 450oF).


When you stack a large convex lens above a solar panel, the magnification effect makes it so you can get away with using a smaller photovoltaic cell to get the same amount of energy from the sun. You’ll find convex lenses in telescopes, microscopes, binoculars, eyeglasses, and more.


Mirrors
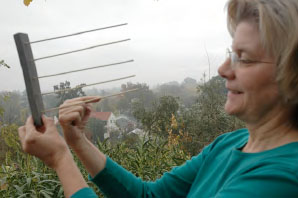
lenses-part1What if you coat one side of the lens with a reflecting silver coating? You get a mirror!


Stick wooden skewers into a piece of foam to simulate how the light rays reflect off the surface of the mirror. Note that when the mirror (foam) is straight, the light rays are straight (which is what you see when you look in the bathroom mirror). The light bounces off the straight mirror and zips right back at you, remaining parallel.
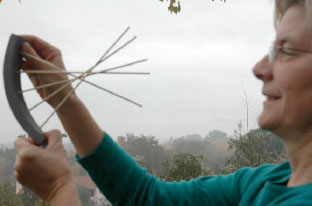

lenses-part2 copyNow arch the foam. Notice how the light ways (skewers) come to a point (focal point).


After the focal point, the rays invert, so the top skewer is now at the bottom and the bottom is now at the top.  This is your flipped (inverted) image. This is what you’d see when you look into a concave mirror, like the inside of a metal spoon. You can see your face, but it’s upside-down.


Slits

A slit allows light from only one source to enter. If you have light from other sources, your light beam is more scattered and your images and lines become blurry. Thin slits can be easily made by placing the edges of two razor blades very close together and securing into place. We’re going to use an anti-slit using a piece of hair, but you can substitute a thin needle.


Here’s a video on using filters and slits with your laser:


Filters

There are hundreds of different types of filters, used in photography, astronomy, and sunglasses. A filter can change the amount and type of light allowed through it. For example, if you put on red-tinted glasses, suddenly everything takes on a reddish hue. The red filter blocks the rest of the incoming wavelengths (colors) and only allows the red colors to get to your eyeball. There are color filters for every wavelength, even IR and UV.


UV filters reduce the haziness in our atmosphere, and are used on most high-end camera lenses, while IR filters are heat-absorbing filters used with hot light sources (like near incandescent bulbs or in overhead projectors).


A neutral density (ND) filter is a grayish-colored filter that reduces the intensity of all colors equally. Photographers use these filters to get motion blur effects with slow shutter speeds, like a softened waterfall.


Build an Optical Bench

It’s time to put all these pieces together and make cool optical stuff – are you ready?


Download Student Worksheet & Exercises


Click here for more experiments on building your own microscope and telescope.


Cat’s Eyes

Corner reflectors are U-turns for light beams. A corner mirror made from three mirrors will reflect the beam straight back where it came from, no matter what angle you hit it at.  Astronauts placed these types of mirrors on the moon so scientists could easily bounce laser beams off the moon and have them return to the same place on Earth. They used these reflected laser beams to measure the speed of light.


You’ll find corner mirrors in “cat’s eye” reflectors on the road. Car headlights illuminate the reflectors and send the beam straight back the same way – right at the driver.


Exercises


  1. Using only the shape, how can you tell the difference between a convex and a concave lens?
  2.  Which type of lens makes objects viewed through it appear smaller?
  3.  Which type of lens makes the objects viewed through it appear larger?
  4.  How do you get the f number?

[/am4show]


Click here to go to next lesson on Convex Lenses

Convex lenses bulge outwards, bending the light out in a spray (diverging beam). A hand-held magnifying glass is a single concave lens with a handle. These lenses have been used as ‘burning glasses’ for hundreds of years – by placing a small piece of paper at its focal point and using the sun as a light source, you can focus the light energy so intensely that you reach the flash point of the paper (the paper auto-ignites around 450oF).


[am4show have=’p9;p58;’ guest_error=’Guest error message’ user_error=’User error message’ ]


When you stack a large convex lens above a solar panel, the magnification effect makes it so you can get away with using a smaller photovoltaic cell to get the same amount of energy from the sun. You’ll find convex lenses in telescopes, microscopes, binoculars, eyeglasses, and more.


Click here to go to next lesson on Thin Lenses

[/am4show]


Thin lenses are either diverging or converging lenses that aren’t very thick in the middle. We can simplify our ray tracing diagrams and our math equations by assuming a lens is thin.


[am4show have=’p9;p58;’ guest_error=’Guest error message’ user_error=’User error message’ ]


Click here to go to next lesson on Converging Lenses

[/am4show]


Converging lenses take incoming light and focus it down to a point before diverging out again. You can have single or double convex lenses, depending on the shape of the lens.


[am4show have=’p9;p58;’ guest_error=’Guest error message’ user_error=’User error message’ ]


But what does the image look like? Remember the line of sight principle where in order to see an object, you have to be able to sight along a line at that object? This idea is how images are formed and what they will look like.


Click here to go to next lesson on Diverging Lenses

[/am4show]


The rays spread out when passing through a diverging lens. You can have single or double concave lenses.


[am4show have=’p9;p58;’ guest_error=’Guest error message’ user_error=’User error message’ ]


Click here to go to next lesson on How Images Change with Distance

[/am4show]


What happens if you bring an object from far away up close to a lens? How does the image change? The answer is that it depends on what type of lens and the distance it is from the lens.


[am4show have=’p9;p58;’ guest_error=’Guest error message’ user_error=’User error message’ ]


Click here to go to next lesson on The Lens Maker Equation

[/am4show]


Imagine you were designing a pair of eyeglasses. How would you know what kind of lens to make? How curved would it be? What would the magnification be? Here’s how you use the lens maker’s equation to figure out the critical information about a lens.


[am4show have=’p9;p58;’ guest_error=’Guest error message’ user_error=’User error message’ ]


Click here to go to next lesson on The Eye

[/am4show]


By using lenses and mirrors, you can bounce, shift, reflect, shatter, and split a laser beam. Since the laser beam is so narrow and focused, you’ll be able to see several reflections before it fades away from scatter. Make sure you complete the Laser Basics experiment first before working with this experiment.


You’ll need to make your beam visible for this experiment to really work.  There are several different ways you can do this:


[am4show have=’p8;p9;p19;p46;p89;p99;’ guest_error=’Guest error message’ user_error=’User error message’ ]


1. Take your laser with you into a steamy bathroom (which has mirrors!) after a hot shower.  The tiny droplets of water in the steam will illuminate your beam. (Psst! Don’t get the laser wet!)


2. If you have carpet, shine your laser under the bed while stomping the floor with your hand.  The small particles (dust bunnies?) float up so you can see the beam. Some parents aren’t going to like this idea, sooo….


3. Drop a chunk of dry ice (use gloves!) into a bowl of water and use the fog to illuminate the beam.  The drawback to this is that you need to keep adding more dry ice as it sublimates (goes from solid to gas) and replacing the water (when it gets too cold to produce fog).


Materials:


  • large paper clips
  • brass fastener
  • index card
  • small mirrors (mosaic-type work well)


Download Student Worksheet & Exercises


Here’s what you do: Open up each paper clip into the “L” shape.  Insert a brass fastener into one U-shape leg and punch it through the card.  Hot glue (or tape) one square mirror to the other end of the L-bracket.  Your mirror should be upright and able to rotate.  Do this with each mirror.  (You can alternatively mount each mirror to a one-inch wooden cube as shown in the video.)


Turn on the laser adjust the mirrors to aim the beam onto the next mirror, and the next!  Turn down the lights first and use any one of the methods mentioned above to make your laser beam visible.


What’s happening? The mirrors are bouncing the laser beam to each other, and the effect shows up when you dim the lights and add fog or dust particles to help illuminate the beam.  A laser beam is a highly focused beam of light, and you can direct that light and bounce it off mirrors!


Why can’t I see the beam normally? The reason you can’t see the laser beam without the help of a steamy room, dirty carpet, or fog machine is that your eyes are tuned for green light, not red (which is why you can see the beam from a green laser at night).


Exercises


  1.   The word LASER is actually an acronym. What does it stand for?
  2. What type of laser did we use in our experiment?
  3. Why can’t we see the laser beams without the help of steam, dirty carpet, etc.?

[/am4show]


Click here to go to next lesson on Line of Sight

The eye is a complex structure that detects and focuses light. Light first enters the eye through the cornea, a clear protective layer on the outside of the eye. The pupil, a black opening in the eye, lets light in. In dark rooms, the pupil will become larger, or dilate, in order to let in more light. If the room suddenly becomes bright, the pupil will become smaller. The pupil is surrounded by the brown, blue, grey, or green iris.


After passing through the pupil, light goes to the lens which, like a hand lens, is a clear curved structure that helps focus light on the retina, in the back of the eye. The retina is where the rods and cones are found.


This video is an old instructional film shown to pre-med students in the early 50s you might enjoy watching:


Click here to go to next lesson on Eye Balloon

[/amprotect]


In this lab, we are going to make an eyeball model using a balloon. This experiment should give you a better idea of how your eyes work. The way your brain actually sees things is still a mystery, but using the balloon we can get a good working model of how light gets to your brain.


[am4show have=’p8;p9;p29;p56;p66;p81;p87;p89;’ guest_error=’Guest error message’ user_error=’User error message’ ]


Here’s what you need


  • 1 biconvex plastic lens
  • 1 round balloon, white, 9 inches
  • 1 assistant
  • 1 votive candle
  • 1 black marker
  • 1 book of matches
  • 1 metric ruler
  • Adult Supervision!


Download Student Worksheet & Exercises


Here’s what you do


  1. Blow up the balloon until it is about the size of a grapefruit. If it’s difficult to inflate, stretch the material a few times or ask an adult to help you.
  2. You will need an extra set of hands for this portion. Ask your partner to hold the neck of the balloon closed to keep the air in while you insert the lens into the opening. The lens will need to be inserted perpendicularly to the balloon’s neck. It will prevent any air from escaping once it’s in place. Like your eye, light will enter through the lens and travel toward the back of the balloon.
  3. Hold the balloon so that the lens is pointing toward you. Take the lens between your thumb and index finger. Look into the lens into the balloon. You should have a clear view of the inside. Start to twist the balloon a little and notice that the neck gets smaller like your pupils do when exposed to light. Practice opening and closing the balloon’s “pupil.”
  4. Have an adult help you put the candle on the table and light it. Turn out the lights.
  5. Put the balloon about 20 to 30 centimeters away from the candle with the lens pointed toward it. The balloon should be between you and the candle. You should see a projection of the candle’s flame on the back of the balloon’s surface. Move the balloon back and forth in order to better focus the image on the back of the balloon and then proceed with data collection.
  6.  Describe the image you see on the back of the balloon. How is it different from the flame you see with your eyes? Draw a picture of how the flame looks.
  7. The focal length is the distance from the flame to the image on the balloon. Measure this distance and record it.
  8. What happens if you lightly push down on the top of the balloon? Does this affect the image? You are experimenting with the affect caused by near-sightedness.
  9. To approximate a farsighted eye, gently push in the front and back of the balloon to make it taller. How does this change what you see?

What’s going on?


Okay, let’s discuss the part of the balloon that relate to parts of your eye. The white portion of the balloon represents your sclera, which you may have already guessed is also the white part of your eye. It is actually a coating made of protein that covers the various muscle in your eye and holds everything together.


Of course, the lens you inserted represents the actual lens in your eye. The muscles surrounding the lens are called ciliary muscles and they are represented by the rubber neck of your balloon. The ciliary muscles help to control the amount of light entering your eyes.


The retina is in the back of your eye, which is represented by the inside back of your balloon. The retina supports your rods and cones. They collect information about light and color and send it to your brain.


Exercises


  1.      How does your eye work like a camera?
  2.      How can you tell if a lens is double convex?
  3.      What is the difference between convex and concave?
  4.      Can you give an example of an everyday object that has both a convex and a concave side?
  5.      How can you change the balloon to make it like a near-sighted eye?
  6.      How can you change the balloon to make it like a far-sighted eye?

[/am4show]


Click here to go to next lesson on Nearsightedness and Farsightedness

In order to see an object, you have to be in its line of sight. With a mirror, that means you have to be in the line of sight of the image that is in the mirror.


[am4show have=’p9;p58;’ guest_error=’Guest error message’ user_error=’User error message’ ]


Click here to go to next lesson on Law of Reflection

[/am4show]


The angle that the reflected light makes with a line perpendicular to to the mirror is always equal to the angle of the incident ray for a plane (2-dimensional) surface.


[am4show have=’p9;p58;’ guest_error=’Guest error message’ user_error=’User error message’ ]


Click here to go to next lesson on Law of Reflection and Flashlights

[/am4show]


The lens in the eye changes shape to bring objects into focus. Myopia (nearsightedness) is the lens’ inability to bring objects that are far away into focus. The light gets brought into focus in front of the retina, so the eyeglasses needed to correct for this have diverging lenses.


[am4show have=’p9;p58;’ guest_error=’Guest error message’ user_error=’User error message’ ]


Hyperopia (farsightedness) is when the image is focused behind the retina, which happens to people later in life. The way to correct it is with a pair of converging lens eyeglasses.


Click here to go to next lesson on Blind Spots

[/am4show]


Here’s an experiment that uses a flashlight with a paper on the front with a slit cut out so a narrow beam of light hits the mirror. Use a protractor instead of the fancy disk that I used in the video):


[am4show have=’p9;p58;’ guest_error=’Guest error message’ user_error=’User error message’ ]


Click here to go to next lesson on Lasers and the Law of Reflection

[/am4show]


The angle that the reflected light makes with a line perpendicular to to the mirror is always equal to the angle of the incident ray for a plane (2-dimensional) surface.


We’re going to play with how light reflects off surfaces. At what angle does the light get reflected? This experiment will show you how to measure it.


[am4show have=’p8;p9;p19;p46;p89;p99;’ guest_error=’Guest error message’ user_error=’User error message’ ]


Materials:


  • laser
  • mirror
  • protractor
  • pencil
  • paper


These downloads are provided by Laser Classroom. Check out their website for more free downloads and really cool lasers!


Click here for the chapter in optics for advanced students.


Did you notice a pattern? When the laser beam hits the mirror at a 30o angle, it comes off the mirror at 60o, which means that the angle on both sides of a line perpendicular to the mirror are equal. That’s the law of reflection on a plane surface.


[/am4show]


Click here to go to next lesson on Specular and Diffuse Reflection

The law of reflection holds true no matter what angle the light hits the surface with. Specular reflection occurs when light reflects off smooth surfaces like mirrors or quiet lakes, and diffuse reflection happens when light reflects off rough surfaces (like everything else). How the light reflects off and scatters depends on the roughness of the material.


[am4show have=’p9;p58;’ guest_error=’Guest error message’ user_error=’User error message’ ]


Click here to go to next lesson on Image Formation in Plane Mirrors

[/am4show]


Mirrors are used to gather light and create images, like the mirror in your bathroom or those found in telescopes. We’re going to actually make a telescope a little later, but now we need to learn how the mirror makes an image in the first place.


[am4show have=’p9;p58;’ guest_error=’Guest error message’ user_error=’User error message’ ]


To see an object (without a mirror), you have to be in the object’s line of sight so the light reflected from the object can hit your eye. Pretty easy, right?


What has to happen to see an object in a mirror?


You can only see objects in the mirror when you are in the line of sight of the image.


Click here to go to next lesson on Parallax

[/am4show]


Parallax is how objects in the distance appear differently than objects up close depending on your viewpoint. If you’re over to one side, you’ll see something different than if you’re over to the other side.


[am4show have=’p9;p58;’ guest_error=’Guest error message’ user_error=’User error message’ ]


You’ve seen this in video games where the background scrolls by more slowly than the foreground, where the main character is.


Astronomers use parallax to measure the distances of stars. Closer stars will look slightly different when the Earth is on one point of its orbit compared to 6 months later when it’s on the other side of the sun.


Parallax shows up in binoculars, microscopes, and other devices where you look through something that uses both eyes. It’s is also how our eyes gain depth perception by overlapping what you see from each eye. Next time you’re in the passenger seat of a car, look at the speedometer and compare your reading with that of the driver’s.


Click here to go to next lesson on Virtual Images

[/am4show]


Have you ever seen a candle in a mirror? The image of the candle looks like the reflected rays seem to be coming from the image point, but they really don’t. This type of image is a virtual images, because it appears that light is coming from this location, but it’s not really the case.


[am4show have=’p9;p58;’ guest_error=’Guest error message’ user_error=’User error message’ ]


Virtual images that are formed where light doesn’t actually get to. When you look into the bathroom mirror, it sure looks like you standing a few feet away into the depth of the wall, even though light never gets at that point in space behind the mirror.


Click here to go to next lesson on Plane Mirrors

[/am4show]


When you look in a plane mirror, you’ll see images that are virtual, upright, left-right reversed, and have no magnification.


[am4show have=’p9;p58;’ guest_error=’Guest error message’ user_error=’User error message’ ]


Click here to go to next lesson on Ray Tracing

[/am4show]


Ray tracing is how scientists figure out the path that light takes by looking at the speed of the wave, the optical density of the medium, and how reflective the surface is. Ray tracing shows how light can reflect, bend, change direction as it moves from one medium to another. Let’s find out how you can locate any image of any point by tracing rays.


[am4show have=’p9;p58;’ guest_error=’Guest error message’ user_error=’User error message’ ]


Click here to go to next lesson on Mirror Mirror

[/am4show]


Ever notice that even though you may be 6 feet tall, you don’t need a 6-foot tall mirror in order to see your whole self? How big of a mirror do you actually need to see your entire length?


[am4show have=’p9;p58;’ guest_error=’Guest error message’ user_error=’User error message’ ]


So mirrors only need to be half your height in order for you to see your full length! If you have a full length mirror at home, after measuring your own height, tape off the top and bottom so only a length that is half your height still shows and see if you can see your whole self in the mirror.


Click here to go to next lesson on Right Angle Mirrors

[/am4show]


Right angle mirrors are two mirrors that are connected together to form an L-shape. What’s interesting about this is that while normally you’d have one image appear in one mirror, you can have three images appear when you put them together at right angles! Here’s how…


[am4show have=’p9;p58;’ guest_error=’Guest error message’ user_error=’User error message’ ]


Click here to go to next lesson on Multiple Mirrors

[/am4show]


Your optic nerve can be thought of as a data cord that is plugged in to each eye and connects them to your brain. The area where the nerve connects to the back of your eye creates a blind spot. There are no receptors in this area at all and if something is in that area, you won’t be able to see it. This experiment locates your blind spot.


[am4show have=’p8;p9;p29;p56;p81;p87;’ guest_error=’Guest error message’ user_error=’User error message’ ]


Here’s what you need


  • 1 frog and dot printout
  • 1 meter stick
  • 1 scrap piece of cardboard


Download Student Worksheet & Exercises


Here’s what you do


  1.  Print out the frog and dot and remove the dotted portion. Attach it to the piece of cardboard, which should have a matching portion removed. You can place the paper and cardboard on the meter stick at the notched area.
  2. Now to locate blind spots. First, close your left eye. Look at the frog with your right eye. Can you see the dot and the frog? You should be able to see both at this point, but concentrate on the frog.  Now slowly move the stick toward you so that the frog is coming toward your eye. Pay attention and stop when the dot disappears from your peripheral vision. At this point, the light hitting the dot and reflecting back toward your eye is hitting the blind spot at the back of your right eyeball, so you can’t see it. Record how far your eye is from the card for your right eye.
  3. Continue to move the stick toward your face and at some point you will notice that you are able to see the dot again. Keep moving the stick forward and back. What happens to the dot?
  4.  Repeat steps 2 and 3 with your left eye, keeping your right eye closed. This time, stare at the dot and watch for the frog to disappear. Move the paper on the stick back and forth slowly until you notice the frog disappears. You have found the blind spot for your left eye. Be sure to note the distance the paper is from your eye.

What’s going on?


There are no light receptors in the area of your eye where the optic nerve attaches to your eyeball. This is your blind spot and if an image is in this spot, the light reflected off of it doesn’t get perceived by your eye. So you don’t see it!


Exercises


  1. What did you notice about the vision of the student and the blind spot that you measured?
  2. Why do you think it’s important to know where your blind spot is?

[/am4show]


Click here to go to next lesson on The Lens of the Eye

Did you know that you can change the number of images you see by changing the angle two mirrors make with each other? Here’s how…


[am4show have=’p9;p58;’ guest_error=’Guest error message’ user_error=’User error message’ ]


Click here to go to next lesson on Concave Mirrors

[/am4show]


benham1Charles Benhamho (1895) created a toy top painted with the pattern (images on next page). When you spin the disk, arcs of color (called “pattern induced flicker colors”) show up around the disk. And different people see different colors!


We can’t really say why this happens, but there are a few interesting theories. Your eyeball has two different ways of seeing light: cones and rods. Cones are used for color vision and for seeing bright light, and there are three types of cones (red, green, and blue). Rods are important for seeing in low light.


One possibility is… [am4show have=’p8;p9;p19;p46;p66;’ guest_error=’Guest error message’ user_error=’User error message’ ]


…how the human eye is tuned for different colors. Your eyeballs respond at different rates to red, green, and blue colors. The spinning disk triggers different parts of the retina. This alternating response may cause some type of interaction within the nervous system that generates colors.


Another theory is that certain cones take longer react, and thus stay active, for longer amounts of time (though we’re still talking milliseconds, here). To put another way, the white color activates all three cones, but then the black deactivates them in a certain sequence, causing your brain to get mixed and unbalanced signals. Your brain does the best it can to figure it out the information it’s getting, and “creates” the colors you see in order to make sense of it all.


Neither of these theories explains the colors of Benham’s disk completely and the reason behind the illusion remains unsolved. Can you help out these baffled scientists?


Materials:


Download Student Worksheets & Exercises


All you need to do is download this PDF file and cutout a copy of a disc on the page. Then find a way to spin it at high speeds – you can stick a pencil through the center and spin it like a top, thread string through it and pull to rotate (just like the Mixing Colors Experiment), attach to a drill or mixer or electric screwdriver, or slap it on a motor shaft and engage the power. Which works best?


Exercises


  1. What colors were you able to see when the disks were spinning?
  2. How did the different patterns look when they were spun?
  3.  How did speed and direction affect what you saw?

Download your Refraction Problem Set here.

Click here to go to your VERY LAST lesson… Dream BIG!

[/am4show]


You already are familiar with what happens to an image on a plane mirror. What if the mirror is curved? Spherical mirrors are mirrors that are like a small section of a ball. (You could also argue that a plane mirror is a spherical mirror with an infinitely large radius, but let’s save that for another time…)


[am4show have=’p9;p58;’ guest_error=’Guest error message’ user_error=’User error message’ ]


Click here to go to next lesson on Focusing the Light

[/am4show]


If you’ve never done this experiment, you have to give it a try! This activity will show you the REAL reason that you should never look at the sun through anything that has lenses in it.


Because this activity involves fire, make sure you do this on a flame-proof surface and not your dining room table! Good choices are your driveway, cement parking lot, the concrete sidewalk, or a large piece of ceramic tile.  Don’t do this experiment in your hand, or you’re in for a hot, nasty surprise.


As with all experiments involving fire, flames, and so forth, do this with adult help (you’ll probably find they want to do this with you!) and keep your fire extinguisher handy.


Materials:


  • sunlight
  • dead leaf
  • magnifying glass
  • fire extinguisher
  • adult help

Here’s what you need to do:


[am4show have=’p8;p9;p19;p46;p105;p96;’ guest_error=’Guest error message’ user_error=’User error message’ ]


Magnifying lenses, telescopes, and microscopes use this idea to make objects appear different sizes by bending the light. When light passes through a different medium (from air to glass, water, a lens…) it changes speed and usually the angle it’s traveling at.  A prism splits incoming light into a rainbow because the light bends as it moves through the prism. A pair of eyeglasses will bend the light to magnify the image.


[/am4show]


Click here to go to next lesson on How Concave Mirrors Create Images

Concave mirrors are also used as ‘shoplifting mirrors’. Store owners post these mirrors around help them see a larger area than a flat mirror shows, although the images tend to be a lot smaller.


[am4show have=’p9;p58;’ guest_error=’Guest error message’ user_error=’User error message’ ]


Concave mirrors can create real and virtual images depending on the location of the object relative to the mirror.


Click here to go to next lesson on Building a Telescope

[/am4show]


So you’ve played with lenses, mirrors, and built an optical bench. Want to make a real telescope? In this experiment, you’ll build a Newtonian and a refractor telescope using your optical bench.

Materials:


  • optical bench
  • index card or white wall
  • two double-convex lenses
  • concave mirror
  • popsicle stick
  • mirror
  • paper clip
  • flash light
  • black garbage bag
  • scissors or razor
  • rubber band
  • wax paper
  • hot glue

[am4show have=’p8;p9;p19;p46;p105;p89;p90;’ guest_error=’Guest error message’ user_error=’User error message’ ]


Download Student Worksheet & Exercises


[/am4show]


Click here to go to next lesson on Reflection Rules for Curved Mirrors

In concave mirrors, the incident parallel light traveling parallel to the principal axis passes through the focal point when it reflects. Conversely, incident parallel light traveling through the focal point will then travel parallel when it reflects.


[am4show have=’p9;p58;’ guest_error=’Guest error message’ user_error=’User error message’ ]


Click here to go to next lesson on Ray Tracing for Concave Mirrors

[/am4show]


Reflection on a concave mirror uses two important basic rules: first, incident light traveling parallel to the principal axis passes through the focal point after it reflects on the surface. Second, incident light traveling through the focal point will travel parallel to the principle axis after it reflects.


[am4show have=’p9;p58;’ guest_error=’Guest error message’ user_error=’User error message’ ]


Click here to go to next lesson on Shapes of Mirrors

[/am4show]


Mirrors can be flat or curved, and they give different sizes of images depending not only on how curved or straight they are, but also which way they curve.


[am4show have=’p9;p58;’ guest_error=’Guest error message’ user_error=’User error message’ ]


Click here to go to next lesson on Concave Mirror Images

[/am4show]


But what does the image really look like? It depends on where you place the object relative to the mirror. If you place an object at the center of curvature, you’ll get a real inverted image the same size and location as the original.


[am4show have=’p9;p58;’ guest_error=’Guest error message’ user_error=’User error message’ ]


If you place it beyond the center of curvature (away from the mirror), the image will be inverted (upside-down), smaller, and real. In front of the center of curvature will give an image that is beyond the center, inverted, and larger than the original. Objects at the focal point don’t give any image at all.


To get a virtual image, you need to put the object between the focal point and the mirror, which will appear right-side up and magnified.


Click here to go to next lesson on Image Size and Placement

[/am4show]


What size is the image of the object, and where is it? Using the mirror equation, we can easily figure this out…


[am4show have=’p9;p58;’ guest_error=’Guest error message’ user_error=’User error message’ ]


Click here to go to next lesson on More Practice with Concave Mirrors

[/am4show]


Let’s do another sample problem so you see how easy it is to find out information about the image…


[am4show have=’p9;p58;’ guest_error=’Guest error message’ user_error=’User error message’ ]


Click here to go to next lesson on Aberration

[/am4show]


Spherical mirrors have aberration, which is a loss in the definition of the image because of the geometry of the mirror itself. It’s a defect in the mirror shape itself, which is caused by not being able to focus all the light to a specific point.


[am4show have=’p9;p58;’ guest_error=’Guest error message’ user_error=’User error message’ ]


Telescopes with mirrors use parabolic instead of spherical mirrors. The shape of the outer edges allow for sharper, clearer images.


Click here to go to next lesson on Convex Mirrors

[/am4show]


Convex mirrors create virtual images behind the mirror. are also called diverging mirrors, since incident light reflects off the mirror and diverges, never intersecting on the object side of the mirror.


[am4show have=’p9;p58;’ guest_error=’Guest error message’ user_error=’User error message’ ]


The rules of reflection with incident light reflecting on a convex mirror are a little different from concave mirrors. Recall that for concave mirrors, incident light traveling parallel to the principal axis will pass through the focal point after reflection, and incident light traveling through the focal point will travel parallel after reflection.


For convex mirrors, incident light traveling parallel to the principal axis will reflect so that the extension will pass through the focal point, and any extension passing through the focal point will travel parallel to the principal axis.


But what does the image actually look like? Convex mirrors always create virtual, upright, smaller images that look like they’re right behind the mirror, no matter where you put the object. The size of the image depends on how far away the object is. The further from the mirror, the smaller the image is going to appear.


Yay! You completed this section! Now it’s time for you to solve physics problems on your own:


Download your Reflection Problem Set here.

[/am4show]


Energy can take one of two forms: matter and light (called electromagnetic radiation). Light is energy that can travel through space. When you feel the warmth of the sun on your arm, that’s energy from the sun that traveled through space as infrared radiation (heat). When you see a tree or a bird, that’s light from the sun that traveled as visible light (red, orange… the whole rainbow) reflecting and bouncing off objects to get to your eye. Light can travel through objects sometimes… like the glass in a window.


[am4show have=’p9;p58;’ guest_error=’Guest error message’ user_error=’User error message’ ]


Key Concepts

Imagine tossing a rock into a still pond and watching the circles of ripples form and spread out into rings. Now look at the ripples in the water – notice how they spread out. What makes the ripples move outward is energy , and there are different kinds of energy, such as electrical (like the stuff from your wall socket), mechanical (a bicycle), chemical (a campfire) and others.


The ripples are like light. Notice the waves are not really moving the water from one side of the pond to the other, but rather move energy across the surface of the water. To put it another way, energy travels across the pond in a wave. Light works the same way – light travels as energy waves. Only light doesn’t need water to travel through the way the water waves do – it can travel through a vacuum (like outer space).


Light can change speed the same way sound vibrations change speed. (Think of how your voice changes when you inhale helium and then try to talk.) The fastest light can go is 186,282 miles per second – that’s fast enough to circle the Earth seven times every second, but that’s also inside a vacuum. You can get light going slower by aiming it through different gases. In our own atmosphere, light travels slower than it does in space.


Your eyeballs are photon detectors. These photons move at the speed of light and can have all different wavelengths, which correspond to the colors we see. Red light has a longer wavelength (lower energy and lower frequency) that blue light.


What’s Going On?

When a beam of light hits a different substance (like a window pane or a lens), the speed that the light travels at changes. (Sound waves do this, too!) In some cases, this change turns into a change in the direction of the beam.


For example, if you stick a pencil is a glass of water and look through the side of the glass, you’ll notice that the pencil appears shifted. The speed of light is slower in the water (140,000 miles per second) than in the air (186,000 miles per second), called optical density, and the result is bent light beams and broken pencils.


You’ll notice that the pencil doesn’t always appear broken. Depending on where your eyeballs are, you can see an intact or broken pencil. When light enters a new substance (like going from air to water) perpendicular to the surface (looking straight on), refractions do not occur.


However, if you look at the glass at an angle, then depending on your sight angle, you’ll see a different amount of shift in the pencil. Where do you need to look to see the greatest shift in the two halves of the pencil?


Depending on if the light is going from a lighter to an optically denser material (or vice versa), it will bend different amounts. Glass is optically denser than water, which is denser than air.


Not only can you change the shape of objects by bending light (broken pencil or whole?), but you can also change the size. Magnifying lenses, telescopes, and microscopes use this idea to make objects appear different sizes.


Questions to Ask

  1. Can light change speeds?
  2. Can you see ALL light with your eyes?
  3. Give three examples of a light source.
  4. Why does the pencil appear bent? Is it always bent? Does the temperature of the water affect how bent the pencil looks? What if you put two pencils in there?
  5. What if you use oil instead of water for bending a pencil?
  6. How does a microscope work?
  7. What’s the difference between a microscope and a telescope?

Click here to go to next lesson on Light Reflection

[/am4show]


You can see objects because light from that object travels to your eyes. Sometimes light is reflected off objects before it reaches our eyes, and sometimes it comes straight from the source itself.


A candle is a light source. So is a campfire, a light bulb, and the sun. An apple, however, reflects light. It doesn’t give off any light on its own but you can see it because light waves bounce off the apple into your eye. If you shut off the light, then you can’t see the apple. In this same way, the sun is a light source, and the moon is a light reflector.
[am4show have=’p9;p58;’ guest_error=’Guest error message’ user_error=’User error message’ ]


You see objects because light reflections because light reflects off them into your eye. The angle that the light wave approaches it equal to the angle that the wave leaves the surface, which is not only true for light but also sound waves.


Click here to go to next lesson on Does Light Travel in a Straight Line?

[/am4show]


Does light travel in a straight line? Let’s find out…


[am4show have=’p9;p58;’ guest_error=’Guest error message’ user_error=’User error message’ ]


Click here to go to next lesson on Light Refraction

[/am4show]


Light also bends as it passes from one medium to another, like going from the air to a glass window. But why does that happen?
[am4show have=’p9;p58;’ guest_error=’Guest error message’ user_error=’User error message’ ]


You can imagine a toy car going from a wood floor to carpeting. One wheel hits the carpet first and slows down before the other, causing the toy to turn. The direction of the wave changes in addition to the speed. The slower speed must also shorten its wavelength since the frequency of the wave doesn’t change.


The bottom line is that bending is caused by the change in speed of light when it crosses a boundary. This is true everywhere, even in the vacuum of space if it’s going from space to our atmosphere.


Click here to go to next lesson on Light Refraction using Two Lasers

[/am4show]


This simple activity has surprising results! We’re going to bend light using plain water. Light bends when it travels from one medium to another, like going from air to a window, or from a window to water. Each time it travels to a new medium, it bends, or refracts. When light refracts, it changes speed and wavelength, which means it also changes direction.


[am4show have=’p8;p9;p19;p46;p89;p99;’ guest_error=’Guest error message’ user_error=’User error message’ ]


Materials:


  • Red and green laser
  • Paperclip
  • Index card
  • Tape
  • Rubber band
  • Water glass


  1. Open the paperclip into an “L” shape, and tape it to an index card so the card stands up. This is your projection screen.
  2. Use the rubber band to attach the laser pointers together. You’ll want them very close and parallel to each other. Place the rubber band close to the ON button so the laser will stay on when you put the rubber band over it.
  3. Place the laser pointers on a stack of books and put switch them on with the rubber band.
  4. Shine the lasers through the middle of an empty glass jar and onto the screen.
  5. Put a mark where the red and green laser dots are on the screen.
  6. With the lasers still on, slowly fill the container with water. What happened to the dots?
  7. You can add a couple of drops of milk or a tiny sprinkling of cornstarch to the water to see the beams in the water.

Here’s a quick activity you can do if the idea of refraction is new to you… Take a perfectly healthy pencil and place it in a clear glass of water.  Did you notice how your pencil is suddenly broken? What happened? Is it defective? Optical illusion?  Can you move your head around the glass in all directions and find the spot where the pencil gets fixed? Where do you need to look to see it broken?


When light travels from water to air, it bends. The amount it bends is measured by scientists and called the index of refraction, and it depends on the optical density of the material. The more dense the water, the slower the light moves, and the greater the light gets bent. What do you think will happen if you use cooking oil instead of water?


So the idea is that light can change speeds, and  depending on if the light is going from a lighter to an optically denser material (or vice versa), it will bend different amounts.  Glass is optically denser than water, which is denser than air. Here’s a couple of values for you to think about:


Vacuum 1.0000
Air 1.0003
Ice 1.3100
Water 1.3333
Pyrex 1.4740
Cooking Oil 1.4740
Diamond 2.4170


This means if you place a Pyrex container inside a beaker of vegetable oil, it will disappear, because it’s got the same index of refraction! This also works for some mineral oils and Karo syrup. Note however that the optical densities of liquids vary with temperature and concentration, and manufacturers are not perfectly consistent when they whip up a batch of this stuff, so some adjustments are needed.


Questions to Ask


1. Is there a viewing angle that makes the pencil whole?


2. Can we see light waves?


3. Why did the green and red laser dots move?


4. What happens if you use an optically denser material, like oil?


Click here to go to next lesson on Diffraction

[/am4show]


Diffraction happens when light goes around obstacles in its path. Sound waves diffract bend around obstacles, so if you’re stuck behind a pillar at a concert, you can still hear just fine.


[am4show have=’p9;p58;’ guest_error=’Guest error message’ user_error=’User error message’ ]


Ever play with a prism? When sunlight strikes the prism, it gets split into a rainbow of colors. Prisms un-mix the light into its different wavelengths (which you see as different colors). Diffraction gratings are tiny prisms stacked together.


When light passes through a diffraction grating, it splits (diffracts) the light into several beams traveling at different directions. If you’ve ever seen the ‘iridescence’ of a soap bubble, an insect shell, or on a pearl, you’ve seen nature’s diffraction gratings.


Scientist use these things to split incoming light so they can figure out what fuels a distant star is burning. When hydrogen burns, it gives off light, but not in all the colors of the rainbow, only very specific colors in red and blue. It’s like hydrogen’s own personal fingerprint, or light signature.


Astronomers can split incoming light from a star using a spectrometer (you can build your own here) to figure out what the star is burning by matching up the different light signatures.


Materials:


  • feather
  • old CD or DVD


Here’s what you do: Take a feather and put it over an eye. Stare at a light bulb or a lit candle. You should see two or three flames and a rainbow X. Shine a flashlight on a CD and watch for rainbows. (Hint – the tiny “hairs” on the feather are acting like tiny prisms… take your homemade microscope to look at more of the feather in greater detail and see the tiny prisms for yourself!


What happens when you aim a laser through a diffraction grating? Here’s what you do:


Materials:


Download Student Worksheet & Excercises


Exercises


  1. Which light source gave the most interesting results?
  2. What happens when you aim a laser beam through the diffraction grating?
  3. How is a CD different and the same as a diffraction grating?
  4. Why does the feather work?


Click here to go to next lesson on Useful Diffraction

Do you have thick or thin hair? Let’s find out using a laser to measure the width of your hair and a little knowledge about diffraction properties of light. (Since were using lasers, make sure you’re not pointing a laser at anyone, any animal, or at a reflective surface.)


[am4show have=’p8;p9;p19;p46;p89;p99;’ guest_error=’Guest error message’ user_error=’User error message’ ]


Light is also called “electromagnetic radiation”, and it can move through space as a wave, which makes it possible for light to interact in surprising ways through interference and diffraction. This is especially amazing to watch when we use a concentrated beam of light, like a laser.


If we shine a flashlight on the wall, you’ll see the flashlight doesn’t light up the wall evenly. In fact, you’ll probably see lots of light with a scattering of dark spots, showing some parts of the wall more illuminated than the rest. What happens if you shine a laser on the wall? You’ll see a single dot on the wall.


In this experiment, we used a laser to discover how interference and diffraction work. We can use diffraction to accurately measure very small objects, like the spacing between tracks on a CD, the size of bacteria, and also the thickness of human hair.


Here’s what you need:


  • a strand of hair
  • laser pointer
  • tape
  • calculator
  • ruler
  • paper
  • clothespin

WARNING! The beam of laser pointers is so concentrated that it can cause real damage to your retina if you look into the beam either directly or by reflection from a shiny object. Do NOT shine them at others or yourself.


Download Student Worksheet & Exercises


  1. Tape the hair across the open end of the laser pointer (the side where the beam emits from)
  2. Measure 1 meter (3.28 feet) from the wall and put your laser right at the 1 meter mark.
  3. Clip the clothespin onto the laser so that it keeps the laser on.
  4. Where the mark shows up on the wall, tape a sheet of paper.
  5. Mark on the sheet of paper the distance between the first two black lines on either side of the center of the beam.
  6. Use your ruler to measure (in centimeters) to measure the distance between the two marks you made on the paper. Convert your number from centimeters to meters (For me, 8 cm = 0.08 meters.)
  7. Read the wavelength from your laser and write it down. It will be in “nm” for nanometers. My laser was 650 nm, which means 0.000 000 650 meters.
  8. Calculate the hair width by multiplying the laser wavelength by the distance to the wall (1 meter), and divide that number by the distance between the dark lines. Multiply your answer by 2 to get your final answer. Here’s the equation:

Hair width = [(Laser Wavelength) x (Distance to Wall)]  / [ (Distance between dark lines) x 0.5 ]


In the video:


  • wavelength was 650 nm = 0.000 000 650 meters
  • distance from the wall was 1 meter
  • the distance between the dark lines was 8 cm = 0.08 m

Using a calculator, this gives a hair width of 0.000 0162 5meters, or 16.25 micrometers (or 0.000 629 921 26 inches). Now you try!


What’s Going On?


The image here shows how two different waves of light interact with each other. When a single light wave hits a wall, it shows up as a bright spot (you wouldn’t see a “wave”, because we’re talking about light).


When both waves hit the wall, if they are “in phase”, they add together (called constructive interference), and you see an even brighter spot on the wall.


If the waves are “out of phase”, then they subtract from each other (called “destructive interference”) and you’d see a dark spot. In advanced labs, like in college, you’ll learn how to create a phase shift between two waves by adding extra travel length to one of the waves along its path.


So why are there dark lines along the light line when you shine your laser on the hair in this experiment? It has to do with something called “interference”.


One kind of interference happens when light goes through a small and narrow opening, called a slit. When light travels through a single slit, it can interfere with itself. This is called diffraction.


When light travels through one of two slits, it can interfere with light traveling through the other slit, a lot like how water ripples can interfere with each other as they travel over the surface of water.


If you’re wondering where the slit is in this experiment, you’re right! There’s no narrow opening that light it traveling through. in fact, light appears to be traveling around something, doesn’t it? Light from the laser must travel around the hair to get to the wall. The way that light does this has to do with Babinet’s Principle, which relates the opposite of a slit (a small object the size of a slit) to the slit itself.


It turns out amazingly enough that when light hits a small solid object, like a piece of hair, it creates the same interference pattern as if the hair were replaced with a hole of the same size. This idea is called Babinet’s Principle.


By measuring the diffraction pattern on the wall, we can measure the width of a small object that the light had to travel around by measuring the dark lanes in the spot on the wall. In our lab, the small object is a piece of your hair!


Questions to Ask:


  1. What would happen to the diffraction pattern if the hair width was smaller?
  2. Using this experiment, how can you tell if the hair is round or oval?
  3. If we redid these experiments with a different color laser instead of red, what changes would you have needed to make?
  4. How can you modify this experiment to measure the width of a track on a CD? Does the track width change as a function of location on the CD? If so, is it larger or smaller near the outside?

Exercises 


  1.  Which light source gave the most interesting results?
  2. What happens when you aim a laser beam through the diffraction grating?
  3. How is a CD different and the same as a diffraction grating?
  4. Why does the feather work?

Click here to go to next lesson on Introduction to Lasers

[/am4show]


Have you ever wondered why you just can’t just shine a flashlight through a lens and call it a laser? It’s because of the way a laser generates light in the first place.
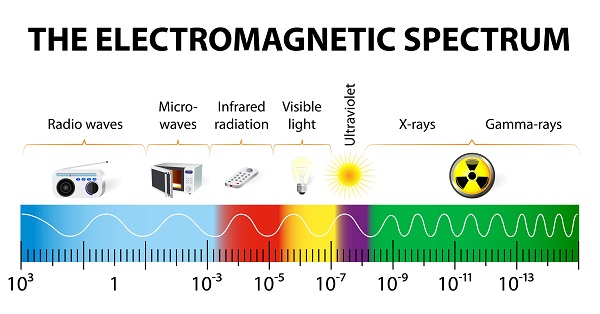

The word LASER is an acronym for Light Amplification by Stimulated Emission of Radiation.
That’s a mouthful. Let’s break it down.


Let’s do an experiment that shows you how a laser is different from light from a flashlight by looking at the wavelengths that make up the light.


[am4show have=’p8;p9;p19;p46;p89;p99;’ guest_error=’Guest error message’ user_error=’User error message’ ]


Materials:


  • flashlight
  • laser
  • diffraction grating or old CD
  • clear tape
  • red, green, and/or blue fingernail polish


Download your student worksheet here!
This download is provided by Laser Classroom. Check out their website for more free downloads and really cool lasers!


Lasers are optical light that is amplified, which means that you start with a single particle of light (called a photon) and you end up with a lot more than one after the laser process.


Stimulated emission means that the atom you’re working with, which normally hangs out at lower energy levels, gets excited by the extra energy you’re pumping in, so the electrons jump into a higher energy level. When a photon interacts with this atom, if the photon as the same exact energy as the jump the electron made to get to the higher level, the photon will cause the electron to jump back down to the lower level and simultaneously give off a photon in the same exact color of the photon that hit the atom in the first place.


The end result is that you have photons that are the same color (monochromatic) and in synch with each other. This is different from how a light bulb creates light, which generates photons that are scattered, multi-colored, and out of phase. The difference is how the light was generated in the first place.


Radiation refers to the incoming photon. It’s a word that has a bad connotation to it (people tend to think all radiation is dangerous, when really it’s only a small percentage that is). So in this case, it just means light in the laser. The incoming photon radiation that starts the process of stimulated emission (when the electron jumps between energy levels and generates another photon), and the light amplification means that you started with one photon, and you ended up with two. Put it all together and you have a LASER!


[/am4show]


Click here to go to next lesson on Light Interference

Lasers light is different from light from a flashlight in a couple of different ways. Laser light is monochromatic, meaning that it’s only one color.


Laser light is also coherent, which means that the light is all in synch with each other, like soldiers marching in step together. Since laser light is coherent, which means that all the light waves peaks and valleys line up. The dark areas are destructive interference, where the waves cancel each other out. The areas of brightness are constructive interference, where the light adds, or amplifies together. LED light is not coherent because the light waves are not in phase.


[am4show have=’p8;p9;p19;p46;p89;p99;’ guest_error=’Guest error message’ user_error=’User error message’ ]


Materials:


  • laser
  • flashlight


Download your student worksheet here! This download is provided by Laser Classroom. Check out their website for more free downloads and really cool lasers!


Hold your flashlight very, very close to a sheet of paper at a small angle and look at the light on the paper. Do you see any dark spots, or is it all the same brightness? (It should be the same brightness.)


Now try this with a red laser (do NOT use a green laser). Hold it very close to the paper again at a small angle and look for tiny dark spots, like speckles. Those are coherent waves interfering with each other. It’s really hard to see this, so you may not be able to find it with your eyes. (You can pass the light through a filter (like a gummy bear) to cut down on the intensity so the speckle pattern shows up better.)


What’s happening is this: light travels in waves, and when those waves are in phase (coherent) they interfere with each other in a special way. They cancel each other out (destructive interference) or amplify (constructive interference). This pattern isn’t found with sunlight or light from a bulb because that kind of light all out of phase and doesn’t have this kind of distinct interference pattern.


Click here to go to next lesson on More on Light Interference

[/am4show]


Let’s take a closer look at the interference patterns of light:


[am4show have=’p9;p58;’ guest_error=’Guest error message’ user_error=’User error message’ ]


Click here to go to next lesson on Thin Film Interference

[/am4show]


Ever noticed a rainbow on top of a water puddle where there is oil floating on top?


[am4show have=’p9;p58;’ guest_error=’Guest error message’ user_error=’User error message’ ]


The oil is spread in a very thin layer on top of the water, and when light hits this thin layer, it interferes and causes a rainbow to be seen.


Click here to go to next lesson on Polarization

[/am4show]


Polarization has to do with the direction of the light.  Think of a white picket fence – the kind that has space between each board.  The light can pass through the gaps int the fence but are blocked by the boards.  That’s exactly what a polarizer does.


When you have two polarizers, you can rotate one of the ‘fences’ a quarter turn so that virtually no light can get through – only little bits here and there where the gaps line up. Most of the way is blocked, though, which is what happens when you rotate the two pairs of sunglasses. Your sunglasses are polarizing filters, meaning that they only let light of a certain direction in. The view through the sunglasses is a bit dimmer, as less photons reach your eyeball.


Polarizing sunglasses also reduce darken the sky, which gives you more contrast between light and dark, sharpening the images. Photographers use polarizing filters to cut out glaring reflections.


Materials:


  • two pairs of polarized sunglasses
  • tape (the 3/4″ glossy clear kind works best – watch second video below)
  • window

[am4show have=’p8;p9;p19;p46;p105;p89;’ guest_error=’Guest error message’ user_error=’User error message’ ]


Here’s what you do: Stack two pairs of sunglasses on top of each other and look through both sets of lenses… now rotate one pair a quarter turn (90o).  The lenses should block the light completely at 90o and allow light to pass-through when aligned at 0o. These lenses allow some light to pass through but not all. When you rotate the lenses to 90o, you block out all visible light.


You use the “filter” principle in the kitchen. When you cook pasta, you use a filter (a strainer) to get the pasta out of the water. That’s what the sunglasses are doing – they are filtering out certain types of light. Rotating the lenses 90o to block out all light is like trying to strain your pasta with a mixing bowl. You don’t allow anything to pass through.


Astronomers use polarizing filters to look at the moon. Ever notice how bright the moon is during a full moon, and how dim it is near new moon? Using a rotating polarizing filter, astronomer can adjust the amount of light that enters into their eye.


Download Student Worksheet & Exercises


Advanced students: Download your Polarization lab here.


Exercises


  1. Why do you need two polarizers to block the light completely?
  2.  How can you tell if your sunglasses are polarized if you only have one pair?

[/am4show]


Click here to go to next lesson on Shadows

The electromagnetic spectrum shows the different energies of light and how the energy relates to different frequencies. The wavelength (λ) equals the speed of light (c) divided by the frequency (ν), or λ = c / ν. The speed of light is: c = 3 x 10⁸ m/s (300,000,000 meters per second).


[am4show have=’p9;p58;’ guest_error=’Guest error message’ user_error=’User error message’ ]


You and I don’t detect most electromagnetic waves. Our eyeballs can only ‘see’ in the 400-700 nm (nanometer) range, which is only a small part of the entire spectrum, so we need special detectors to find the rest of the photons zipping around.


Radio signals are picked up using an antenna (similar to your satellite dish in the backyard). These waves have the longest wavelengths and lowest energy in the electromagnetic spectrum.


Making IR Visible to the Human Eye

Infra-red light is in the part of the electromagnetic spectrum that isn’t usually visible to human eyes, but using this nifty trick, you will easily be able to see the IR signal from your TV remote, remote-controller for an RC car, and more!


Exercises


  1. Look over your data table. What kinds of objects (plastic, metal, natural, etc.) allow infrared light to pass through them?
  2.  Why does the camera work in making the infrared light visible?

X-rays are more difficult to detect, because they would rather go through the detector than bounce off of it, so we use complicated mathematics and the shadows of the photons to “see” x-rays.


Gamma rays are the toughest to detect – they are very highly energized packets of light that would rather zoom through mirrors than be detected. Gamma radiation has the highest energy and highest frequency in the electromagnetic spectrum.


Click here to go to next lesson on Visible Light

[/am4show]


Here’s a neat experiment you can do with shadows…


[am4show have=’p9;p58;’ guest_error=’Guest error message’ user_error=’User error message’ ]


Click here to go to next lesson on Color and Vision

[/am4show]


Do you see where the “visible light” rainbow section is in the electromagnetic spectrum image below? This small area shows the light that you can actually see with your eyeballs. Note that the “rainbow of colors” that make up our entire visible world only make up a small part of all the light, from 400-700 nm (nanometers, or 10-9.
[am4show have=’p9;p58;’ guest_error=’Guest error message’ user_error=’User error message’ ]


Each color corresponds to a particular wavelength within the visible light spectrum. When that wavelength hits your eye, you perceive a particular color.


Red has the longest wavelengths (closer to 400 nm) and violet has the highest frequencies (closer to 700nm). UV (ultra-violet) light is invisible, which means you can’t see it with just your eyes. Our sun gives off light in the UV. Too much exposure to the sun and you’ll get a sunburn from the UV rays.


UV sensitive materials have a pigment inside that changes color when exposed to UV light from either the sun or lights that emit in the 350nm – 300nm wavelength. If you have fluorescent black lights, use them. (Do regular incandescent bulbs work? If not, you know they emit light outside the range of the beads!)


UVA waves are the longest of the UV waves, and you’ll find them in black lights. These are not absorbed by the ozone layer. Their frequency wavelength ranges from 315-400nm.


UVB waves are is medium energy waves, mostly absorbed by the ozone layer and have a range between 315-280nm). UVC are the shortest, highest energy UV waves that are used to kill germs, and they are completely absorbed by the atmosphere and the ozone layers.


On the other end of the visible spectrum of visible light is infrared light. Infra-red light is in the part of the electromagnetic spectrum that isn’t usually visible to human eyes, but using this nifty trick, you will easily be able to see the IR signal from your TV remote, remote-controller for an RC car.


Click here to go to next lesson on Cold Light Mixing

[/am4show]


You can demonstrate the primary colors of light using glow sticks! When red, green, and blue cold light are mixed, you get white light. Simply activate the light stick (bend it until you hear a *crack* – that’s the little glass capsule inside breaking) and while wearing gloves, carefully slice off one end of the tube with strong cutters, being careful not to splash (do this over a sink).
[am4show have=’p9;p58;’ guest_error=’Guest error message’ user_error=’User error message’ ]


Sometimes the chemical light sticks contain a glowing green liquid encapsulated within a red or blue plastic tube, so when you slice it open to combine it with the other colors, it isn’t a true red. Be sure that your chemical light sticks contain a glowing RED LIQUID and BLUE LIQUID in a clear, colorless plastic tube, or this experiment won’t work.


Click here to go to next lesson on What is Color?

[/am4show]


Is white or black a color? No and no. White is the mixture of all the colors (red, orange, yellow, green, blue indigo, and violet), so technically white isn’t a color of light but rather the combination of colors. Black is also not technically a color. In outer space, it’s pitch-black dark because there’s no light. In a room with the lights off, it’s also black. Black is the absence of color.


[am4show have=’p9;p58;’ guest_error=’Guest error message’ user_error=’User error message’ ]


Wasn’t that amazing how you can make objects change color just by changing the color light you hit it with?


Click here to go to next lesson on Where do different colors come from?

[/am4show]


Have you ever wondered where different colors come from? Here’s the physics behind why apples are red and grass is green…
[am4show have=’p9;p58;’ guest_error=’Guest error message’ user_error=’User error message’ ]


Click here to go to next lesson on Pigments

[/am4show]