This experiment is just for advanced students. If you guessed that this has to do with electricity and chemistry, you’re right! But you might wonder how they work together. Back in 1800, William Nicholson and Johann Ritter were the first ones to split water into hydrogen and oxygen using electrolysis. (Soon afterward, Ritter went on to figure out electroplating.) They added energy in the form of an electric current into a cup of water and captured the bubbles forming into two separate cups, one for hydrogen and other for oxygen.


This experiment is not an easy one, so feel free to skip it if you need to. You don’t need to do this to get the concepts of this lesson but it’s such a neat and classical experiment (my students love it) so you can give it a try if you want to. The reason I like this is because what you are really doing in this experiment is ripping molecules apart and then later crashing them back together.


Have fun and please follow the directions carefully. This could be dangerous if you’re not careful. The image shown here is using graphite from two pencils sharpened on both ends, but the instructions below use wire.  Feel free to try both to see which types of electrodes provide the best results.


[am4show have=’p9;p40;p76;p91;p58;’ guest_error=’Guest error message’ user_error=’User error message’ ]


You will need:


  • 2 test tubes or thin glass or plastic something closed at one end. I do not recommend anything wider than a half inch in diameter.
  • 2 two wires, one needs to be copper, at least 12 inches long. Both wires need to have bare ends.
  • 1 Cup
  • Water
  • One 9 volt battery
  • Long match or a long thin piece of wood (like a popsicle stick) and a match
  • Rubber bands
  • Masking tape
  • Salt


Download Student Worksheet & Exercises
1. Fill the cup with water.


2. Put a tablespoon or so of salt into the water and stir it up. (The salt allows the electricity to flow better through the water.)


2. Put one wire into the test tube and rubber band it to the test tube so that it won’t come out (see picture).


3. Use the masking tape to attach both wires to the battery. Make sure the wire that is in the test tube is connected to the negative (-) pole of the battery and that the other is connected to the positive (+) pole. Don’t let the bare parts of the different wires touch. They could get very hot if they do.


4. Fill the test tube to the brim with the salt water.


5. This is the tricky part. Put your finger over the test tube, turn it over and put the test tube, open side down, into the cup of water. (See picture.)


6. Now put the other wire into the water. Be careful not to let the bare parts of the wires touch.


7. You should see bubbles rising into the test tube. If you don’t see bubbles, check the other wire. If bubbles are coming from the other wire either switch the wires on the battery connections or put the wire that is bubbling into the test tube and remove the other. If you see no bubbles check the connections on the battery.


8. When the test tube is half full of gas (half empty of salt water depending on how you look at it) light the long match or the wooden stick. Then take the test tube out of the water and let the water drain out. Holding the test tube with the open end down, wait for five seconds and put the burning stick deep into the test tube (the flame will probably go out but that’s okay). You should hear an instant pop and see a flash of light. If you don’t, light the stick again and try it another time. For some reason, it rarely works the first time but usually does the second or third.


A water molecule, as you saw before, is two hydrogen atoms and one oxygen atom. The electricity encouraged the oxygen to react with the copper wire leaving the hydrogen atoms with no oxygen atom to hang onto. The bubbles you saw were caused by the newly released hydrogen atoms floating through the test tube in the form of hydrogen gas. Eventually that test tube was part way filled with nothing but pure hydrogen gas.


But how do you know which bubbles are which? You can tell the difference between the two by the way they ignite (don’t’ worry – you’re only making a tiny bit of each one, so this experiment is completely safe to do with a grown up).


It takes energy to split a water molecule. (On the flip side, when you combine oxygen and hydrogen together, it makes water and a puff of energy. That’s what a fuel cell does.) Back to splitting the water molecule – as the electricity zips through your wires, the water molecule breaks apart into smaller pieces: hydrogen ions (positively charged hydrogen) and oxygen ions (negatively charged oxygen). Remember that a battery has a plus and a minus charge to it, and that positive and negative attract each other.


So, the positive hydrogen ions zip over to the negative terminal and form tiny bubbles right on the wire. Same thing happens on the positive battery wire. After a bit of time, the ions form a larger gas bubble. If you stick a cup over each wire, you can capture the bubbles and when you’re ready, ignite each to verify which is which.


If the match burns brighter, the gas is oxygen. If you hear a POP!, the gas is hydrogen. Oxygen itself is not flammable, so you need a fuel in addition to the oxygen for a flame. In one case, the fuel is hydrogen, and hence you hear a pop as it ignites. In the other case, the fuel is the match itself, and the flame glows brighter with the addition of more oxygen.


When you put the match to it, the energy of the heat causes the hydrogen to react with the oxygen in the air and “POP”, hydrogen and oxygen combine to form what? That’s right, more water. You have destroyed and created water! (It’s a very small amount of water so you probably won’t see much change in the test tube.)


The chemical equations going on during this electrolysis process look like this:


A reduction reaction is happening at the negatively charged cathode. Electrons from the cathode are sticking to the hydrogen cations to form hydrogen gas:


2 H+(aq) + 2e –> H2(g)


2 H2O(l) + 2e –> H2(g) + 2 OH(aq)


The oxidation reaction is occurring at the positively charged anode as oxygen is being generated:


2 H2O(l)  –> O2(g) + 4 H+(aq) + 4e


4 OH(aq) –> O2(g) + 2 H2O(l) + 4 e-


Overall reaction:


2 H2O(l)  –> 2 H2(g) + O2(g)


Note that this reaction creates twice the amount of hydrogen than oxygen molecules. If the temperature and pressure for both are the same, you can expect to get twice the volume of hydrogen to oxygen gas (This relationship between pressure, temperature, and volume is the Ideal Gas Law principle.)


This is the idea behind vehicles that run on sunlight and water.  They use a solar panel (instead of a 9V battery) to break apart the hydrogen and oxygen and store them in separate tanks, then run them both back together through a fuel cell, which captures the energy (released when the hydrogen and oxygen recombine into water) and turns the car’s motor. Cool, isn’t it?


Note: We’re going to focus on Alternative Energy in Unit 12 and create all sorts of various energy sources including how to make your own solar battery, heat engine, solar & fuel cell vehicles (as described above), and more!


Exercises


  1. Why are bubbles forming?
  2. Did bubbles form at both wires, or only one? What kind of bubbles are they?
  3. What would happen if you did this experiment with plain water? Would it work? Why or why not?
  4. Which terminal (positive or negative) produced the hydrogen gas?
  5. Did the reaction create more hydrogen or more oxygen?

[/am4show]


Click here to go to next lesson on Molecules and Atoms.

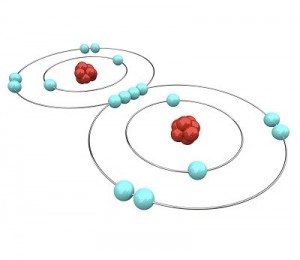
Oxygen Atomic Diagram

Let’s try another way to look at this. You’re playing miniature golf and you come to the old wind mill hole. Your friend takes a shot and since the blades of the windmill are going nice and slow he gets the ball right through. Now it’s your turn. Suddenly you hear a zap and a pow and sparks go flying. Something has gone wrong with the wind mill and it starts spinning at amazing speeds. You decide to give it a try and hit the ball towards the wind mill.


Well since it is spinning out of control, those blades now form almost a solid disk so that there is no way your ball can get through the wind mill. Electrons do the same thing. They move so fast that even though there may not be many of them, they form a shell that can’t be penetrated. (To be clear, particles that are smaller than an atom can go through the shells and pop out the other side.)


Let’s go a little further with this shell thing. An atom can have as few as one and as many as seven shells. Imagine our balloon again. Now there can be a balloon inside of a balloon inside a balloon and so on. Up to seven balloons! Each balloon, whoops, I mean shell, can have only so many electrons in it. This simple equation 2n2 tells you how many electrons can be in each shell. The n stands for the number of the shell.
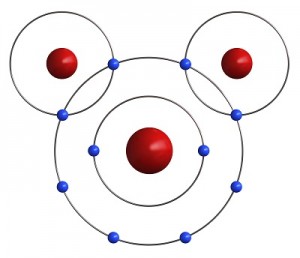

The first shell can have up to 2 x 1(first shell)2 or 2 electrons. The second shell can have up to 2 x 2(second shell)2 or 8 electrons. The third shell can have up to 2 x 32 or 18 electrons. The fourth shell can have up to 2 x 42 or 32 electrons. All the way up to the seventh shell which can have 2 x 72 or 98 electrons!


One last thing about shells, the shells have to be full before the electrons will go to the next shell. A helium atom will have two electrons. Both of them will be in the first shell. A Lithium atom will have three electrons. Two will be in the first shell and one (since the first shell is filled) will be in the second shell.


Electrons provide the size and stability of the atom and, as such, the mass and the structure of all matter. Electrons are also the key to all electromagnetic energy. But wait, that’s not all! It is the number of electrons in an atom that determines if and how atoms come together to form molecules. Electrons determine how and what matter will be.


Atoms like to feel satisfied and they feel satisfied if they are “full”.  An atom is “full” if its outer electron shell has as many electrons as it can hold or if there are eight or a multiple of eight (16, 24 etc.) electrons in the outer shell. This is called the octet rule and works most of the time, but is not perfect.


If an atom is not full, it is not satisfied. An unsatisfied atom needs to do something with its electrons to be happy. Luckily atoms are very friendly and love to share. Most atoms are not satisfied as individuals. The oxygen atom has six electrons in its outer shell. It needs eight electrons to be satisfied.


Luckily, two Hydrogen atoms happen by. Each one of them has only one electron in its outer shell and needs one more to be satisfied. If both Hydrogens share their one electron with the Oxygen, the oxygen has eight electrons and is satisfied. Also, if the Oxygen shares an electron with each Hydrogen, then both Hydrogens are satisfied as well. Just like your mother told you, it’s nice to share. It is this sharing of electrons that makes atoms come together to form molecules.

Click here to go to next lesson on Electrostatic Charge.

[/am4show]


To summarize, protons and neutrons are in the nucleus of an atom, and tightly bound together. The proton has a positive charge while the neutron has no charge, and both of them are much larger than the electron. The tiny electron is outside the nucleus and weakly bound to the atom and carries a negative a charge.


[am4show have=’p9;p58;’ guest_error=’Guest error message’ user_error=’User error message’ ]


Go get a balloon. The rubber latex kind work the best (not the shiny Mylar kind). You’ll need it for the next set of experiments we’re going to talk about below. When you rub a balloon on your head, you charge up the balloon with a negative static charge. But how much charge is it? The units of charge are called the Coulomb (C), just like the units of time are seconds (s). And just like seconds, you can have microseconds (10-6 seconds) and nanoseconds (10-9 seconds), you can have microCoulombs (10-6 C or μC) and nanoCoulombs (10-9 C or nC).


The charge of one electron is -1.6 x 10⁻¹⁹ C… it’s a really small number! The charge of one proton is +1.6 x 10⁻¹⁹ C. The kind of charge (whether positive or negative) is determined by how many extra protons or electrons are present in addition to the ones that are evenly matched to balance the charge. If an object has 15 protons and 17 electrons, then it’s got a negative charge by 2 electrons. Just because an object is not charged (electrically neutral) doesn’t mean it doesn’t have any protons or electrons. Rather it means that the number of electrons and protons are evenly matched to balance the charge of the object. We say that charge is quantized, which means that electric charge isn’t a continuous fluid flow, but instead is made up of tiny packets of charged particles. The charge on one electron is -1.60 x 10⁻¹⁹ C.  This is one of the most fundamental concepts in physics! 


Click here to go to next lesson on The Charge of Lightning.

[/am4show]


Let’s go back to rubbing a balloon on your head. When you do this and bring it close to objects like a thin stream of water trickling out of the faucet, or small its of paper, or bubbles in the air, or even a ping pong ball on the table, did you notice now you can influence things? You can make water flick and spray, paper jump up and down, and bubbles and ping pong balls will follow your every move. But why is that?


[am4show have=’p9;p58;’ guest_error=’Guest error message’ user_error=’User error message’ ]


Click here to go to next lesson on Maxwell’s First Equation.

[/am4show]


The influence you’re exerting on these objects is called the electric force,  which is a non-contact force that can happen over a distance.


[am4show have=’p9;p58;’ guest_error=’Guest error message’ user_error=’User error message’ ]


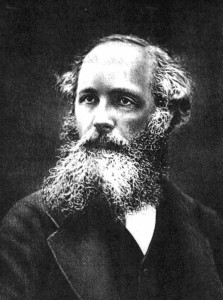
James Maxwell, a Scottish theoretical physicist who made important contributions to electromagnetic theory.

Did you notice that you can exert a force on an object without touching it? Try it now if you haven’t already! Did you notice how opposite charges attract and like charges repel? That’s the fundamental key concept with this section.  Electrical force are the attractive for opposite charges and repulsive for like charges. Electrical force is also attractive between a charged and a neutral object.


Click here to go to next lesson on Conductors and Insulators.

[/am4show]


An electrical circuit is like a NASCAR raceway.  The electrons (racecars) zip around the race loop (wire circuit) superfast to make stuff happen. Although you can’t see the electrons zipping around the circuit, you can see the effects: lighting up LEDs, sounding buzzers, clicking relays, etc.


There are many different electrical components that make the electrons react in different ways, such as resistors (limit current), capacitors (collect a charge), transistors (gate for electrons), relays (electricity itself activates a switch), diodes (one-way street for electrons), solenoids (electrical magnet), switches (stoplight for electrons), and more.  We’re going to use a combination diode-light-bulb (LED), buzzers, and motors in our circuits right now.


A CIRCUIT looks like a CIRCLE.  When you connect the batteries to the LED with wire and make a circle, the LED lights up.  If you break open the circle, electricity (current) doesn’t flow and the LED turns dark.


LED stands for “Light Emitting Diode”.  Diodes are one-way streets for electricity – they allow electrons to flow one way but not the other.


Remember when you scuffed along the carpet?  You gathered up an electric charge in your body.  That charge was static until you zapped someone else.  The movement of electric charge is called electric current, and is measured in amperes (A). When electric current passes through a material, it does it by electrical conduction. There are different kinds of conduction, such as metallic conduction, where electrons flow through a conductor (like metal) and electrolysis, where charged atoms (called ions) flow through liquids.


[am4show have=’p8;p9;p20;p47;p106;p76;p97;p58;’ guest_error=’Guest error message’ user_error=’User error message’ ]


Here’s what you need:


  • 2 AA batteries
  • AA battery case
  • 2 alligator wires
  • LEDs (any you choose is fine)


Download Student Worksheet & Exercises


Be alert for:


1. Batteries inserted into the case the wrong way!


2. LED in the wrong way (LEDs are picky about plus and minus – they are POLARIZED)


3. Is there a metal-to-metal connection?  (You’re not grabbing ahold of the plastic insulation, are you?)


4. Bad wires can cause headaches – if all else fails, then swap out your alligator clip lead wires for new ones.


Exercises


  1. What does LED stand for?
  2. Does it matter which way you wire an LED in a circuit?
  3. Does the longer wire on the LED connect to plus (red) or minus (black)?
  4. Do you need to hook up batteries to make a neon bulb light up?  Why or why not?
  5. What’s the difference between a light bulb and your LED?
  6. What is the difference between a bolt of lightning and the electricity in your circuit?
  7. What is the charge of an electron?

[/am4show]


Click here to go to next lesson on Why does metal conduct electricity?

switch-zoomMake yourself a grab bag of fun things to test: copper pieces (nails or pipe pieces), zinc washers, pipe cleaners, Mylar, aluminum foil, pennies, nickels, keys, film canisters, paper clips, load stones (magnetic rock), other rocks, and just about anything else in the back of your desk drawer.

Certain materials conduct electricity better than others. Silver, for example, is one of the best electrical conductors on the planet, followed closely by copper and gold. Most scientists use gold contacts because, unlike silver and copper, gold does not tarnish (oxidize) as easily. Gold is a soft metal and wears away much more easily than others, but since most circuits are built for the short term (less than 50 years of use), the loss of material is unnoticeable.
[am4show have=’p8;p9;p20;p47;p76;p97;p58;’ guest_error=’Guest error message’ user_error=’User error message’ ]


Modify your basic LED circuit into a Conductivity Circuit by removing one clip lead from the battery and inserting a third clip lead to the battery terminal. The two free ends are your new clips to put things in from the grab bag. Try zippers, metal buttons, barrettes, water from a fountain, the fountain itself, bike racks, locks, doorknobs, unpainted benches… you get the idea!


Here’s what you need:


  • 2 AA batteries
  • AA battery case
  • 3 alligator wires
  • LEDs (any you choose is fine)
  • paper clip
  • penny
  • other metal objects around your house (zippers, chairs, etc…)


Why does metal conduct electricity?

Why does metal, not plastic, conduct electricity? Imagine you have a garden hose with water flowing through it. The hose is like the metal wire, and the water is like the electric current. Trying to run electricity through plastic is like filling your hose with cement. It’s just the nature of the material.


Download Student Worksheet & Exercises


Exercises


  1.       Name six materials that are electrically conductive.
  2.        What kinds of materials are conductors and insulators?
  3.      Can you convert an insulator into a conductor? How?
  4.        Name four instances when insulators are a bad idea to have around.
  5.      When are insulators essential to have?

[/am4show]


Click here to go to next lesson on Liquid Conductors.

When an atom (like hydrogen) or molecule (like water) loses an electron (negative charge), it becomes an ion and takes on a positive charge. When an atom (or molecule) gains an electron, it becomes a negative ion. An electrolyte is any substance (like salt) that becomes a conductor of electricity when dissolved in a solvent (like water).


This type of conductor is called an ‘ionic conductor’ because once the salt is in the water, it helps along the flow of electrons from one clip lead terminal to the other so that there is a continuous flow of electricity.


This experiment is an extension of the Conductivity Tester experiment, only in this case we’re using water as a holder for different substances, like sugar and salt. You can use orange juice, lemon juice, vinegar, baking powder, baking soda, spices, cornstarch, flour, oil, soap, shampoo, and anything else you have around. Don’t forget to test out plain water for your ‘control’ in the experiment!


[am4show have=’p8;p9;p20;p47;p76;p91;p58;’ guest_error=’Guest error message’ user_error=’User error message’ ]


Here’s what you need:


  • 2 AA batteries
  • AA battery case
  • 2 alligator clips
  • LED
  • water
  • salt
  • glass jar (like a clean jam jar)


Download Student Worksheet & Exercises


Exercises


  1. Why does electricity flow through some solutions but not all of them?
  2. What is a salt?
  3. How are electrolytes used today in real life?
  4. Which substance was your top conductor?
  5. Which substance didn’t conduct anything at all?
  6. What happens if you mix an electrolyte and non-electrolyte together?

[/am4show]


Click here to go to next lesson on Superconductors.

When I was in 10th grade, my teammate and I designed what we thought was pretty clever: a superconductor roller coaster, which we imagined would float effortlessly above its magnetic track. Of course, our roller coaster was only designed on paper, because yttrium barium copper oxide ceramics had only just been discovered by top scientists.


Did you notice how it was smoking in the video? That’s because it was so cold! The usual problem with superconductors is that they need to be incredibly cold in order to exhibit superconductive properties.  Yttrium barium copper oxide (YBa2Cu3O7) was the first compound that used liquid nitrogen for cooling, making superconductors a lot less expensive to work with – you no longer needed a cryogenic lab in order to levitate objects above a magnet.


Recently, scientists have found a way to make an amazing superconductor by taking a single crystal sapphire wafer and coating it with a thin (~1µm thick) ceramic material (yttrium barium copper oxide). Normally, the ceramic layer has no interesting magnetic or electrical properties, but that’s when you’re looking at it at room temperature. If you cool this material below -185ºC (-301ºF), it turns out that the ceramic material becomes a superconductor, meaning that it conducts electricity without resistance, with no energy loss. Zero. That’s what makes it a ‘superconductor’.


To further understand superconductivity, it’s helpful to understand what normally happens to electricity as it flows through a wire. As you may know, energy cannot be created or destroyed, but can be changed from one form to another.


In the case of wires, some of the electrical energy is changed to heat energy. If you’ve ever touched a wire that had been in use for a while, and discovered it was hot, you’ve experienced this. The heat energy is a waste. It simply means that less electricity gets to its final destination.


This is why superconductivity is so cool (no pun intended.) By cooling things down to temperatures near absolute zero, which is as low as temperatures can get, you can create a phenomenon where electricity flows without having any of it converted to heat.


Why do superconductors float above magnets?

Scientists also figured out that superconductors and magnetic field really do not like each other. The Meissner effect happens when a superconductor expels all its magnetic fields from inside.


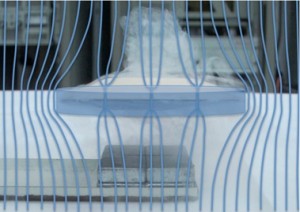
However, if you make your superconductor thin enough, you can get the magnetic field to penetrate in discrete quantities (this is real quantum physics now) called flux tubes (the blue lines that go through the disc).


Inside each of the magnetic flux tubes, the superconductivity is destroyed, but the superconductor tries to keep the magnetic tubes pinned in weak areas and any movement of the superconductor itself (like if you pushed it) causes the flux tubes to move, and this is what traps (or locks) the superconductor in midair.


If you’d like to experiment with superconductors yourself, check out this information.


Click here to go to next lesson on The difference between polarizing and charging.

Have you ever had a bad hair day? Did you happen to notice if the air was drier or wetter weather on those days? Usually folks have bad hair days when the air is drier, which is when static charge can build up more easily. Some folks notice every time they touch a doorknob, slide down a plastic slide, or scuff along the carpet in socks that they get zapped. Since there’s less water vapor in the air on drier days, there’s more of a chance for static charge to build up. The water molecule dissipates the static charge, and the more wet the air is (humid), the less static build up there is. Static electricity experiments are really hard to do on humid days, especially if it’s raining outside!
[am4show have=’p9;p58;’ guest_error=’Guest error message’ user_error=’User error message’ ]
Can you rub a balloon and stick it to the wall? Why does that work? The wall isn’t positively charged, is it?


No… the wall is not charged at all. It’s electrically neutral. However, when you bring a negatively charged balloon near it, two important things happen: the negative charge on the balloon repels the negative charges in the wall, pushing them further away. At the same time, the positive charges in the wall are attracted to the balloon and move toward it. The result is that the balloon sticks to the wall, and you have just moved charges around in the wall without even realizing it. Polarization means that you separate the charges in an object. The wall became polarized when you brought the balloon close to it.


Like charges repel and opposites attract.This happens in neutrally charged objects, like the yardstick in the electrostatic motor that you’ve done previously on this page. If the object is a conductor, like a metal, the charges move quickly from one side of the object to the other quite freely along the surface.


However if the object is an insulator, the electrons simply redistribute themselves within the atom, since the charges can’t move along the surface as they would with a conductor. The electrons live in an electron cloud that surrounds the nucleus of the atom, which normally is uniform and symmetrical. When an electrical charge is applied to insulators, that cloud will distort and become non-symmetrical as the electrons move in response.  In this way, insulators can be polarized.


Water is a polar molecule. In a molecule, the atoms stay together to form the molecule through bonds that are formed between the negative and positive charges on the individual atoms. For water, the oxygen  and hydrogen have a polar bond because the protons in one are attracted to the electrons in the other. The electrons are shared and their electron clouds overlap.


For water however, the electrons within the clouds are not equally shared which makes the electron cloud distorted, making one side of the water molecule more negatively electrically charged than the other. This makes water a polar molecule because the electron cloud is shifted more toward the oxygen than the hydrogen atoms.


When you bring a charged balloon near a thin trickle of water streaming from the faucet, the stream is deflected and sprayed by the presence of the balloon because the water molecules are polar and align to the balloon.


Just a quick tip: don’t mix up the concepts of polarizing and charging.  Charging is when there’s an imbalance of electric charge, like rubbing the balloon on your head. The balloon now has an excess number of electrons, so it’s negatively charged. Objects that are polarized have their charges separated either on the surface or within the atom itself. The overall charge of a polarized object is balanced (electrically neutral), even if the negative charges are at one end and positive charges are on the other.


Scientific Concepts for Atoms:


  • All matter is made of atoms.
  • An atom is the smallest part of stable matter.
  • Atoms rarely hang out alone. They join together in groups from two to millions of atoms.
  • Atoms are made of three basic particles. Neutrons, protons, and electrons.
  • Neutrons and protons are together in the middle of the atom and make up the nucleus of the atom. Electrons move around the nucleus. They don’t “orbit” the nucleus. Next lesson we will talk more about how they move. It’s one of the wacky things about electrons.
  • Atoms differ from one another by how many protons, neutrons, and electrons they have in them.
  • Elements are specific kinds of atoms. Every atom is a type of element.
  • There are over 112 elements. Ninety of which are found naturally. Twelve different elements are the major ingredients of over 90% of all matter. Five different elements are the major ingredients of all living things.
  • Carbon, Hydrogen, Oxygen, Nitrogen, and Calcium are the five main elements that make up all living matter.
  • Most atoms come from stars and have been around since the beginning of time.
  • Atoms get used, and reused again and again as things change over time.

Scientific Concepts for Electrons:


  • Electrons don’t orbit nuclei. They pop in and pop out of existence.
  • Electrons do tend to stay at a certain distance from a nucleus. This area that the electron tends to stay in is called a shell.
  • The electrons move so fast around the shell that the shell forms a balloon like ball around the nucleus.
  • An atom can have as many as seven shells.
  • The number of electrons an atom has determines how many shells it has.
  • A shell can only hold so many electrons. The number of electrons a shell can hold can be determined by the formula 2n2 where n is the number of the shell.
  • Atoms are “satisfied” if they have a full outer shell or if they have a multiple of eight electrons in their outer shell.
  • If an atom is not “satisfied” it will gladly share electrons with other atoms forming molecules.

Click here to go to next lesson on Charging Methods.

[/am4show]