 This project is for advanced students. A crystal radio is among the simplest of radio receivers – there’s no battery or power source, and nearly no moving parts. The source of power comes directly from the radio waves themselves.
The crystal radio turns the radio signal directly into a signal that the human ear can detect. Your crystal radio detects in the AM band that have been traveling from stations (transmitters) thousands of miles away. After working with the electromagnetic spectrum in Unit 9 where we played with frequency and wavelengths of light, you’ll find that you’ve got all the basics for picking up AM radio stations using simple equipment from an electronics store.
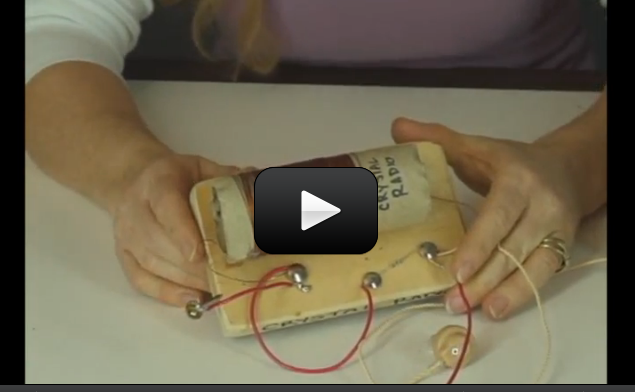
The radio is made up of a tuning coil (magnet wire wrapped around a toilet paper tube), a detector (germanium diode) and crystal earphones, and an antenna wire.
One of the biggest challenges with detecting low-power radio waves is that there is no amplifier on the radio to boost the signal strength. You’ll soon figure out that you need to find the quietest spot in your house away from any transmitters (and loud noises) that might interfere with the reception when you build one of these.
One of things you’ll have is to figure out the best antenna length to produce the clearest, strongest radio signal in your crystal radio. I’m going to walk you through making three different crystal radio designs.
Materials:
- Toilet paper tube
- Magnet wire
- Germanium diode: 1N34A
- 4.7k-ohm resistor
- Alligator clip test leads
- 100’ stranded insulated wire (for the antenna)
- Scrap of cardboard
- Brass fasteners (3-4)
- Telephone handset or get a crystal earphone
Here’s what you do:
[am4show have=’p9;p49;’ guest_error=’Guest error message’ user_error=’User error message’ ]
<
Download Student Worksheet & Exercises
The video below shows how to make a slightly different model that uses different parts. If you have the Science Mastery Diamond program, this is the one you have the parts for. The company, GSST sadly has gone out of business, but they gave us permission to use their project guidebook with the video that we made for their kit. Download the project guidebook here and gather your materials!
Materials:
- 8 steel (unpainted) thumbtacks
- Toilet paper tube
- 70 feet of #26-30 magnet wire
- 1 large paper clip
- 2 4″ pieces of hook up wire
- Germanium diode: 1N34A
- 470 pf disc capacitor
- 0.01 mf disc capacitor
- Alligator clip test leads
- 100’ stranded insulated wire (for the antenna)
- Scrap of cardboard or wood for your project
- Crystal earphone
Exercises
- What are radio waves?
- Name some of the parts needed for any radio that we also used in this radio.
- What serves as the tuning coil for the crystal radio?
- Why do you need a ground for the radio?
[/am4show]
You can use one that you have already. The one I used int he video is a 1/4 Watt resistor.
Can i just use a 4.7k-ohm resistor from a VCR player or do i have to get a new one?
The e-Science online learning program has two different levels: K-8 and K-12. The higher level is appropriate for advanced 5-8th graders as well, as it includes textbook downloads and more involved projects than you’ll find in the K-8 section. Any projects/activities which involve flames, power tools, chemicals, soldering, or are just harder to do skill-wise are in this section (the underwater ROV robot, advanced robots, electronics, advanced chemistry experiments, crystal radio, etc.) all fall into this category. You can see the difference in the access levels when you find an experiment that says “This experiment is for grades 9-12.” as you won’t be able to access the content or watch the accompanying video with the K-8 access. You can always request an upgrade/downgrade at any time – just send us a request – the upper level is $57 per month.
If you’d like to know a secret: I am going to be releasing a special version of the Crystal Radio with the Lasers Lab in e-Camp later this summer that will be accessible to everyone, K-12.