 Imagine you have two magnets. Glue one magnet on an imaginary record player (or a ‘lazy susan’ turntable) and hold the other magnet in your hand. What happens when you bring your hand close to the turntable magnet and bring the north sides together?
The magnet should repel and move, and since it’s on a turntable, it will circle out of the way. Now flip your hand over so you have the south facing the turntable. Notice how the turntable magnet is attracted to yours and rotates toward your hand. Just as it reaches your hand, flip it again to reveal the north side. Now the glued turntable magnet pushes away into another circle as you flip your magnet over again to attract it back to you. Imagine if you could time this well enough to get the turntable magnet to make a complete circle over and over again… that’s how a motor works!
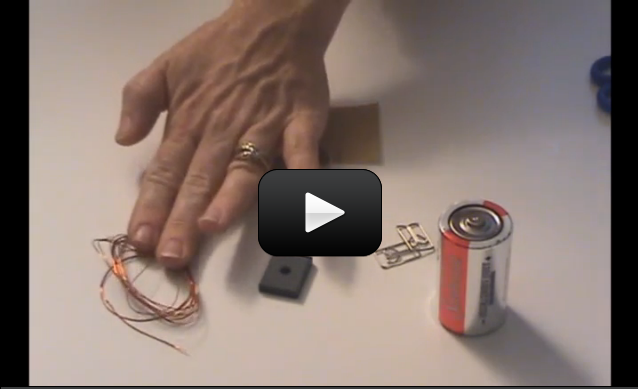
This next activity mystifies even the most scientifically educated! Here’s what you need:
Materials:
- magnet
- magnet wire (26g works well)
- D cell battery
- two paper clips (try to find the ones shown in the video, or else bend your own with pliers)
- sandpaper
- fat rubber band
[am4show have=’p8;p9;p21;p48;p106;p77;’ guest_error=’Guest error message’ user_error=’User error message’ ]
1. Start out by winding the magnet wire around a D-cell battery 12-15 times. Coil the wire around the circular loop to keep the wires together. Be sure that the “ears” are straight (see photo below). This is now your ‘rotor’:

2. IMPORTANT! Remove the insulation by sanding the entire length of both “ears”, flip the rotor over, and sand only one “ear” side, leaving the insulation intact on the side of the remaining “ear”.
3. Wrap the rubber band around the battery long-ways. Untwist a paper clip to make the shape shown in the video.

4. Make two of these paper clip shapes. You can use pliers to help make the shape. Place the left end under the rubber band in the center of the each end. The loop on the right end is where the rotor will hang (you can flip it over or bend accordingly if it falls out too much.)
5. Slide the rotor into the loops.
6. Place the magnet on the battery just under the rotor under the rubber band (you can use an additional rubber band to secure if needed). You want the rotor to be as close to the magnet as possible without hitting it. Give it a spin, and you’re off!
Troubleshooting: Usually problems arise when checking the connection between the battery and paper clips. Hold the battery with the fingertips in the center of each battery end and squeeze to make a good connection. If it still fails to spin, check your rotor: one ear should be insulation-free, the other should have a stripe of insulation down its length.
If you’re still having trouble, check the ears to be sure they are straight. The rotor needs to be able to spin nicely, so ensure it is well-balanced. Egg-shaped rotors just won’t turn.
Wow! How does THAT work? When you run electricity through any wire, it turns slightly into a magnet. When you stack wires on top of each other (as you did with the coil of wire), you multiply this effect and get a bigger magnet.
For the DC motor: The coil of wire is the O-shaped ring. When the sanded parts of the “ears” are connected to the paper clip, current flows through the circuit. When this happens, everything connects together and turns the coil wire into an electromagnet, which is then attracted to the magnet on the battery.
When the O-ring rotates, it moves around until the un-sanded portion breaks the connection and turns it back into just a coil of wire. The coil continues to float around in a circle until it hits the sanded parts again, which re-energizes the coil, turning it back into an electromagnet, which is now attracted to the magnet on the battery, which pulls it around again…and round it goes!
[/am4show]
My guess is that there was still spots where it wasn’t completely sanded off, or it would have just sat there getting hot. If the wire started to spin and “jumped” off the paperclips, that would have disconnected it as well, just like the insulated wire did. Great job experimenting with it! 🙂 Keep up the good work!
Hi Aurora, We loved this one, and wanted to see what would happen if we sanded the wires all the way around. We found that it also spun around rapidly. Could you explain the difference between the one that was only sanded on three sides and the one that we completely sanded? Thanks!
You should have a loop of it in the Electricity packet. Let me know if you don’t see it and we’ll send you another. Contact me directly at aurora@superchargedscience.com!
Hi, Aurora… We have the Diamond kit and are looking for the materials for this experiment. I’ve found most everything except the 26g magnet wire. Is this included? Thanks!
I made one like this and it looked almost the same but only spun
for 7 seconds.
Ok – I reloaded the video – try again? Sometimes trying a different computer or web browser can help, too. Let me know if you still have trouble. Happy experimenting! 🙂
Hi, Aurora. We are having trouble with the video for the homemade DC motor — it stops after the 5-minute mark.