Hans Lippershey was the first to peek through his invention of the refractor telescope in 1608, followed closely by Galileo (although Galileo used his telescope for astronomy and Lippershey’s was used for military purposes). Their telescopes used both convex and concave lenses.
A few years later, Kepler swung into the field and added his own ideas: he used two convex lenses (just like the ones in a hand-held magnifier), and his design the one we still use today. We’re going to make a simple microscope and telescope using two lenses, the same way Kepler did. Only our lenses today are much better quality than the ones he had back then!
You can tell a convex from a concave lens by running your fingers gently over the surface – do you feel a “bump” in the middle of your hand magnifying lens? You can also gently lay the edge of a business card (which is very straight and softer than a ruler) on the lens to see how it doesn’t lay flat against the lens.
Your magnifier has a convex lens – meaning the glass (or plastic) is thicker in the center than around the edges. The image here shows how a convex lens can turn light to a new direction using refraction. You can read more about refraction here.
A microscope is very similar to the refractor telescope with one simple difference – where you place the focus point. Instead of bombarding you with words, let’s make a microscope right now so you can see for yourself how it all works together. Are you ready?
[am4show have=’p8;p9;p11;p38;p92;p19;p46;p105;p66;p74;’ guest_error=’Guest error message’ user_error=’User error message’ ]
How to Make a Microscope
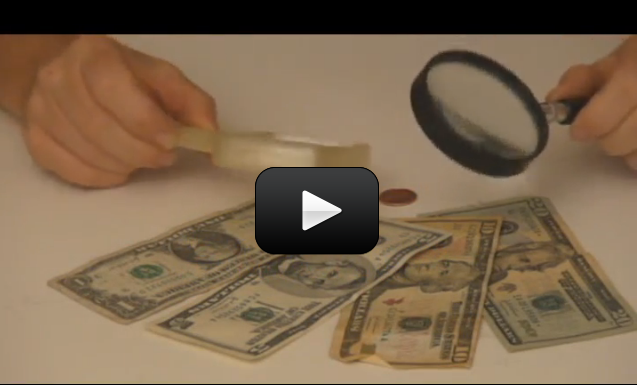
Materials:
- 2 hand held magnifiers
- dollar bill
- penny
Here’s what you do: Hold one magnifying glass in each hand. Focus one lens on a printed letter or small object. Add the second lens above the first, so you can see through both. Move the lens toward and away from you until you bring the letter into clear focus again. You just made a microscope! The lens closest to your eye is the EYEpiece. The lens closest to the object is the OBJECTive. The image here is of the objective part of a compound microscope. The different silver tubes have different sizes of lenses, each with a different magnification, so the same scope can go from 40X to 1,000X with the flip of a lens.
How do I determine magnification power for my microscope? Simply multiply the powers of your optics together to get the power of magnification. If you’re using one lens at 10X and the other at 4X, then the combined effect is 40X. You’ll usually find the power rating stamped in tiny writing along the magnifier.
So now you’ve made a microscope. How about a telescope? Is it really a lot different?
The answer is no. Simply hold your two lenses as you would for a microscope, but focus on a far-away object like a tree. You just made a simple telescope… but the image is upside-down!
 We don’t fully understand why, but every time we teach this class, kids inevitably start catching things on fire. We think it’s because they want to see if they really can do it – and sure enough, they find out that they can! Just do it in a safe spot (like a leaf on concrete) if that’s something you want to do. Click here for a detailed instructional video on how to do this safely.
How do I connect the flaming shrubbery back to the main optics lesson? Ask your child why the leaf catches on fire… and when the shrug, you can lead them around to a discussion about focus points of a lens. It’s hard for kids to visualize the light lines through a lens, so you can shine a strong light through a fine-tooth comb as shown in the image above. Use clear gelatin (or Jell-O) shapes as your “lenses” and shine your rays of light through it. If your room is dark enough, you’ll get the image shown above.
The point where all the lines intersect is where things catch fire, as the energy is most concentrated at this point. Note how the lines flip after the focus point – this is why the telescope images are inverted. The microscope image is not flipped because you’ve placed the image (and/or your eye) before the focus point. Play around with it and find out where the focus point is. Slide your lenses along a yardstick to easily measure distances.
How to Make a Telescope
Materials:
- 2 hand held magnifiers
- window
Want to experiment further? Then click for the Optical Bench experiment and also sneak a peek at the Advanced Telescope Building experiment where you will learn about lenses, refractor, and newtonian telescopes.
Ready to buy your own professional-quality instrument that will last you all the way through college? Click here for our recommendations on microscopes, telescopes, and binoculars.
[/am4show]
Is Gskyer a good telescope company.