 Hello, my name is Genevieve. I am 6. I love science, rockets, and robots and rainbows and all things pink. I am excited to get bigger so I can be a scientist.
When my mom showed me the cookie snatcher robot project I got very excited. This would be my 4th robot, but the others were solar powered.
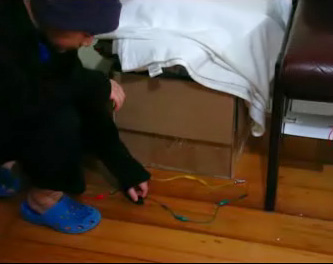
First I connected the motor and nut to the popsicle sticks and made them into 1 group. Then I put the battery cases on and made the switches Then I connected the wires
I have 2 older brothers and I wanted to use their toothbrushes for the grabbers, but mom said no. Darn ! So I used more popsicle sticks instead
The nut on my robot moved so fast my mom and dad had to put a rubber band at the end of the bolt to keep the nut from coming off.
I followed along with the video and only needed a little help from my mom and dad. It was so much fun to do it by myself.
I can’t wait to do more, but first I think I want to add wheels and a cart so I can get as many cookies as I can. I want to make an alligator cookie snatcher too.
Thank you for all of the fun projects!
I want to thank you for the wonderful half school year that I’ve done in science. I’ve had fun doing the experiments I’m actually almost done all the units! I attached a video of my bristlebot.
[jwplayer config=StandardPlayer file=http://escience.s3.amazonaws.com/main-escience/kid-movie2.flv image=https://www.sciencelearningspace2.com/wp-content/uploads/2010/09/kidmovie2.jpg]
I have a couple pictures I will show you:
This one below is of a magnifying glass and a leaf from Unit 9.
And this is my jigglebot!

Just thought you’d enjoy seeing some of your excited students in Anchorage, Alaska. We learned that it’s best to make colored rockets so we might have a better chance of locating them in the deep snow. Pinks and purples are preferred to yellow since digging up yellow snow can be risky, if you know what I mean.
To give you some perspective, the kids are standing on a picnic table top so they may have a hard surface upon which to stomp the soda bottle. This is a record snowfall so far this winter.
Thanks for the great project. We had a blast!!
[jwplayer config=StandardPlayer file=http://escience.s3.amazonaws.com/main-escience/kid-movie1.flv image=https://www.sciencelearningspace2.com/wp-content/uploads/2010/09/kidmovie1.jpg]
All the best,
Samantha, Mason & Allegria
 “…Thank you for the free tele-classes. Also my son got “pouring science” (the homesciencetools chemistry set recommended on your site) but I’m just letting him pour colored water back and forth while he learns not to spill.”
“…whenever I sing that catchy insurance jingle, “we are farmers”,
He says “we’re not farmers. We’re scientists.”
I have been pre-schooling him at home, but he definitely has had the spark for science lighted.
My husband was happy to see that our boy is handy with a little screw driver thanks to your robotics summer lab.
(He kept asking for this “pouring science” mainly because of the pics on your site.)
Quotes we’ve memorized from your live tele classes:
- What does soda have that water does not have?
Bubbles. - What are bubbles?
Gas. - Which is faster, thunder or lightening?
Lightening. - What is fire?
Heat and light. - What else is fire?
Gas and Plasma.
We’ll keep adding to it. Thanks!
[jwplayer config=StandardPlayer file=http://escience.s3.amazonaws.com/main-escience/sciencejan32012002.flv image=https://www.sciencelearningspace2.com/wp-content/themes/chrome_20/images/tadaa1.jpg]
Wired Remote Control Car
We used a plastic throat lozenge box container to make our remote control. And to make the car look cooler, we used a mushroom box for a top. We tried a Kleenex box but that was too heavy and it wouldn’t allow it to turn as well. We also used telephone wire to make it easier to wire to both motors.
What we learned:
Wires can get put on the wrong way but it is easy to switch back around so the car moves in the right direction. Having switches to turn something on and off is much better than needing to disconnect wires. Wide rubber bands on the wheels add more traction.
This project took a lot of patience to get it to work the way we wanted it to.
 Hydraulic Earth Mover
Materials used:
large size popcicle sticks, vinyl tubing, syringes, water, hot glue, brass fasteners, wire, plastic cup, wheels, skewers and straws
How it works:
The syringes and tubing are filled with water and when one set pushes in, the other pushes out causing the vehicle to move its arm up or down. We color coded ours so we would know which syringe moved what part of the vehicle.
This is how some construction trucks work except they use oil instead of water. This was a complicated project but really cool when it’s done. All our friends are impressed with this and love to try it out!
Download Student Worksheet & Exercises
Click on image above to enlarge.
Exercises
- Hydraulics refers to the use of what to do work?
- Solids
- Gases
- Fluids
- Liquids
- What is it called when we use air to do work?
- Aerodynes
- Pneumatics
- Nitrous
- Oxygenation
- In general, liquids cannot be squished together. What do we call this?
- Impressive
- Immersive
- Inert
- Incompressible
- Is the answer to the previous question important to how all hydraulic systems work?
- Yes
- No
 We love kites and have lots of them. Sled kites are the easiest to fly and easy to make. Tetrahedral kits are more of a challenge but worth the extra work. My mom had to help with a lot of the knot tying.
What we learned:
Kites are like planes. The forces on them are the same. They are the lift, thrust, drag and the weight.
When we made a larger version of the tetrahedral kite we discovered that it flew better without a bridle. We attached the lead string directly to the kite and it doesn’t need a tail for stability either. When we made a smaller one, it needed the bridle and tail to keep it from spinning around. The best size we made was using 9 and a half inch straws. This made a bigger surface area for the tissue paper skin. When we first tried to fly this we were actually attempting to fly it upside down. We thought the wind should catch it more like a parachute to fly it. But then we realized it was more like an airplane flying like a v-shape in the air. That worked much better.
Once we made the 10 cell kite and tried it out we figured it would fly even better if it had more surface area so we made another level and changed it to a 20 cell kite. It worked and flew great! Someday we may even add more but we’ll have to do that work out in the garage because it won’t fit through our door!
Click on an image to enlarge:
 |
 |
|
 |
 |
|
 What we used:
Copper tubing, votive and birthday candles, a lighter and matches, foam insulation and foil bread and pie pans
How Elijah built his boat:
First my dad coiled the copper tubing for us. Then I got a piece of foam and then I drilled holes for my tubing and dug another hole for my candle to sit in which I covered in foil to protect the foam from burning or melting. Then I used a pie pan and bent it to fit and cut a hole in the top for a smoke vent and to let oxygen in. I used a birthday candle so I could get a bigger flame. It worked great and moved very fast in the water. I named it the Turbo Turtle.
How Hannah built her boat:
My boat was more boat shaped. I used a tin bread pan and bent the back of the pan inward to set my copper tubing on. I hot glued it in place. Then I used metal tape to set the candle on so sit wouldn’t slip. For decoration I used cut pieces of a pie pan to make a top section and a flag for the back.
How Eliana built her boat:
My mom helped me drill holes in the back on the bread pan and we put the coil through those and used lots of hot glue to try to seal it. We used a little piece of foam to hold it up. Then we put the candle in the middle. Mine worked for a little while but then got leaks so I just decorated mine the way I wanted and used it to play with.
What we learned and how it worked:
We filled the copper tubing with water and put it in the pool and lit the candle and waited a short while and then watched it shake and then start cruising. The water in the tubing boils causing steam that pushes out the back and then causes a vacuum to suck more water back in and start the cycle over again. These worked really good and it was fun to be creative with it.
Click on an image to enlarge:
 |
 |
|
 |
|
|
 Solar Powered Cooking
We got together with a group of friends and made four different kind of solar ovens.
The first one was large (2’x3′). My mom helped with this one. We used a box inside another box and we insulated it with foam insulation on the bottom and newspapers on the side. We were hoping this would allow the temperature to get about 300 degrees. We lined the inside of the box with foil to keep the heat in and lined that with black paper to absorb the heat. We used foam board covered in a paper mirror sheeting for reflectors. We attached those on 3 sides. Inside we used a rack to raise the food off the bottom of the oven and to be able to get the best angle of the sun. We also needed to tip the whole box to make sure we didn’t have shadows inside the oven. Then we covered the top with sheets of glass to help insulate more.
The second ovens were made out of pizza boxes. After we cut our windows, we used slow cooker oven liners for the windows instead of plastic wrap so we would not have a chemical reaction with the heated plastic. We also insulated these with a thin layer of foam on the bottom before the foil and black paper.
The third ovens we made were hot dog cookers made out of pringle’s chips cans. We cut a slit down the middle and made flaps to open and then used the cooker liners for windows again. Last we drilled holes in each end for a skewer to fit through.
The fourth oven was a funnel shaped cooker. We covered poster board with foil and shaped that into a funnel and used a foil covered piece of foam for the base. Then we covered a jar with black paper to use for cooking.
Into the (preheated) big oven we put chocolate chip cookie dough. And to compared ovens we put cookie dough in one of the pizza box ovens as well. The cookies in the big oven were done in about 20 minutes. The oven had reached about 250 degrees. The smaller oven took about 40 minutes and had reached 200 degrees.
In the rest of the pizza box ovens we had chips and cheese for nachos and one box had an egg cooking. We all used dark colored pans inside the cookers. The cheese only took about 10-15 minutes to melt. The egg took about an hour.
In the pringles cans we cooked hot dogs which took 1/2 an hour to reach 170 degrees. We were hungry and couldn’t wait longer than that.
The jar inside the funnel cooker had green beans from our garden in it. They never really got done. The temp only reached 160 degrees but this was probably because it was really cold to start with so it was taking to long to heat. And then it got cloudy. Oh well, no veggies that day!
This was super fun to do. We had a lot of success. We were surprised how quickly the cookies got done even though it didn’t get as hot as we were hoping it would.
Click on an image to enlarge.
 |
 |
|
 |
 |
|
I had a lot of fun making this. Thank you, Aurora, for showing me how to do all this.
This really was a challenge to connect up! But now I know how to make a Motor Reversal Switch…Nightmare!
I didn’t have a wooden peg to push the tacks through, so I have used a plastic peg with metal clips wrapped around the peg opening. Also, I couldn’t find fishing line to use for the trip wire, so I had to use some other line, but it still works well.
Please login or register to read the rest of this content.
 Sugar Crystals/ Rock Candy
We did this with a group of friends so we started with 18 cups of sugar but ended up using a whole 25 pound bag to get the solution supersaturated.
We used superfine sugar which dissolved really quickly so it was hard to tell when there were bits still on the bottom. We also flavored it with some LifeSaver candies.
We used 4 different jars to grow our crystals. In one we had a string suspended in it with no lid. In the second, we used a skewer with a lid on. In the third, we had a skewer with the lid partway off. And in the fourth, we had a skewer and the lid was mostly off. The only major difference we noticed was with the jar with the string and no cover at all. the crystals are not lined up as neatly and it’s kind of big and chunky. The skewers helped to form the crystals more uniformly. We also don’t think evaporation was too important in the forming of the crystals.
We learned that sugar crystals are shaped like prisms and rectangles and that the growth is not just a multiplication of more crystals, the crystals themselves actually get bigger. Most of our growth happened within the first 3 weeks. They haven’t changed much since then. So we concluded that this had something to do with the superfine sugar versus regular sugar. Next time we’ll have to try it with regular to compare the growth rate.
This was fun to do and hopefully our mom will actually let us eat it now!
Click on an image to enlarge.