This experiment is just for advanced students. If you guessed that this has to do with electricity and chemistry, you’re right! But you might wonder how they work together. Back in 1800, William Nicholson and Johann Ritter were the first ones to split water into hydrogen and oxygen using electrolysis. (Soon afterward, Ritter went on to figure out electroplating.) They added energy in the form of an electric current into a cup of water and captured the bubbles forming into two separate cups, one for hydrogen and other for oxygen.
This experiment is not an easy one, so feel free to skip it if you need to. You don’t need to do this to get the concepts of this lesson but it’s such a neat and classical experiment (my students love it) so you can give it a try if you want to. The reason I like this is because what you are really doing in this experiment is ripping molecules apart and then later crashing them back together.
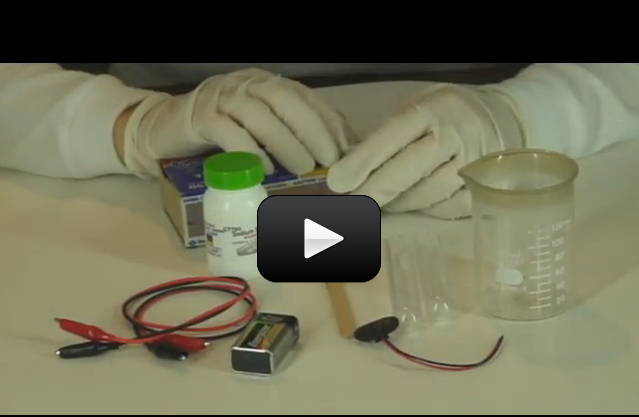
Have fun and please follow the directions carefully. This could be dangerous if you’re not careful. The image shown here is using graphite from two pencils sharpened on both ends, but the instructions below use wire. Feel free to try both to see which types of electrodes provide the best results.
The negative side is creating hydrogen and this reaction creates twice the amount of hydrogen than oxygen molecules. Please read the explanation of the reaction on this page for more details.
Why is the positive side making bubbles much slower than the negative side?
Yes, a fishy smell is normal.
This worked but is it normal for the solution after the experiment to smell like fish?
You can use a 9V, two AA’s or a D-cell.
Can we make a 9V battery terminal or can we use a D or two AA battery.
My dauhgter, Andie, wants to know why the solution in the test tube around the anode didn’t gradually turn green
[ Cu(OH)2) ] during the electrolysis, but rather caused the common solution to turn green all at once when the anode was removed and the test tube was dumped into it??
Another related observation . . . the jaws of the alligator clip which served as the anode are corroded almost all the way through and have become extremely brittle (we let the reaction go on for 1 1/2 hours plus). The solution in this “positive” test tube — when dumped out — caused the instantaneous deep green color we mentioned.
Thanks for the reply . . . We didn’t notice any Cl odor. I kinda suspected the green color had something to do with copper somehow, and suspected the iodine in the salt might have something to do with the amber color. One more observation . . . After the green appeared, it sank to the bottom over time, and the amber reappeared on top (????)
I am puzzled by the brown coloration, but if the concentration of the iodized salt is high enough I’d guess 2I- ==> I2: two iodide ions are oxidized to molecular “I-two” or I2 or other iodine compounds. The green color is due to formation of Cu(OH)2 when the oxidized Cu metal reacts with the NaOH solution formed during electrolysis. (All this assumes that there is Cu somewhere at the anode.) Cl2 is also released at the anode but wouldn’t color the solution significantly. A slight odor of Cl2 should be noticed. Hope this helps!
WOW!! My daughter got some unexpected results. We used distilled water with iodized table salt added, and a nine volt battery with a 9v battery snap-on connector with alligator clips (one end of each submerged). “-” side started with very small, slow and steady bubbles and gradually increased over 1 1/2 hours until it was steadily fizzing — filling up the entire test tube with invisible gas. The “+” side had very little activity and barely produced any gas at all.
Unexpectedly, over time the salt/distilled water solution turned an amber brown (????). Nothing changed as we removed the mostly “empty” looking “-” test tube, and ignited the hydrogen (“pop”). However, as we carefully lifted the “+” test tube, the water that poured out suddenly turned the rest of the distilled water/salt solution from amber to DARK GREEN!!!
What accounts for these various color changes, and why was there such a huge difference in the activities surrounding each of the two opposite electrodes??
Regards,
Andie and Bobby D’
Why does it take sooooooo long for salt to mix with water
It’s the leftovers from the chemical reaction that change the solution’s color.
The saline solution changed color why did that happen?
Why is one of the tubes not bubbling like other?
thank you so much.I learned a lot about electrolysis.thanks
Oxygen’s atomic radius is 60pm, not 48. 🙂
Hi. If oxygen has 8 electrons and hydrogen only has one, why is hydrogen’s atomic radius 53pm and oxygen’s only 48pm? Oxygen has more electron shells so why isn’t it larger?
I attached a penny to the end of the oxygen producing wire. This seemed to speed up the flow of hydrogen bubbles from the negative wire. I also split the two wires up into more wires which also seemed to speed up the flow of hydrogen bubbles. So, does more surface area at the ends of the wires speed up the production of hydrogen? Are any other gasses produced in this experiment? And does using more batteries speed up the reaction? I’m currently using 18 AA batteries to power the experiment. Lastly, if you keep the electricity on for 200 hours or so do you think the water level would lower noticeably in a 16 ounce jar? Thanks.
Kyle Bisson
I would encourage you to perform the experiment with both ionic substances and record your results. Write up a lab of your own describing your investigation just as a chemist would do. Follow the steps of the scientific method. Record everything. Many times, the tiniest tidbit of info can, when looking back at the results of a lab, make all the difference in being able to repeat an experiment or in understanding why an experiment didn’t work.
Answer: Both substances will work. The key is the presence of sodium. A sodium ion has a lower electrode potential than a hydrogen ion. This relationship is necessary for electrolysis to take place, so Na+ in any salt is suitable for use as an electrolyte.
In the video you use Sodium Sulfate. In the materials list you write salt. Are you referring to table salt, Sodium Chloride? Will either give the same result?
Yes, that can work as long as your 12 Volt battery is a lantern battery and NOT a car battery. (It’s the amps you have to watch out for!)
Is it possible to use NaCl and can a 12 volt battery be used without much danger?.
Glass or plastic is fine.
Do the test tubes need to be glass or will plastic do for the electrolysis experiment?
Yes. My mom just cancelled our subscription to Supercharged Science, but maybe i’ll be back next summer. lol. \\\
Cheers! Sevy Keble 🙁
The pencils in the photo in my previous comment – do you see it? 🙂
I said “what do you mean, pencils”, because we don’t watch the whole video at one time. Watch a tiny bit, then go and do it. By steps. I’ll try to do this, but I’m not sure if I’ll be able to, because school just started and I’ll be very busy.
Cheers! Sevy Keble :\ 😀 😛 :] 😐
Thanks!
1. I put about half a cup of water in. And I put 1 table spoon of Sodium Sulfate in.
2. There WERE bubbles forming on the aligator clips, but I mean they were actually smoking–letting off some kind of brownish blackish gas.
What do you mean, pencils?
Oops! Sorry – I missed seeing your next comment Sevy. 🙂
It sounds like you had too much of the chemical in the water. Here’s are a few tips:
1. Your solution needs to be a saturated solution, without any bits of chemical on the bottom. Notice that I am using about 100mL of water in my jar and 1 tbl of sodium sulfate. 100mL is a bit more than half of a cup (1 cup = 237mL), so you’ll want to adjust the amount of chemical you’re adding in for your level of water, but this experiment usually isn’t very picky.
2. Make sure your alligator clips are not touching each other when in the water.
BTW- by smoking, do you mean bubbles were forming? If so, that’s what you want – and you’ll capture that gas inside each test tube. If you still have trouble, you can use graphite rods at the ends of the alligator clips – they make better electrodes. You’ll need to modify this setup to make the pencils shorter so they fit inside your test tubes:
Start first with the setup above (you don’t need the 6V lantern battery – a 9V works just fine). Skip the sodium sulfate for now and just use plain water. If you see bubbles forming on the tips of the sharpened pencils, you know your setup is working.
Now, break the pencils into smaller pieces and sharpen both ends. Place a test tube over each to capture the gas. Keep me posted on how it goes!
Aurora, can you please reply? I really want to finish this experiment.
Cheers! Sevy Keble 😐
We used a battery like the one in the video. The wires were wires with aligator clips like in the Electricity Unit. We put 1 tablespoon of Sodium Sulfate in it, like you asked.
Sevy Keble 😛 😀
Tell me more about your setup – how much power did you use? And what did you use for electrodes? And what was in the solution besides water?
Hi Aurora, we tried doing this experement, and when we put the chemical in, it just formed a hard plate on the bottom of our beaker. Also, the ends of the metal that were in the water started smoking.
Sevy Keble 😀
Hmmm…. it seems to be working now. Try again? You can also try a different web browser to see if this helps. You should have a total video time of 8:48. Let me know if you still have trouble.
Video keeps cutting off during the safety directions for electrolysis experiment (wear gloves, tie up hair, etc), we’ve tried two computers…can you please correct this issue?? Thanks
Well, at least I learned from it.
Hmmm… sounds like you added to much! 🙂
Is the sodium sulfate that settled supposed to solidify at the bottom? lol
Cool, I’ll do that.
Sure. You can even use tinfoil if you don’t have any wire at all. 🙂
Hi,
I have got all of the stuff I need for the experiment except for the alligator clips. Can I just trim my insolated wire and twist it around the battery connector?
Jimmy Reiter
Your universal indicator changes colors depending on the level of acidity of your paper. Sometimes even touching it with your fingers transfers something that you can visibly pick up with the indicator. To get a good gauge for this, check the pH of vinegar and ammonia (get adult help with the ammonia – it’s nasty stuff to work with). The vinegar will be the color of your acids and the ammonia is the color of your bases.
Aurora, thank you very much for the sugestion about making your own pH strips! We just did it, and when we put the universal indicator on, it was different colors: green, red, and yellow. Is that bad or good?
sevy keble 🙂
Thank you very much! I will do that right away!
sevy keble 🙂